Showing posts with label a wish for everything. Show all posts

Saturday, August 14, 2021

A Wish For Everything meets Stitched Triangles

 Thank you for joining me today!

Happy Birthday Jack


Fancied using the stitched triangles today and this is what I came up with!
The edging was the hardest part and not quite equal but who care's.

Materials required for this card are:

Card Stock: basic black, Merry Merlot
Designer Series Paper: pattern party
Dies: playful alphabet, stitched triangles (2) of each type
Embossing Folders: *subtle 3D (sorry I can't stop using this one)
Ink: memento tuxedo black
Stamp Sets: a wish for everything 
Accessories: *black basic rhinestones, foam adhesive sheets
* = no longer available, when using layering dies (1) is the smallest

Hope you liked today's card. If you would like more information on how to make it, please don't hesitate to contact me, I'd love to hear from you.

If you wish to buy any of the items used, go to contacting me at the top of the page for details on how to order.

Will be back again soon with more cards, in the meantime take care and have a great day.
Annette 😘

Friday, April 30, 2021

Dressed To Impress & more

 Thank you for joining me today!

Today our Georgia puts her Big Girl pants on!!!
Woo Hoo she's 21


And it's time for her grow now, but I very much doubt if she will, she enjoys her fun too much!

Materials required for this card are:

Card Stock: basic black, basic white, gold foil
Designer Series Paper: *golden honey (sdsp), true love 
Dies: all dressed up, playful alphabet, stitched so sweetly
Embossing Folders: subtle
Ink: memento tuxedo black
Ribbon: *scalloped edge
Stampin' Blends: black, colour lifter, daffodil delight, magenta madness, old olive, soft sea foam, so saffron
Stamp Sets: a wish for everything, dressed to impress  
* = retired

Hope you liked today's card. If you would like more information on how to make it, please don't hesitate to contact me, I'd love to hear from you.

If you wish to buy any of the items used, go to contacting me at the top of the page for details on how to order.

Will be back again soon with more cards, in the meantime take care and have a great day.
Annette 😘

Sunday, April 4, 2021

Inspiring Iris meets A Wish for Everything

Thank you for joining me today!

My second Easter card completed. 

This one's for my Aunt, My mum's name was Iris and yellow her favourite colour.


Again this is a mixture of old and current products. The only way to make room is to use up old stash or sell it.

Materials required for this card are:

Card Stock: basic white (thick), pear pizzazz
Designer Series Paper: *gingham gala
Dies: layering ovals (p6)(s6), snow time
Embossing Folders: dainty diamonds 3D
Ink: daffodil delight, pear pizzazz, smoky slate
Ribbon: *organdy combo 
Stamp Sets: a wish for everything, inspiring iris
Accessories: *gingham gala sequins

* = retired, when using layering dies (1) is the smallest

Hope you liked today's card. If you would like more information on how to make it, please don't hesitate to contact me, I'd love to hear from you.

If you wish to buy any of the items used, go to contacting me at the top of the page for details on how to order.

Will be back again soon with more cards, in the meantime take care and have a great day.

Annette 😘 

Saturday, December 19, 2020

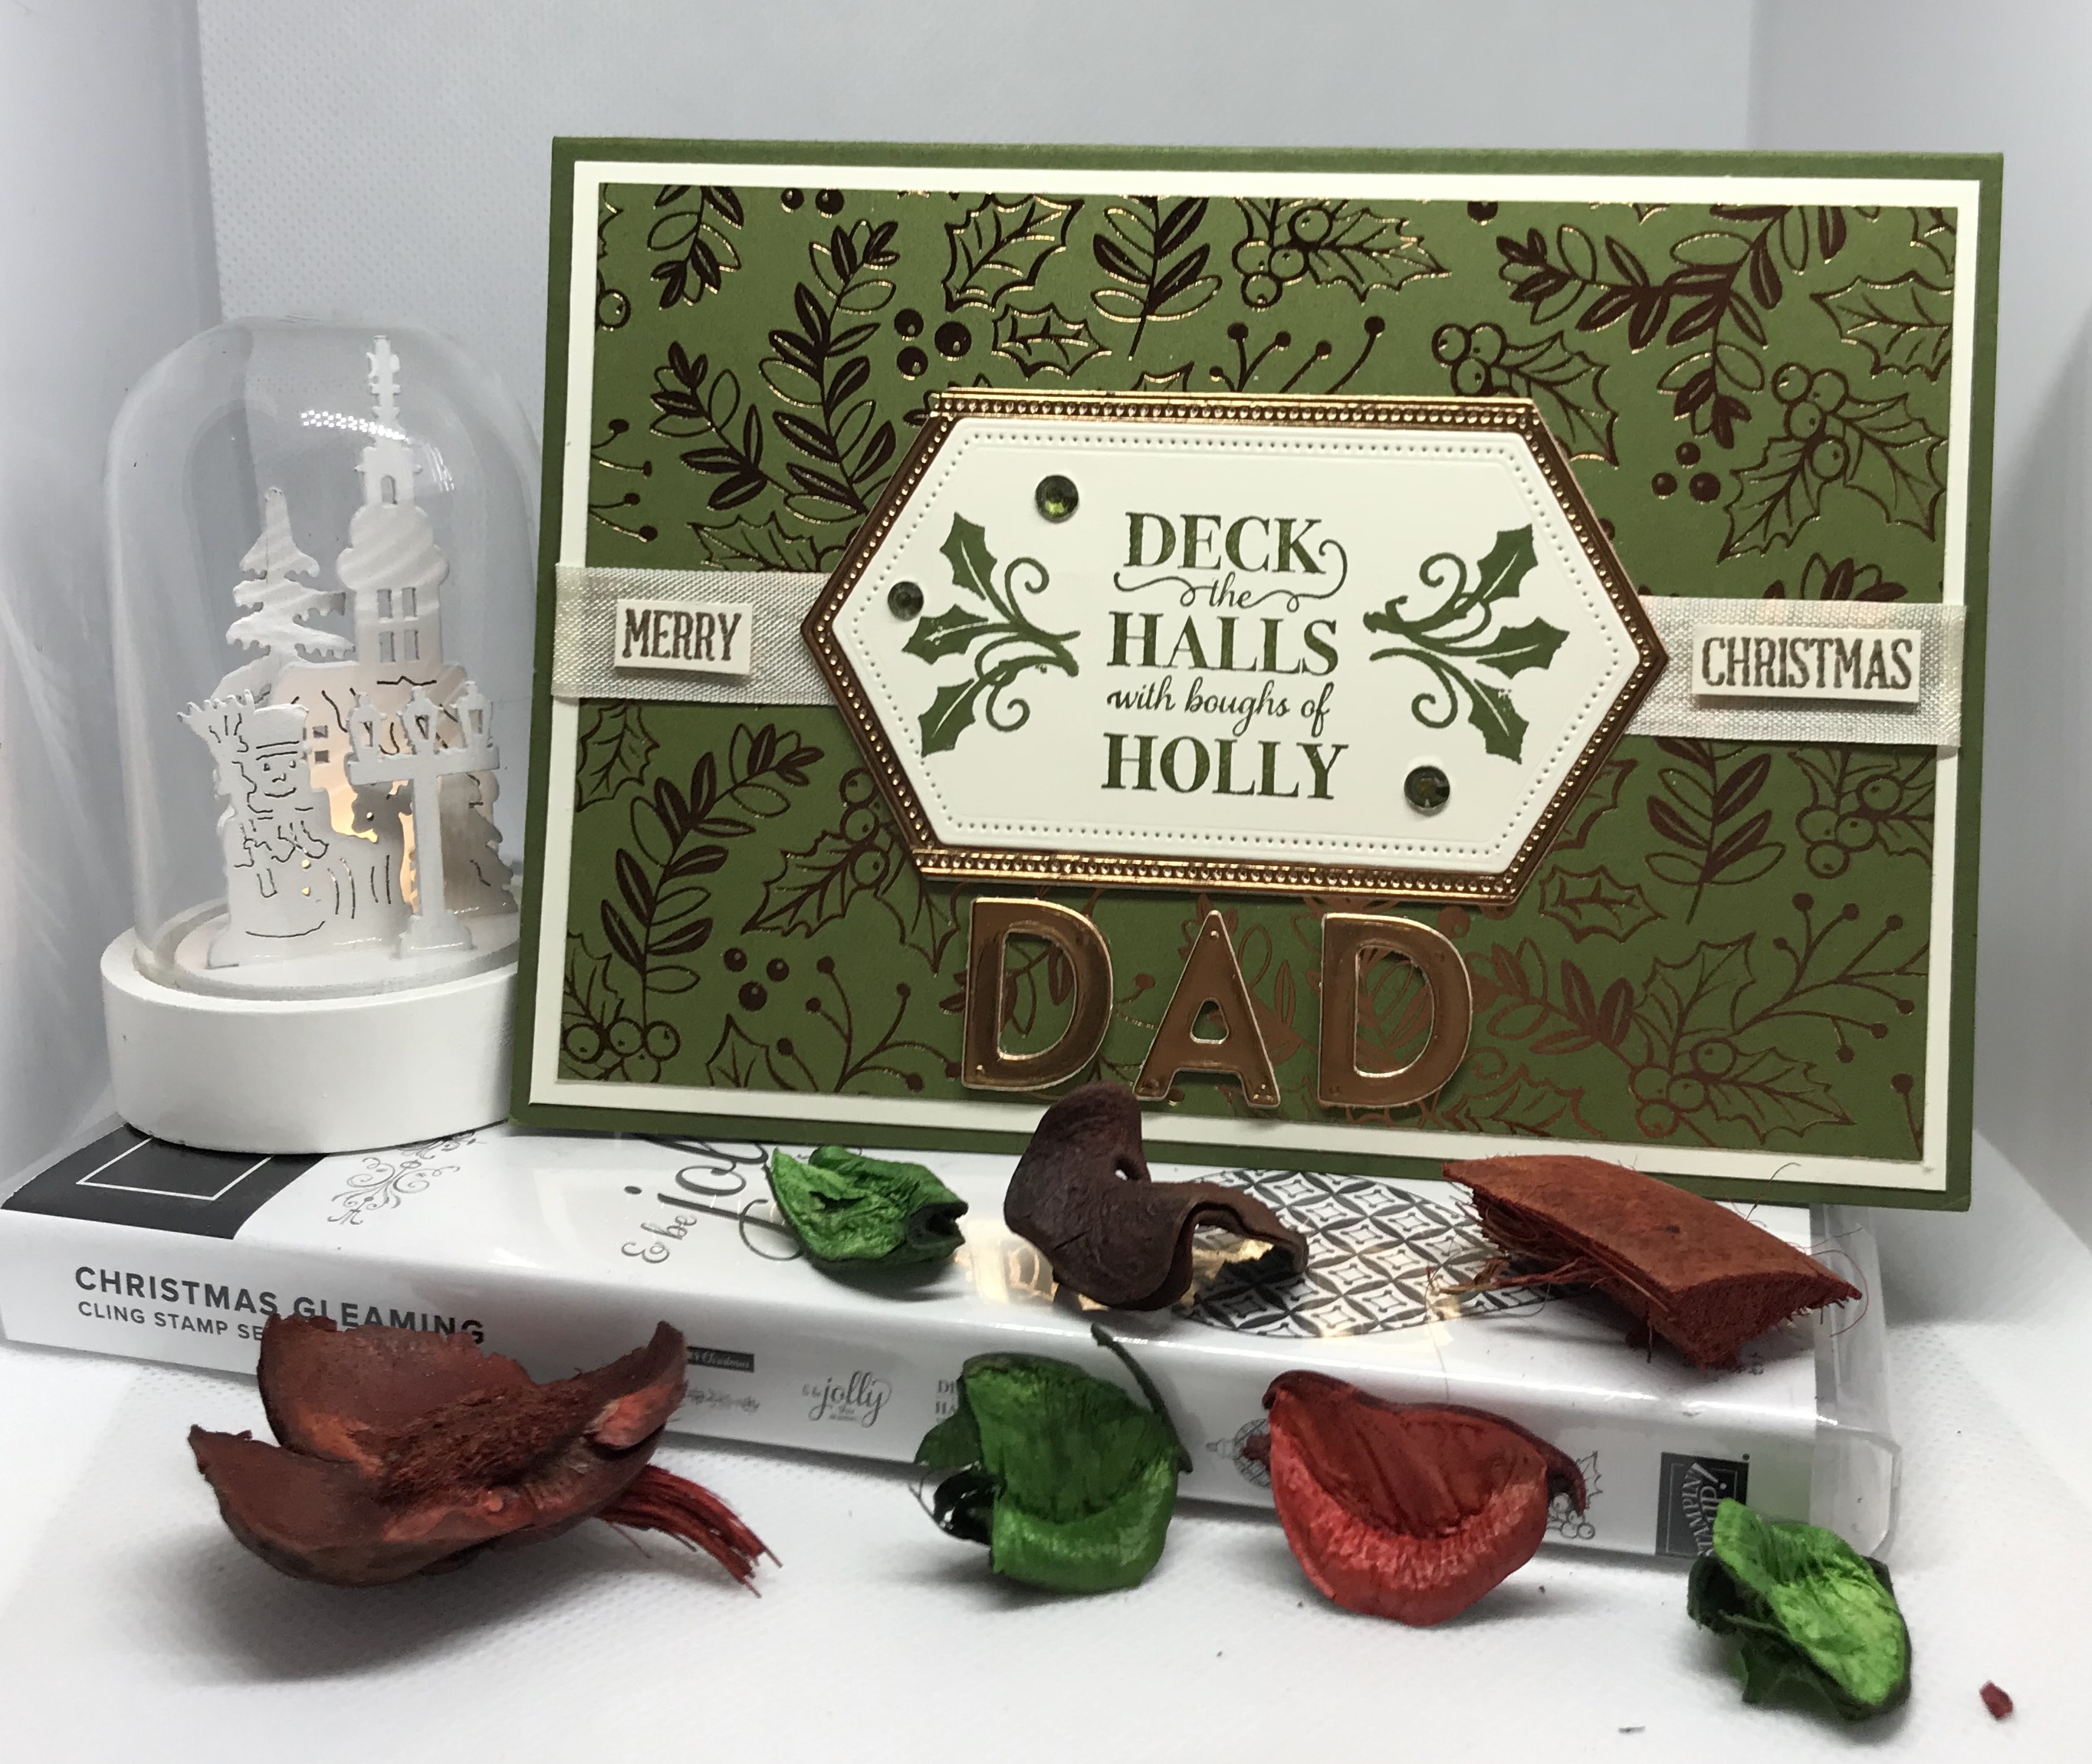
Christmas gleaming meets A Wish For Everything

Hello and welcome to my haven in a hectic world

This was my Dad's card for last year and it was still in my draft folder which means it wasn't posted last year! This year's will come soon

This is a card I 'CASd' from Jill Chapman @ paper daisy crafting. Most of the products are retired now, but I liked the style for my Dad.


Materials required for this card are:

Card stock: mossy meadow and very vanilla
DSP:(r) brightly gleaming
Dies: stitched nested labels (5 & 6),playful alphabet
Embossing Powder: copper
Ink: mossy meadow & versamark
Ribbon: (r) *seam binding
Stampin' blends: mossy meadow
Stamp sets: christmas gleaming, (r) *merry christmas to all, a wish for everything
Accessories: basic rhinestones
(r) = retired, and when using layering dies (1) is the smallest
The larger nested label was die cut a second time on one side to make it narrower.

If you wish to buy any of the items used, go to contacting me at the top of the page for details on how to order.

Hope you liked today's card, if you need more information please don't hesitate to contact me.

Will be back again soon with more cards, in the meantime have a good day.
Annette 😘

Thursday, July 23, 2020

A Wish For Everything meets Word Wishes

Hello and welcome to my haven in a hectic world!

Happy Birthday Anne

I just love these ornate dies, the card came together so easily!!!
Retired product and easily be swapped out for current product.


Materials required for this card are:

Card stock: *mint macaron glimmer, mint macaron, whisper white
DSP: ornate garden
Dies:ornate borders, ornate layers, stitched so sweetly, word wishes
Ink: mint macaron
Ribbon: *sheer linen
Stampin' blends: mint macaron
Stamp sets: a wish for everything
Accessories: basic rhinestones
* = retired

Hope you liked today's card. If you would like more information on how to make it, please don't hesitate to contact me, I'd love to hear from you.

If you wish to buy any of the items used, go to contact me at the top of the page for details on how to order.

Will be back again soon with more cards, in the meantime have a great day.
Annette 😘

Tuesday, June 23, 2020

Mountain Air meets A Wish for Everything

                        Hello and welcome to my haven in a hectic world

 hope you're having a great day.

Happy fathers day Dad!
Materials required for this card are:

Card stock: pretty peacock, whisper white
Dies: majestic mountain, stitched nested labels (7&8), stitched rectangles (1) narrow
Embossing folder: pinewood planks
Ink: basic gray, gray granite, mint macaron, pretty peacock, seaside spray
Ribbon: (r) sycamore street
Stampin' blends: 
Stamp sets: a wish for everything, mountain air

(r) = retired and when using layering dies (1) is the smallest

If you wish to buy any of the items used, go to contact me at the top of the page for details on how to order.

Hope you liked today's card, if you need more information please don't hesitate to contact me, I'd love to hear from you.
Annette 😘

Thursday, April 30, 2020

A Wish for Everything meets Sailing Home

Hello and welcome to my haven in a hectic world, thanks for dropping by.

I'm back again! there were two birthdays for me today and I felt both cards needed to be shown.

Happy Birthday Nigel!
The second photo is a close up of the card insert.
Measurements are all centimetres.

Card Stock: Night of Navy 21 x 14.5 scored at 10.5 (card base) 7 x 13 (stitched nested label), 1 x 5 (happy & birthday sentiment), Whisper White 20 x 14 scored at 10 & 15 (insert), 7 x 7 (die cutting), Champagne Foil 4.5 x 4.5 (helm).
DSP: 7 x 13 (stitched nested label).

(cs) = card stock, (dsp) = designer series paper, (ef) = embossing folder, (ep) = embossing powder, (ss) = stamp set, when using layered dies (1) is the smallest.
  • Using the stitched nested labels dies and the night of navy stitched nested label (cs) die cut a (8).
  • Using the stitched nested labels dies and the come sail away (dsp) die cut a (8).
  • Now adhere these two labels together using liquid glue, (make sure they both have the right side facing out).
  • Using the  night of navy happy & birthday sentiments (cs)  stamp the happy & birthday from the a wish for everything (ss) using versamark and whisper white craft ink and then heat emboss using white (ep). Now trim these two sentiments down to have very narrow borders.
  • Using the sailing home (ss) and the whisper white die cutting (cs) stamp the larger boat in night of navy ink leaving room on the (cs) to die cut the stitched label from the all dressed up dies.
  • Using stampin' blends colour in the boat in light cherry cobbler, light crumb cake and light balmy blue.
  • Die cut stitched label from the all dressed up dies, the boat from the smooth sailing dies and the helm using the champagne foil (cs) and the smooth sailing dies.
  • Stamp the stitched label using the water stamp from the lilypad lake (ss) in night of navy.
  • With the night of navy card base (cs) die cut an opening in the middle using the (6) die from the stitched nested labels dies.
  • Once die cut, emboss the front of the card using the high seas 3D (ef).
  •  Now with the whisper white insert (cs) and working on the left panel, stamp the light house in gray granite along with the birds and sentiment in night of navy. (I used a night of navy wash for the sea at the bottom of the lighthouse).
  • Attach the helm using dimension pads.
  • Adhere the right side of nested stitched label to the 3rd panel of the insert making sure the points of the label are on the folded crease using liquid glue.
  • Adhere the boat to the small stitched label using liquid glue.
  • Now adhere the label at each side across the front of card using liquid glue.
  • On the front of the card adhere 3 (r) white perfect accents down the left side.
  • Position the happy & birthday sentiments so they are hidden behind the boat when the card is closed and attach using dimensional pads.
Will be back again soon with more cards. Enjoy the rest of your day!
Annette X

Monday, April 13, 2020

Welcome Easter meets Whacky Wishes

Hello and welcome to my haven in a hectic world.

Happy Easter to all!

This is a card I made for my Son, Daughter in law and Grandson, who live in Plymouth, I send our Grandson money instead of an Easter Egg (I feel chocolate eggs might not travel well).

I found this card on Pinterest made by Angie at chicknscratch, I adapted it slightly as I only have the German version of the Welcome Easter stamp set and wanted the words in English. Plus I've done it using centimetres instead of inches.

There are two pictures as I printed a greeting and added an embellishment on the inside, which I don't usually do.

Card Stock: Old Olive 4.5 x 4.5 (leaf), So saffron 10.5 x 14.5 (card base), 17 x 14 (1st layer) 6 x 6 (scalloped square), Whisper White 12 x 8 (overlay), 6 x 6 (chick), 2.5 x 9.5 (large sentiment), 3 x 3 (flower), 3 x 8 (small sentiment).
DSP: 7.5 x 10.5.

All measurements are in centimetres.
(cs) = card stock, (ef) = embossing folder, (ss) = stamp set, (r) = retired, when using layering dies  (1) is the smallest.
  • Start with the so saffron (cs) 1st layer and the 17cm across the top of the scoreboard, score down at 7cm and burnish.
  • Now with the whisper white (cs) overlay and the 12cm across the top of the scoreboard, score down at 1cm and burnish.
  • Stamp the chick from the welcome easter (ss) in memento black ink onto the whisper white (cs) square.
  • Colour in the chick using so saffron and pumpkin pie stampin' blends.
  • Stamp the happy easter sentiment on the whisper white (cs) larger sentiment in memento black ink from the welcome easter (ss) (I used the (r) wacky wishes (ss)).
  • Now stamp the second greeting for  the inside of the card on the whisper white (cs) small sentiment using the A wish for everything (ss).
  • All the following pieces can be die cut with one pass through the cutting machine of your choice.
    • Chick, stitched shapes dies, square (3)
    • Happy Easter, (r) cards & labels dies
    • the 2nd sentiment, stitched rectangles dies narrow (2)
    • Scallop square (cs) layering squares, scalloped square (7)
  • Stamp the flower from the thoughtful blooms (ss) and punch out using the small bloom punch
  • Punch the leaves using the old olive (cs) and the leaf punch.
  • Emboss the lefthand side of the 1st layer using the parisian flourish (ef).
  • Emboss the chick using the subtle (ef).
  • Adhere the best dressed (dsp) to the front of the whisper white layover (cs).
  • Adhere the layover to the back of 1st layer using liquid glue.
  • Adhere the 1st layer to the card base using liquid glue.
  • Adhere the chick to the scalloped square using liquid glue.
  • Attach the scalloped square to the layover using dimensional pads.
  • Attach the happy easter to the layover using dimensional pads.
  • Adhere the smaller sentiment to the inside of the card using liquid glue.
  • Add a (r) gingham gala sequin to the inside sentiment.
  • Colour a basic rhinestone with a daffodil delight stampin' blend then place in the centre of the sequin.
  • Adhere the flower to the leaves using liquid glue.
  • Attach the leaves and flower to the top sentiment using a glue dot.
  • Again colour a basic rhinestone with the daffodil delight stampin' blend and place in the centre of the flower.
Will be back again soon with more cards, thanks for stopping by.
Annette X

Saturday, April 11, 2020

Artisan Texture and more!

Hello and welcome to my haven in a hectic world.

Happy Birthday Thomas from Grandad J!

This is my second card for today.
When I went to post Tom's card while out on my daily walk last Tuesday (postie is slower to deliver just now due to Corona, they can't work faster than they already do) I realised that there wasn't a card from his Grandad (88 & housebound just now), so I rushed home with an idea in my head, but once I started, something totally different came out, hope you like it!
All measurements are in centimetres.

Card Stock: Blueberry Bushel 21 x 14.5 scored at 10.5 (card base), 8.5 x 3 (birthday), Grapefruit Grove 4 x 1(wishing you a), Pineapple Punch 2 x 1 (happy), Whisper White 10 x 14 (1st layer), 3 x 1 (from me).

(cs) = card stock, (ef) = embossing folder, (ep) = embossing powder.

  • Using the whisper white 1st layer (cs) stamp the images from the artisan textures (ss) using all of the (18/20) in colours.
  • Emboss this layer using the coastal weave 3D (ef) then adhere to the blueberry bushel card base  using liquid glue.
  • Die cut the birthday sentiment from the well written dies using the blueberry bushel (cs), and adhere across the card using liquid glue.
  • Using the a wish for everything (ss) and whisper white craft ink stamp the 'wishing you a' on the grapefruit grove (cs) and the 'happy' on the pineapple punch (cs). Now heat emboss using white (ep).
  • Stamp 'from me' from the label me bold (ss) in call me cover ink then heat emboss using clear (ep).
  • Trim down the sentiments and attach to the 1st layer using dimensional pads.
  • Colour some basic rhinestones using blueberry bushel, call me clover, calypso coral and pineapple punch stampin' blends, and adhere to the card.
Will be back again soon with more cards and thanks for dropping by.
Have a nice day
Annette X

Friday, September 20, 2019

Daisy Lane meets A Wish For Everything

Hello everyone, hope you're day is going well

Happy Birthday Leah!

This card is for one of my granddaughters and the problem is she's not a tomboy but neither is she girly so it's hard to decide what to create for her.

So this is what I came up with!
We went Lichfield Cathedral a couple of weeks ago to see the Space show, which was amazing!!!!  and when we got to the SHOP at the end of the show, as you always do, I just couldn't resist this lovely mason jar with the twinkle twinkle little star on it and lights inside. So hubby was very good to me and bought it for me, isn't he the best!!

To recreate this card follow the guide below:
(cs) = Card Stock, (ss) = Stamp Set, dsp = Designer Series Paper, Ⓡ = Retired, When using layering dies (1) is the smallest.

All measurement are in centimetres

Card Stock: Blueberry Bushel 8.5 x 7 (pocket)
Call Me Clover 4 pieces  21 x 14.8 (card base), 5 x 7 (leaves), 6 x 4 (happy), 3.5 x 1.5 (stitched tag)
Pineapple Punch 5 x 10 (daisy)
Whisper White 1 x 2.5 (birthday)
Dies: Needlepoint Elements, nested labels, Pretty Pines, Word Wishes
DSP: In Colors 18-20 6.8 x 10.5 (1st layer)
Embossing Folders: Layered Leaves, Ⓡ Pretty Pines, Stitched Nested Labels
Punches: Medium Daisy
Ribbon: In Color Grosgrain
Stampin' Pads: Call Me Clover
Accessories: Faceted Gems


Starting with the larger piece of call me clover (cs) score and fold at 10.5, this is the card base.

Emboss, the top front 8.5 centimetres of the card base, using the layering leaves folder.

Using liquid glue adhere the in color (dsp) to the front of card at the bottom.

Add a strip of grosgrain ribbon across the join between the two colours using narrow tear n tape.

It's now time to do the die cutting, you will need to run the pocket through 4 times in all.
For the 1st pass using the stitched nested labels dies and the straight edge die run through along the narrower edge for the top stitching (this does not cut, it only gives the stitching effect).
For the 2nd pass run through with (7) stitched nested label along with the rest of the pieces that need cutting. With the call me clover (cs) pieces, cut the leaves from pretty pines, the happy from word wishes and the stitched tag from the stitched labels dies.

For the embossing on the pocket follow the directions below:
1. big shot platform
2. cutting pad
3. die face up, taped to the back of the pocket
4. thin silicone mat (blue)
5. Impressions pad (white)

Run through twice to create the (+) cross.

With the piece of pineapple punch (cs) stamp the medium daisy twice using pineapple punch ink, then punch them out with the medium daisy punch, and brush lightly with a wink of stella.

Using dimensional pads position the pocket, add the leaves using liquid glue, adhere the two daisies together with liquid glue then adhere to the card using a dimensional pad.

Adhere the happy sentiment using liquid glue.

With the small piece of whisper white (cs) stamp the 'birthday' from the a wish for everything (ss) in call me clover and trim down. Adhere to the stitched tag using liquid glue and add to the card using dimensional pads.

Add the faceted gems.

This looks to be a lot of work but it isn't I assure you!

Will be back again soon with more cards.
Annette X


Delicate Whispers and more

Welcome to my blog and    t hank you for joining me today! Happy Anniversary to Sylvia & Bill Intermediate level - blending with a brush...