Tuesday, June 30, 2020

Painted Poppies meets Silhouette Scenes

Hello and welcome to my haven in a hectic world!

Happy Birthday to our wonderful Daughter-in-law Serenia

I enjoyed making this card, but next time will use wax paper when die cutting the tree, it took a bit of teasing out. The sentiment was computer generated.


Materials required for this card are:

Card stock: basic black, shimmery white, whisper white
Dies: ornate, sweet silhouettes
Embossing powder: black
Ink: soft suede, so saffron, pumpkin pie, cajun craze, cherry cobbler, versamark, memento tuxedo black
Punch: detailed trio
Ribbon: glittered organdy
Stamp sets: painted poppies, silhouette scenes
Accessories: * black rhinestones

* = retired

Hope you liked today's card. If you would like more information on how to make the card please don't hesitate to contact me, I'd love to hear from you.

If you wish to buy any of the items used, go to contact me at the top of the page for details on how to order.

Will be back again soon with more cards, in the meantime have a great day.
Annette 😘

Monday, June 29, 2020

Meant To Be meets Itty Bitty Greetings 3

Hi and welcome to my haven in a hectic world
thanks for popping by!

Happy 1st Anniversary to Jenny & Leigh


Well this is the last of the cards made for my 3 children, who all got married in June. It's dull and cold here today, but last year it was a scorcher all day and a good time was had by all. My how time flies!!!

For directions and measurements on how to make this card go to the post for 6th June.

Hope you liked today's card if you need more information please don't hesitate to contact me, I'd love to hear from you.

If you wish to buy any of the items used, go to contact me at the top of the page for details on how to order.

Will be back again soon with more cards, in the meantime have a good day.
Annette 😘 


Sunday, June 28, 2020

Beautiful moments meets label me bold

Hello and welcome to my haven in a hectic world!

Well there's still no sign of being able to go out for Sunday dinner 
yet, so it's another card for the lovely Sue.
about this card


Materials required for this card are:

Card stock: basic black, thick whisper white
DSP: (r)peaceful poppies
Dies: ornate layers (3) wide, stitched rectangles (4) wide
Ink: men onto black
Stampin' blends: bronze, ivory, old olive, rich razzleberry, so saffron
Stamp sets: beautiful moments, (r) label me bold (on my shelf for ever)

(r) = retired, when using layering dies (1) is the smallest

Hope you liked today's card, if you need more information please don't hesitate to contact me, I'd love to hear from you.

If you wish to buy any of the items used, go to contact me at the top of the page for details on how to order.

Will be back again soon with more cards, in the meantime have a great day.
Annette 😘

Saturday, June 27, 2020

Meant To Be meets Itty Bitty Greetings 2

Hi and welcome to my haven in a hectic world
thanks for popping by!

Happy Anniversary Ste & Sere 14 years ago today you tied the knot


It's one for three so to speak, all my children decided to get married in June, so I don't play favourites, they all get the same card, just arranged differently!
For directions and measurements on how to make this card go to 6th June post.

Hope you liked today's card if you need more information please don't hesitate to contact me, I'd love to hear from you.

If you wish to buy any of the items used, go to contact me at the top of the page for details on how to order.

Will be back again soon with more cards, in the meantime have a good day.
Annette 😘 

Tuesday, June 23, 2020

Mountain Air meets A Wish for Everything

                        Hello and welcome to my haven in a hectic world

 hope you're having a great day.

Happy fathers day Dad!
Materials required for this card are:

Card stock: pretty peacock, whisper white
Dies: majestic mountain, stitched nested labels (7&8), stitched rectangles (1) narrow
Embossing folder: pinewood planks
Ink: basic gray, gray granite, mint macaron, pretty peacock, seaside spray
Ribbon: (r) sycamore street
Stampin' blends: 
Stamp sets: a wish for everything, mountain air

(r) = retired and when using layering dies (1) is the smallest

If you wish to buy any of the items used, go to contact me at the top of the page for details on how to order.

Hope you liked today's card, if you need more information please don't hesitate to contact me, I'd love to hear from you.
Annette 😘

Friday, June 19, 2020

Forever Blossoms meets So Sentimental

Hello and welcome to my haven in a hectic world

Sue's thank you card for week 14

I nearly forgot to do a card for this week, so made a very quick one!


Materials required for this card are:

Card stock: whisper white
DSP: 19/21 in colors
Dies: cherry blossoms, stitched so sweetly
Embossing folder: subtle
Ink: memento tuxedo black, rococo rose
Ribbon: (r) sheer (whisper white, dyed call me clover)
Stampin' blends: (r) call me clover, rococo rose
Stamp sets: forever blossoms, so sentimental
Accessories: basic pearls (dyed rococo rose)

(r) = retired and when using layering dies (1) is the smallest
The larger nested label was die cut a second time on one side to make it narrower.

Hope you liked today's card if you need more information please don't hesitate to contact me, I'd love to hear from you.

If you wish to buy any of the items used, go to contact me at the top of the page for details on how to order.

Will be back again soon with more cards, in the meantime have a good day.
Annette 😘

Wednesday, June 17, 2020

Layered With Kindness meets Parisian Beauty

                    Hi folks and welcome to my haven in a hectic world

Happiest of birthday's to Sheilah.

For this card, I picked out the stamp set I wanted to use along with petal pink card stock, then decided to find some designer series paper that would match up.
All measurements are in inches.

Petal Pink 4¾  x 6¾  (1st layer), 2¼  x 2¼  (sentiment), 1 x 3 (flower heads), Shimmery White 10 x 7 scored at 5 (card base) , 2 ¼ x 1  (sentiment).
DSP 2½ x 6¾  (2nd layer).

(cs) = card stock, (dsp) = designer series paper, (ef) = embossing folder, (r) = retired, (ss) = stamp set.
  • Lightly mark the 1st layer down the middle using a pencil.
  • Now stamp the leaves from the layered with kindness (ss) twice at the bottom of the lefthand side in pool party, 
  • Stamp 3 of the larger flower heads and 2 of the buds in petal pink on petal pink (cs). Fussy cut these flowers and put to one side for now.
  • Emboss the lefthand side using the subtle (ef). This needs to be carried out using two passes though the big shot. Remove the pencil mark.
  • Adhere the parisian blossoms (dsp) down the right hand side using liquid glue.
  • Using narrow tear & tape adhere some (r) calypso coral ombre ribbon down the middle of the card along the (dsp) edge.
  • Stamp the happy birthday sentiment from the layered with kindness (ss) in petal pink  on petal pink (cs) and then again, pool party on shimmery white (cs).
  • Cut out the petal pink happy birthday using the label me lovely punch and the pool party happy birthday using the label me fancy punch.
  • Cut a piece of the (r) calypso coral ombre ribbon about 10 inches long.
  • Add some tear & tape or snail at the back of the petal pink sentiment and zig zag the ribbon back and fourth across  the adhesive. Then trim the ends.
  • Attach the shimmery white sentiment on top of the petal pink sentiment using dimensional pads.
  • Add dimensional pads to the back of the petal pink sentiment and attach to the card base.
  • Use glue dots to adhere the flower head to the leaves.
  • Job done!
I found this a very quick and easy card to make.

Will be back again soon with more cards, thanks for popping by.
Annette X

Sunday, June 14, 2020

Nature's Thoughts meets painted Labels and more

Hello and welcome to my haven in a hectic world, it's so nice of you to pop by.

We still can't go out for Sunday dinner so here's another card for Sue and her family (between them they cook and deliver our lovely dinner every week).
It's a clean and crisp card today

 Last Sunday I had a lovely picture drawn on the box holding our dinners, which made me smile, should have taken a photo of it but didn't think about it until now.

(cs) = card stock, (ef) = embossing folder, (r) = retired, (su) = stampin' up

Today I'm using a (su) note cards, mint macaron, night of navy, pear pizzazz, (r) pineapple punch and whisper white (cs), night of navy, smoky slate ink,  polka dot tulle ribbon.
  •  To do the sentiment I used my stamparatus.
    • with a larger piece of whisper white (cs) than you need,  die cut the scalloped circle from the painted labels dies.
    • put the scalloped circle to one side for the moment and work with the negative piece.
    • position the sentiment  from the (r) oh so eclectic (ss) in your stamparatus and stamp onto the grid paper. 
    • position the negative over the sentiment making sure it's in the middle and hold in place with your magnets.
    • place the scalloped circle over the sentiment (you may need to use re-positionable tape to keep it place) and then stamp the sentiment a second time.
    • Remove from stamparatus.
  • With whisper white (cs) stamp the feather from the positive thought's (ss) in smoky slate.
  • Now die cut the following using the nature's thoughts dies
    • night of navy butterfly
    • mint macaron & pear pizza leaves
    • pineapple punch & whisper white blooms
    • Stamped feather
    • with the painted labels dies and pineapple punch (cs) die cut the large swirled circle.
  • Emboss the front of the note card using the bricks n mortar (ef) and lightly sponge it using smoky slate ink.
  • zig zag some of the polka dot tulle ribbon across the back of the swirled circle and attach using double sided tape.
  • adhere this to the (cb) using liquid glue.
  • attach the sentiment using dimensional pads.
  • adhere the feather, leaves, butterfly and white bloom using liquid glue.
  • attach the pineapple punch bloom using dimesional pads.
  • add a basic rhinestone to the butterfly.
If you wish to buy any of the items used, go to contact me at the top of the page for details on how to order.
    Will be back again soon with more cards, enjoy the rest of your day.
    Annette X

    Monday, June 8, 2020

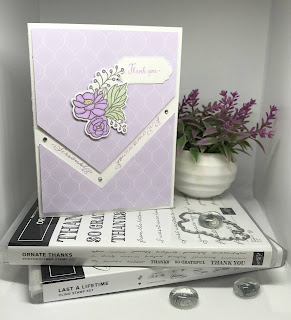
    Last A Lifetime meets Lasting Elegance

    Hello and welcome to my haven in a hectic world, hope you're have a good day!

    It's now week 12 for the lockdown and we actually went to the bank the other day, Yippee!!!
    Still don't go out unless we have to so it made a change.

    This is Sue's card for this week.

    I created it using a u tube video from Lisa Curio's channel made some time ago. I changed the front and was very pleased with the outcome.
    As this has come from an American demonstrator the measurements are in imperial inches.
    (but I will soon be bring you a metric version, so keep your eye out for it!)

    (cb) = card base, (cs) = card stock, (dsp) = designer series paper, (ef) embossing folder,  (r) = retired, (ss) = stamp set.
    Colours used are: purple posy, soft sea foam, so saffron.

    • Start with a (cb) of thick whisper white (cs) 8½ x 5½  scored at 4¼. 
    • Emboss the front of the (cb) using the subtle (ef)
    • Cut 2 pieces of in color 19/21 (dsp) 4 x 4 and 3 x 4 making sure  the pattern goes in the same direction.
    • Using the 4 x 4 piece of (dsp) make a mark on the left side at 1½  then the bottom at 1¾ and finally the right side at 2¼. 
    • Cut off from the left side mark down to the bottom mark, now cut from the right mark down to make a point at the bottom.
    • Place the right side of the 4 x 4 piece level with the top of the 3 x 4 piece, line up so each side is level, then draw a line around the edge of the 4 x 4 piece onto the 3 x 4 piece, now cut along the line to get the corresponding shape for the bottom.
    • Place these pieces onto the (cb) and stamp the sentiments from the ornate thanks (ss) in the gap.
    • Using foam adhesive strips adhere the top and bottom pieces of (dsp) to the (cb).
    • Stamp the flowers from the last a life time (ss) onto whisper white (cs) using memento ink and colour using stampin' blends.
    • Die cut the flowers using the lasting elegance dies.
    • For the top sentiment I used the (r) new wonders (ss) and stamped in purple posy, then die cut using the ornate frames dies.
    • Adhere this sentiment using liquid glue to the (cb).
    • Attach the flowers using dimensional tabs.
    • Add some basic rhinestones in between the gap sentiments and jobs done!!!!
    Thanks for dropping by and enjoy the rest of your day
    Annette X

    Saturday, June 6, 2020

    Meant To Be meets Itty Bitty Greetings number 1

    Hi and welcome to my haven in a hectic world, thanks for popping by!

    Happy 5th Anniversary Stuart & Rachael πŸ’—
    It's just a shame you can't spend it together. But October isn't that far away!
    It's one for three so to speak, all my children decided to get married in June and so I don't play favourites, they all get the same card, just arranged differently!
    Measurements are in centimetres.

    (cs) = card stock, (dsp) = designer series paper, (ef) = embossing folder, (nsu) = non stampin' up, (r) = retired, (ss) = stamp set, when using layering dies (1) is the smallest.
    Colours are merry merlot, smoky slate, whisper white.

    • Start with a card base 21 x 15 scored at 10.5, my card base is (nsu) using up old stash.
    • Cut a piece of (r) neutrals paper stack (dsp) 10 x 14 and adhere to the front of the card base using liquid glue. 
    • With a piece of whisper white (cs) 6 x 6.5 stamp the sentiment "meant to be" from the meant to be (ss) and die cut using the stitched be mine die (2) scalloped heart, there are 2 pieces when cut.
    • Using a piece of vellum (cs) 8.5 x 7 and the stitched be mine dies, die cut the (3) straight heart.
    • With a piece of merry merlot (cs) 6 x 9 and the stitched so sweetly dies, die cut using the (4) scallop rectangle, then emboss using the parisian flourish (ef).
    • Adhere this to the card base using liquid glue.
    • With a piece of whisper white (cs) 6 x 2.5 stamp the "happy anniversary" from the itty bitty greetings (ss), then with the stitched so sweetly dies, die cut using the (1) scallop rectangle.
    • Arrange the hearts and adhere the white outer heart to the vellum heart using liquid glue.
    • Then adhere the white and vellum hearts to the scalloped rectangle using liquid glue.
    • Attach the "meant to be" heart using dimensional pads.
    • Attach the "happy anniversary" scalloped rectangle using dimensional pads.
    • Add some basic rhinestones.
    If you wish to buy any of the items used go to contact me at the top of the page for details on how to order.

    Will be back again soon with more cards, enjoy the rest of your day.
    Annette X

    Thursday, June 4, 2020

    Beauty Abounds and more

    Hello and welcome to my haven in a hectic world, hope you're having a good day.

    Todays card is a mixture of current and very old, I was making a template for a fancy fold card, hence the old card stash, but liked it so much I'm sending it to friends we haven't seen for nearly a year because of house moving and then lockdown. Just want to let then know we miss them.


    All measurements are in centimetres.
    (cb) = card base, (cs) = card base, (r) = retired,  (ss) = stamp set, when using layering dies (1) is the smallest.

    I used pink pirouette (cs), cheerful treats (dsp), pink pirouette taffeta ribbon all (r).
    • start with a card base 28 x 14.8 scored at 3, 10 and 17
    • next cut some (dsp) strips in coordinating patterns 2.5 x 14.3 front panel, 6.5 x 14.3 second panel 10.5 14.3 back panel.
    • Adhere these panels down using liquid glue.
    • for the 3rd panel cut a piece of Whisper white (cs) 6.5 x 14.3.
    • Add a sentiment to this piece of (cs) and also a bit of decoration, (I used the beauty abounds (ss) and memento black ink then  coloured using stampin' blends). I did some light background stamping using the splatter stamp from the same set.
    • Adhere the 3rd panel down, again using liquid glue.
    • Cut a piece (cs) the same colour as the (cb) 1.5 x 14.6 attach some ribbon using glue dots and tear n tape down the length of this piece of (cs) and then adhere to the (cb) using tear n tape.
    • Stamp the sentiment for the front of the card on a piece of whisper white (cs) and die cut using the layering square dies, (4) straight edge for the sentiment and (5) scallop edge for the backing. Adhere these together using liquid glue.
    • attach it the second panel of card slightly over lapping the edge using tear n tape.
    • die cut the tiny butterfly from the butterfly beauty dies and adhere to the top righthand corner.
    Will be back again soon with more cards, enjoy the rest of your day!
    Annette X

    Wednesday, June 3, 2020

    Sailing Home meets High Tide and more

    Hello and welcome to my haven in a hectic world, thank you for dropping by.

    Happy Birthday Mike!

    This is my take, on card from Kelly Acheson's blog "a stamp above"  on 5 May 2020, I changed the orientation and turned it into  swing card.
    closed
    open

    Measurements are in centimetres.

    (cs) = card stock, (dsp) = designer series paper, (ss) = stamp set, when using layering dies (1) is the smallest.
    Colours: Basic Gray, Blueberry Bushel, Pool Party, Seaside Spray.
    • Card base is blueberry bushel (cs) 10.5 x 29.7 scored at 14.8.
    • Die cut the opening for the front using the layering ovals dies  (7), then randomly stamp the anchor from the sailing home (ss) in blueberry bushel.
    • On a piece of whisper white (cs) 7 x 9.5 stamp the scene, water is from the high tide (ss) in seaside spray, boat is from the sailing home (ss) in blueberry bushel and the birds are from the my meadow (ss) in basic gray. Lightly sponge above the water in pool party to form a sky line.
    • Die cut the scene using the stitched shape dies oval (4), now die cut another oval the same size in blueberry bushel.
    • Cut a piece of whisper white (cs) 10 x 14.3 (card insert), do a dry placement, and through the aperture stamp the greeting from the sailing home (ss) using blueberry bushel in the middle.
    • Cut a 2.5 stripe from the 6" x 6"  18/20 in color (dsp) stack, then use the triple banner punch to make the tail at one end and a 1cm score mark at the other.
    • Adhere the dsp to the back of the card insert making sure it's in the middle.  Then using 2 pieces of bakers twine measuring 14cm each create a reef knot and attach both ends to the back of the card insert towards the bottom using sellotape, making sure the knot on the front is roughly in the middle.
    • Attach the card insert to the card base using dimensional pads.
    • Close the card, add some liquid glue down the centre of the dsp showing through the oval aperture then place the scene oval over the top, making sure it's in the right place and adhere down.
    • Open the card and adhere the blueberry bushel oval over the top of the white one.
    • On a scrap piece of whisper white (cs) stamp the happy birthday from the itty bitty greetings (ss) in blueberry bushel and punch out using the classic label punch. I re-inserted the ends to make the label smaller then punched a second label in blueberry bushel and adhered the two together and attached to the front of the card using dimensional pads.
    • Lastly I added a couple of the (r) sail away trinkets.
    Will be back again soon with more cards, enjoy the rest of your day.
    Annette X

    Inspirational Sketches meets Go To Greetings

      Welcome to my blog and    t hank you for joining me today! Happy Birthday Duncan Intermediate card for men -    brush blending,   die cutt...