Showing posts with label organdy combo ribbon. Show all posts

Monday, August 5, 2024

Enduring Beauty and more

 Welcome to my blog

and  thank you for joining me today!

Happy Birthday Sylvia


Kind of Cased - blending with brushes, bow making, decorative masking, die cutting, dry embossing, layering, stampinging

Materials required for this card are:

Bundles: enduring beauty
Card Stock: basic white, gorgeous grape
Decorative Masks: enduring beauty
Embossing Folders: *softly sophisticated 3D
Ink: gorgeous grape, granny apple green, highland heather 
Stamps: magnolia mood
Accessories: blending brushes, *gingham gala sequins, *organdy combo ribbon
 
* = no longer available
  1. Start with a base card 14.5 x 21 scored at 10.5, gorgeous grape layer 10 x 14, white layer 9.6 x 13.6, white for stamping 14 x 11 and 8 x 2
  2. dry emboss the white layer and adhere to the purple layer using liquid glue
  3. adhere this to the card base using liquid glue
  4. stamp the image outline using gorgeous grape 
  5. using the decorative masks and blending brushes build the colours of shading going a little darker for each mask
  6. die cut the image and attach to the card using dimensional pads
  7. stamp the sentiment and create the flagged ends using scissors
  8. attach the sentiment using dimensional pads
  9. make a double bow and attach using glue dots
  10. add the sequins
Hope you liked today's card. If you would like more information on how to make it, please don't hesitate to contact me, I'd love to hear from you.

If you wish to buy any of the items used, go to contacting me at the top of the page for details of how to order.

Will be back again soon with more cards, in the meantime take care and have a great day.
Annette 😊 

Thursday, October 6, 2022

Happiness Abounds meets Stylish Sketches

  Welcome to my blog

and  thank you for joining me today!

Happy birthday Alison


This is a mixture of old and new. Stamping, watercoloring, dry embossing, die cutting and punching.

Materials required for this card are:

Card Stock: balmy blue, basic white thick
Designer Series Paper: *simply marbleous 
Dies: stylish shapes (6)
Embossing Folders: *seaside
Ink: balmy blue, memento black
Punches: decorative circle, lovely labels
Watercolor Pencils: basic black, daffodil delight, early espresso, garden green, pacific point, pumpkin pie
Stamp Sets: happiness abounds, *stylish sketches
Accessories: blender pen, *organdy combo ribbon

* = no longer available, when using layering dies (1)
  1. base card 14.8 x 10.5, dsp 10 x 14.3
  2. stamp and colour the ducks, punch out using the decorative circle 
  3. colour round the edge of the circle using a balmy blue stampin' marker
  4. stamp the sentiment on a ½" strip and flag the ends, then make a ¾" background strip and adhere together
  5. die cut a circle in the dsp, then die cut a balmy blue circle the same size
  6. emboss the dsp and add a strip of ribbon about 2.5cm from the bottom then attach to the base card using dimensionals
  7. adhere the blue circle using wet glue, then the ducks & sentiment using dimensionals 
Hope you liked today's card. If you would like more information on how to make it, please don't hesitate to contact me, I'd love to hear from you.

If you wish to buy any of the items used, go to contacting me at the top of the page for details on how to order.

Will be back again soon with more cards, in the meantime take care and have a great day.
Annette 😘

Monday, December 13, 2021

Hydrangea Haven meets Many Messages

    Thank you for joining me today!

Happy Birthday Sima


A quick card, lots of die cutting, a bit of stamping, a little embossing and lastly some blending

Materials required for this card are:

Card Stock: basic white, fresh freesia, highland heather, just jade, vellum
Dies: hydrangea, stitched so sweetly (6)
Embossing Folders: *subtle 3D, timeworn type 3D
Ink: fresh freesia, highland heather, soft succulent
Ribbon: *organdy combo
Stamp Sets: hydrangea haven, many messages
Accessories: basic rhinestones, blending brushes, decorative masks,
* = no longer available, and when using layering dies (1) is the smallest

Hope you liked today's card. If you would like more information on how to make it, please don't hesitate to contact me, I'd love to hear from you.

If you wish to buy any of the items used, go to contacting me at the top of the page for details on how to order.

Will be back again soon with more cards, in the meantime take care and have a great day.
Annette 😘

Sunday, April 4, 2021

Inspiring Iris meets A Wish for Everything

Thank you for joining me today!

My second Easter card completed. 

This one's for my Aunt, My mum's name was Iris and yellow her favourite colour.


Again this is a mixture of old and current products. The only way to make room is to use up old stash or sell it.

Materials required for this card are:

Card Stock: basic white (thick), pear pizzazz
Designer Series Paper: *gingham gala
Dies: layering ovals (p6)(s6), snow time
Embossing Folders: dainty diamonds 3D
Ink: daffodil delight, pear pizzazz, smoky slate
Ribbon: *organdy combo 
Stamp Sets: a wish for everything, inspiring iris
Accessories: *gingham gala sequins

* = retired, when using layering dies (1) is the smallest

Hope you liked today's card. If you would like more information on how to make it, please don't hesitate to contact me, I'd love to hear from you.

If you wish to buy any of the items used, go to contacting me at the top of the page for details on how to order.

Will be back again soon with more cards, in the meantime take care and have a great day.

Annette 😘 

Sunday, February 28, 2021

Corner Bouquet meets Itty Bitty Greetings

Thanks for joining me today!


There are a few techniques used in this card CASed from Mitosu crafts, blending - water splashing - piecing and last but not least heat in bossing.


Making a really great effect when putting them all together.

Materials required for this card are:

Card Stock: basic black, basic white, gorgeous grape   
Embossing Powder: black
Ink: memento black, gorgeous grape, highland heather, purple posy, versamark
Punches: dragonflies
Ribbon: *organdy combo
Stamp Sets: corner bouquet, itty bitty greetings 
Accessories: blending brushes
* = retired

Hope you liked today's card. If you would like more information on how to make it, please don't hesitate to contact me, I'd love to hear from you.

If you wish to buy any of the items used, go to contacting me at the top of the page for details on how to order.

Will be back again soon with more cards, in the meantime take care and have a great day.
Annette 😘

Tuesday, December 29, 2020

Snowman Season meets Itty Bitty Christmas

Hello and welcome to my haven in a hectic world!


This is the Fourth of my Christmas cards for 2020.  As stated before they are all creations taken from Pinterest last year. So for all of you who first made them a big thank you.


All measurements are in centimetres.
(cs) = card stock, (ef) = embossing folder, (r) = retired, (ss) = stamp set

Card Stock: 4 pieces whisper white 14.5 x 21 scored at 10.5 (card base), 13.5 x 9.5 (embossed layer), 7 x 7 (stamped layer) 1.5 x 6 (sentiment)
2 pieces purple posy/soft seaside spray 14 x 10 (1st layer), 10.5 x 13 (leaves frame)
  • Emboss the larger whisper white (cs) using the subtle (ef).
  • Stamp the snowman from the snowman seasons (ss) using memento ink and then colour it using the light stampin' blends for the scarf and nose, pumpkin pie, purple posy/seaside spray.
  • Die cut the 2 frames (this can be done at the same time) using the frosted frames dies.
  • Staple the seaside spray metallic / organdy combo ribbon at top of the image frame, making a banner.
  • Stamp the sentiment from the itty bitty Christmas (ss) and punch out using the classic label punch.
  • To put together, adhere the embossed (cs) to the purple posy (1st layer) using liquid glue and attach to the card base using dimensional pads. Then attach the other two layers on top again using dimensional pads, finishing with the sentiment.
  • Add a rhinestone to the sentiment.
Thanks for dropping by and hopefully see you again soon
Annette X

Saturday, December 26, 2020

25 dec georgia & ashlie


 Hello and welcome to my haven in a hectic world!

Thanks for joining me today!

Happy Christmas to Georgia & Jack (blue), and Ashlie (purple posy)

I just love this snowman and these cards came together very easily. Didn't have the  winter snow embossing folder when making the cards so used a retired christmasy folder instead.


Materials required for this card are:

Card stock: highland heather, seaside spray, whisper white
DSP: feels like frost
Dies: nature's thoughts, snow time
Embossing folders: *softly falling
Ink: memento tuxedo black
Ribbon: *organdy combo (darkened the blue to seaside spray)
Stampin' blends: basic black, cherry cobbler, daffodil delight, purple posy, seaside spray, shaded spruce
Stamp sets: snow wonder
Accessories: *dazzling diamonds
* = retired

Hope you liked today's card. If you would like more information on how to make it, please don't hesitate to contact me, I'd love to hear from you.

If you wish to buy any of the items used, go to contact me at the top of the page for details on how to order.

Will be back again soon with more cards, in the meantime take care and have a great day.
Annette 😘

Wednesday, April 22, 2020

New Wonder meets Dandelion Wishes and more!

Hi and welcome to my haven in a hectic world, thanks for popping by.

It's now week 5 of the lockdown and this is Sue's card for this week. I cased this card from one I saw on facebook and just added the ribbon on the right.
Measurements are in centimetres.

Card Stock: Very Vanilla 14.8 x 21 scored at 10.5 (card base), 10.5 x 7 (2nd layer) 5 x 6 (fairy).
DSP: 11.5 x 9 (1st layer).
 (cs) = card stock, (dsp) = designer series paper,  (ss) = stamp set), (nsu) = non stampin' up, (r) = retired, when using layering dies (1) is the smallest.
  • Die cut the very vanilla 1st layer (cs) with the Stitched rectangles dies - wide (5) rectangle.
  • Stamp the dandelion from the dandelion wishes (ss) and the just a note from the flourishing phrases (ss) on the left hand side using highland heather ink.  
  • Die cut the perennial essence 1st layer (dsp) with the Stitched rectangles dies - wide (7) rectangle.
  • Adhere the (dsp) rectangle to the very vanilla card base (cs) (mine is a (nsu) base) using liquid glue, leaving more room on the right than the left.
  • Now adhere the very vanilla rectangle using liquid glue.
  • Colour a basic rhinestone using the dark highland heather stampin' blends then adhere to the centre of the flower.
  • With the very vanilla fairy (cs), stamp the fairy from the new wonders (ss) in memento black ink.
  • Using crumb cake, granny apple green, highland heather, lovely lipstick, mango melody, old olive, petal pink and pool party stampin' blends colour in the fairy.
    • hair crumb cake light and dark
    • face & hand light petal pink
    • wings light pool party
    • top granny apple green light and dark
    • skirt highland heather light and dark
    • feet old olive
    • Nib mango melody light and dark
    • pen lovely lipstick light and dark
  • Fussy cut the fairy and add wink of stella to the wings.
  • Attach to the card base using dimensional pads.
  • Make a bow with long tails using (r) organdy combo ribbon and attach using glue dots.
Will be back again soon with more cards, until then keep well and safe.
Annette X

Tuesday, April 14, 2020

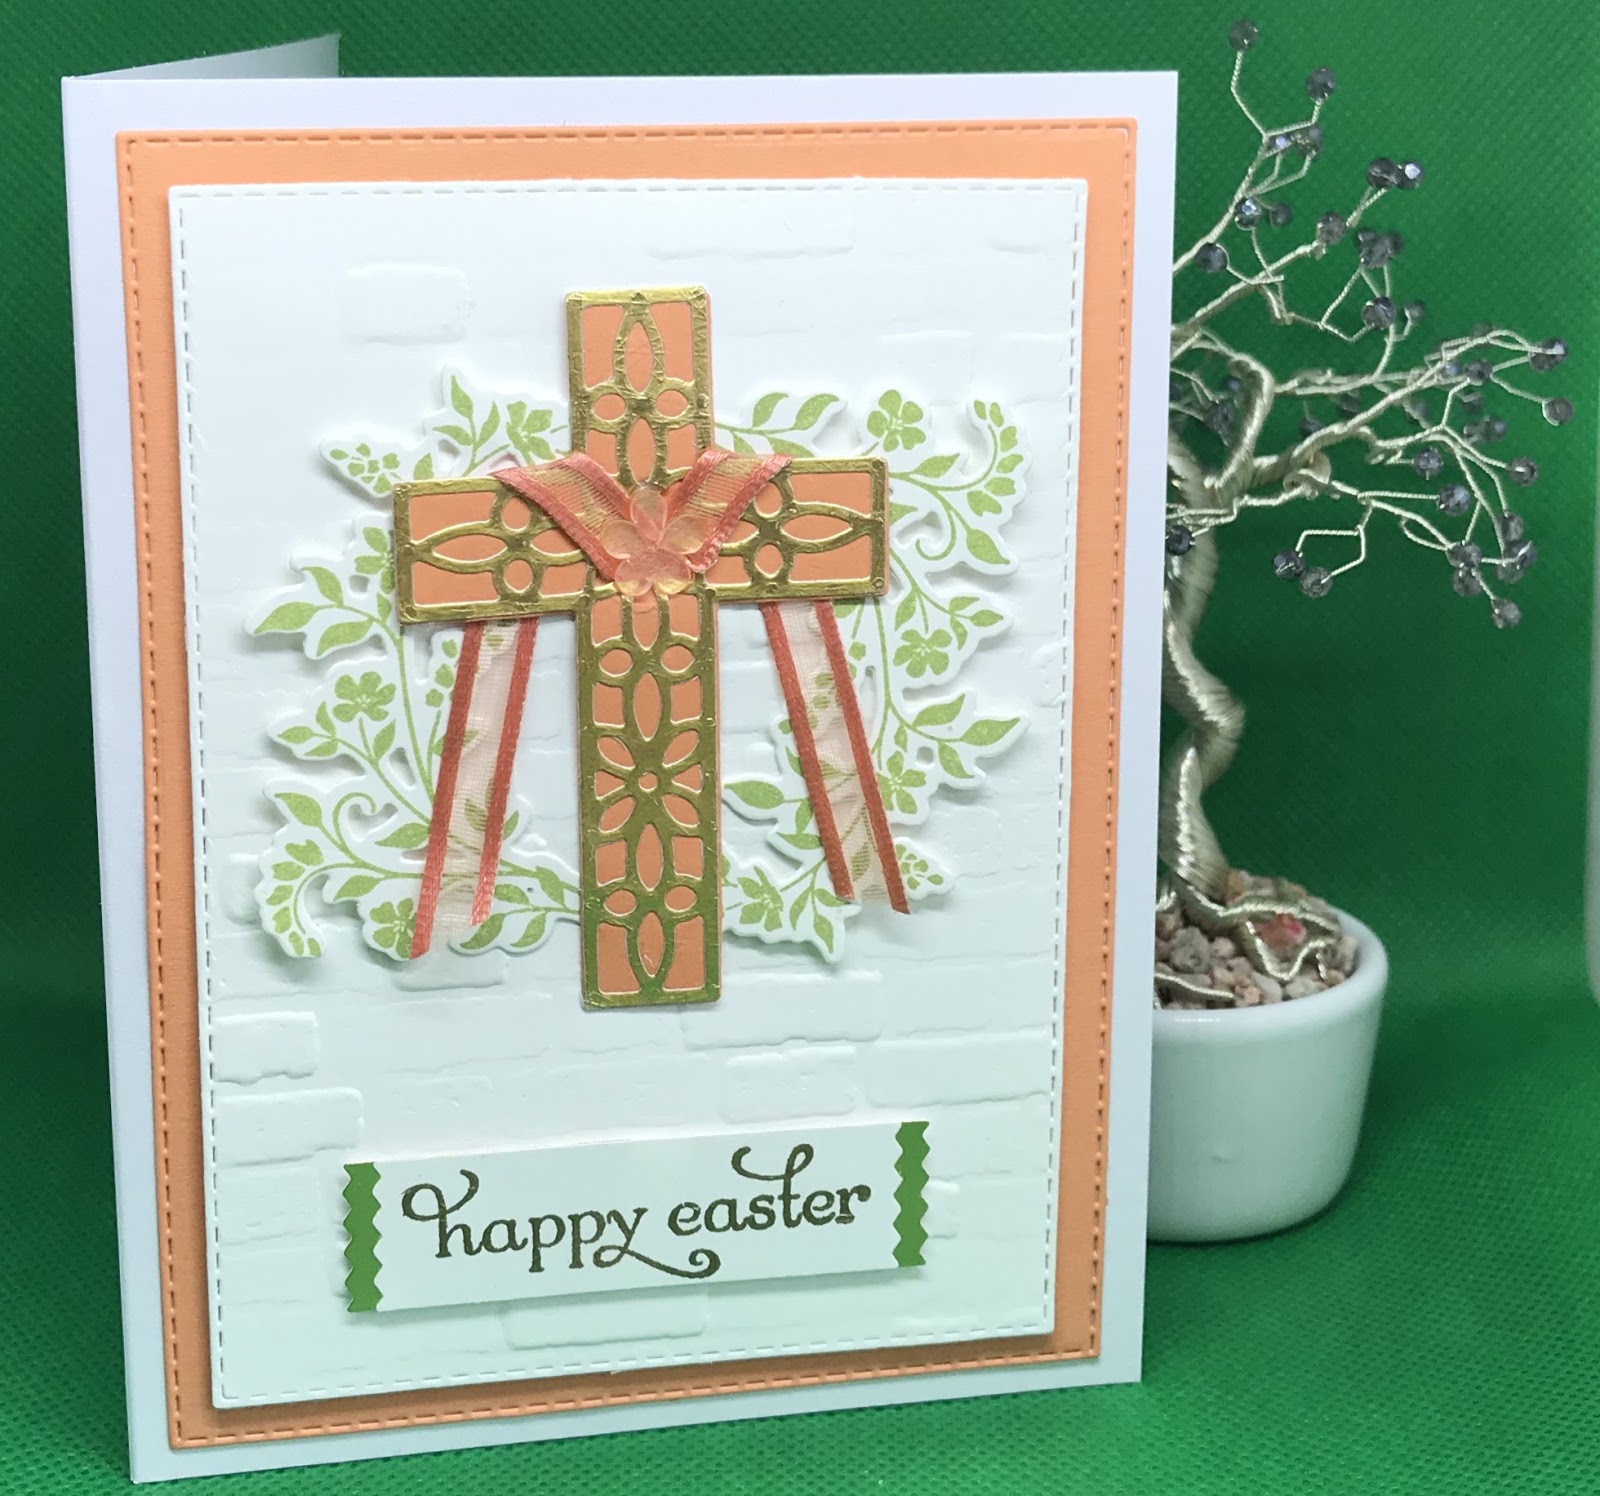
Cross of Hope meets Brick & Mortar 3D

Hi folks, welcome to my haven in a hectic world!

Happy Easter Sheilah!

I normally only do one Easter card each year for my Aunt, but from this year there will be two.
Liked the look of this card even though I dropped a booboo!

All measurements are in centimetres.

(cs) = card stock, (ef) = embossing folder, (ep) embossing powder, (r) = retired, (ss) stamp set

Grapefruit Grove 2 pieces,  9.5 x 13. 5 (1st layer), 5.5 x 7.5 (cross),
Gold foil 2 pieces, 5.5 x 2 (sentiment backing), 5.5 x 7.5 (cross),
Whisper White 4 pieces, 13.8 x 21 scored at 10.5 (card base), 9 x 12.5 (2nd layer), pieces, 5.5 x 2 (sentiment). 5.5 x 16 (2 foliage)
When using layering dies (1) is the smallest.
Colours are Grapefruit Grove, Gold, Pear Pizzazz.
  • With the stitched rectangles dies, die cut the grapefruit grove (cs) using the (8) wide frame, and the whisper white (cs) using the (7) wide frame.
  • Adhere the grapefruit grove rectangle to the base card using liquid glue.
  • Next, emboss the whisper white rectangle using the brick& mortar (ef), (this is what I forgot to do, hence my frosted flower was squashed). Now attach this rectangle to the card base using dimensional pads.
  • With the larger strip of whisper white (cs) stamp the foliage from the hold on to hope (ss) twice and die cut both of these using the cross of hope dies.
  • On the small piece of whisper white (cs) stamp the happy easter from the (r) delightful dozen (ss) using versaMark, then heat emboss using gold (ep).
  • Using the washi label punch, punch out the sentiment, then punch out a second one using the gold foil. Cut this one in half and adhere behind the sentiment leaving a slight edge on either side using liquid glue.
  • Using the cross of hope dies, die cut the 2 crosses, lattice cross in gold foil and grapefruit grove cross solid.
  • Adhere the gold cross to the solid cross using liquid glue.
  • Wrap a piece of the (r) organza ribbon around the cross using a glue dot at the front to adhere it and also at the back on either side to hold the ribbon in place.
  • Add one of the frosted flower embellishments over the ribbon to finish off the front of the cross.
  • Adhere the very top and the very bottom of the foliage behind each side of the cross to make a wreath.
  • Attach to the card base, along with the sentiment using dimensional pads.
  • I felt it needed a little something extra after completing it and writing the blog, so added some random (r) gold sequins.
Will be back again soon with more cards.
Annette X

Thursday, January 9, 2020

Bird Ballad Laser-Cut Cards meets Free As A Bird

Thank you for stopping by my crafting haven today,

Happy Birthday Cheryl!!!

Although at the time of creating this post it's a cold wet miserable day, I'm feeling really good.

Have had  this stamp set for a while now but don't use it enough, so thought I'd have a go with it today.
Card base is one of the bird ballad laser-cut cards 10.8 x 14,  2 pieces of pineapple punch (cs) 10.6 x 14 (backing for the front), 8 x 4.5 stitched nested label 4, 2 pieces of very vanilla 3.5 x 6.5 stitched nested label 3,  21 x 7 all other stamping.

All measurements are in centimetres, and when using nested dies (1) is the smallest.

Colours for the card are pineapple punch, shaded spruce, very vanilla.
(cs) = card stock, (r) = retired,  (ss) = stamp set

  • Adhere the front backing to the card base using liquid glue around the outside edge only.
  • Stamp the greeting from the free as a bird (ss) on the smaller very vanilla piece.
  • Die cut the sentiment and the smaller pineapple punch (cs) using the stitched nested labels (3 & 4).
  • Stamp 4 of the leaves, 2 of the larger flowers, 2 of the buds and 1 of the smaller flowers using memento tuxedo black ink.
  • Use shaded spruce and pineapple punch stampin' blends to colour the flowers and leaves, and then fussy cut them. Use a black stampin' marker to go round the edges if needed.
  • Attach the 2 labels together using dimensional pads and then attach to the card front, again using dimensional pads.
  • Adhere the flowers and leaves using liquid glue, tucking the leaves behind the label.
  • Add some basic rhinestones as flower centres.
  • Tie a bow using the (r) yellow organdy combo ribbon and attach using a glue dot.

After completing and photographing the card I decided to add some wink of stella to the flowers, which looked quite nice.

Will be back again soon with more cards
Annette X

Delicate Whispers and more

Welcome to my blog and    t hank you for joining me today! Happy Anniversary to Sylvia & Bill Intermediate level - blending with a brush...