Showing posts with label basic rhinestones. Show all posts

Saturday, September 27, 2025

Fun fold - With You In Mind

 Welcome to my blog

and  thank you for joining me today!

Happy Birthday Judi


Fun fold cased from Amanda Fowler - Beginner level
die cutting, layering, stamping

Materials required for this card are:

Card Stock: basic white, bubble bath, petunia pop
Designer Series Paper: florals in bloom
Dies: *brilliant wings, textured notes (6), (inside panel)
Ink: petunia pop
Stamps: with you in mind
Accessories: rhinestone basic jewels (added to the butterfly after photo was done)
 
* = no longer available, when using layering dies (1) is the smallest

Start with a base card 14.5 x 21 scored at 10.5 and cut at 15.75 and keep the cut off piece, basic white 8 x 4, bubble bath 4.5 x 3.5, dsp 13.7 x 29 scored at 10 cut at 20 and the off cut cut at 4.5 for the two panels
  1. adhere the dsp to the inside and both sides of the front panel of the base card using liquid glue
  2. stamp the sentiment
  3. using the off cut from the base card trim it down to become a border for the sentiment and adhere with liquid glue to the front panel only
  4. die cut a butterfly and adhere to the corner of the sentiment using liquid glue
  5. add 3 rhinestones to the butterfly (not shown in  the image, but just finishes it off.
Hope you liked today's card. If you would like more information on how to make it, please don't hesitate to contact me, I'd love to hear from you.

If you wish to buy any of the items used, go to contacting me at the top of the page for details of how to order.
 
Will be back again soon with more cards, in the meantime take care and have a great day.
Annette 😊

Wednesday, May 7, 2025

Delightful Wishes meets Linked Together Dies

 Welcome to my blog

and  thank you for joining me today!

Happy Birthday Idwin


Intermediate - die cutting, dry embossing, layering, stamping

Materials required for this card are:

Bundles: delightful wishes
Card Stock: basic white, daffodil delight, lemon lolly, old olive, pecan pie
Dies: linked together
Embossing Folders: plaster painting 3D
Ink: old olive
Stampin' Blends: mossy meadow
Vellum: floral & gingham
Accessories: adhesive sheets, rhinestone basic jewels
 
Start with a base card 14.5 x 21 scored at 10.5, vellum 10 x 14, basic white 11 x 7, 3 x 9, daffodil delight 5 x 12, lemon lolly 5 x 9.5, 5 x 14, old olive 3 x 5.5 full leaves, 3 x 9.5 sentiment, 7 x 4 layering leaves, pecan pie 2 x 6

  1. adhere the vellum to the base card using liquid glue
  2. stamp the 2 full leaves and the hb sentiment 
  3. die cut these along with the 3 full flowers and the larger layer for the layered leaves.
  4. die cut the rest of the elements making sure there is adhesive sheeting on the back of the cs
  5. adhere the lattice work to the base card
  6. layer all the pieces that need to go together, adhere the top sentiment to the base card
  7. adhere the flowers using glue dots
  8. attach the hb sentiment using dimensional pads
Hope you liked today's card. If you would like more information on how to make it, please don't hesitate to contact me, I'd love to hear from you.

If you wish to buy any of the items used, go to contacting me at the top of the page for details of how to order.
 
Will be back again soon with more cards, in the meantime take care and have a great day.
Annette 😊

Tuesday, February 18, 2025

Thoughtful Expressions meets Labeled With Love

 Welcome to my blog

and  thank you for joining me today!

Happy Birthday Sian
This is Sian's first card from me, hope she likes it.


Intermediate level - adding embellishments, blending with alcohol markers, blending with brushes, die cutting, dry embossing, layering, 

Materials required for this card are:

Bundles: thoughtful expressions (frames 3,4)
Card Stock: basic white, lemon lolly
Embossing Folders: *subtle 3D
Embossing powder: heat & stick, *dazzling diamonds
Ink: memento black, fresh freesia, versaMark
Stampin' Blends: fresh freesia, lemon lolly, shy shamrock
Stamps: labeled with love
Accessories: bakers twine 3 color pack, basic rhinestones, 
 paper butterflies

* = no longer available, when using layering dies (1) is the smallest
  1. Start with a base card 14.5 x 21 scored at 10.5, white layer 14.1 x 10.1, white 6 x 13.5, lemon lolly 8 x 8
  2. dry emboss the white layer
  3. wrap bakers twine around the bottom of white layer 3 times and tie a bow
  4. attach the white layer to the base card using dimensional pads
  5. on the smaller piece of white place the smaller circle and then stamp the 2 flowers in moment black on what is left of the piece
  6. colour the flowers using the alcohol markers
  7. die cut these pieces plus the larger circle in lemon lolly (these can all be cut with one pass through the cut & emboss machine 
  8. using a blending brush lightly colour the butterfly
  9. add some veraMark round the edges of the wings, cover with the heat & stick powder and heat using a heat gun, once warm add the dazzling diamonds and heat up again 
  10. arrange the elements on the card and adhere the butterfly and circles with liquid glue, the large flower with a dimensional pad, and the smaller flowers, again with liquid glue
  11. add the rhinestones to the butterfly
Hope you liked today's card. If you would like more information on how to make it, please don't hesitate to contact me, I'd love to hear from you.

If you wish to buy any of the items used, go to contacting me at the top of the page for details of how to order.

Will be back again soon with more cards, in the meantime take care and have a great day.
Annette 😊

Saturday, October 26, 2024

Adoring Hearts meets sweetly scripted

 Welcome to my blog

and  thank you for joining me today!

Happiest of Birthday's Jennifer


This was cased from pinterest and the credit goes to christicreativecrew.blogspot.com. I've used different numbers and sentiments

Very little stamping - dry embossing, die cutting, die cutting using foam sheet backing, layering, stamping

Materials required for this card are:

Bundles: adoring hearts
Card Stock: basic white, mossy meadow, pretty in pink
Dies: alphabet al a mode, *bloomin' hearts, botanical builder
Embossing Folders: basics 3D
Ink: mossy meadow
Stamps: sweetly scripted
Accessories: foam adhesive sheets, rhinestones, *scalloped polkadot ribbon
 
* = no longer available
  1. Start with a base card 14.5 x 21 scored at 10.5, layer one 10.1 x 14.1, layer two 9.7 x 13.7, heart 10 x10, numbers 4 x 4.5, foam 4 x 4.5, scraps for flowers and leaves
  2. stamp the happy birthday towards the bottom of the second layer
  3. dry emboss this layer and attach the ribbon
  4. adhere this layer to the first layer and then to the base card using liquid glue
  5. die cut all the pieces, (adhere the foam sheet to the card stock for the numbers before cutting)
  6. stamp the 'just for you' inside the banner
  7. attach the heart and sentient using dimensional pads behind each of the flowers
  8. attach the numbers to the heart
  9. give the flowers dimension using an embossing tool
  10. adhere the leaves to the larger flower, then adhere both flowers to the base card using liquid glue
  11. add the rhinestones to the centre of the flowers
Hope you liked today's card. If you would like more information on how to make it, please don't hesitate to contact me, I'd love to hear from you.

If you wish to buy any of the items used, go to contacting me at the top of the page for details of how to order.

Will be back again soon with more cards, in the meantime take care and have a great day.
Annette 😊 

Thursday, September 5, 2024

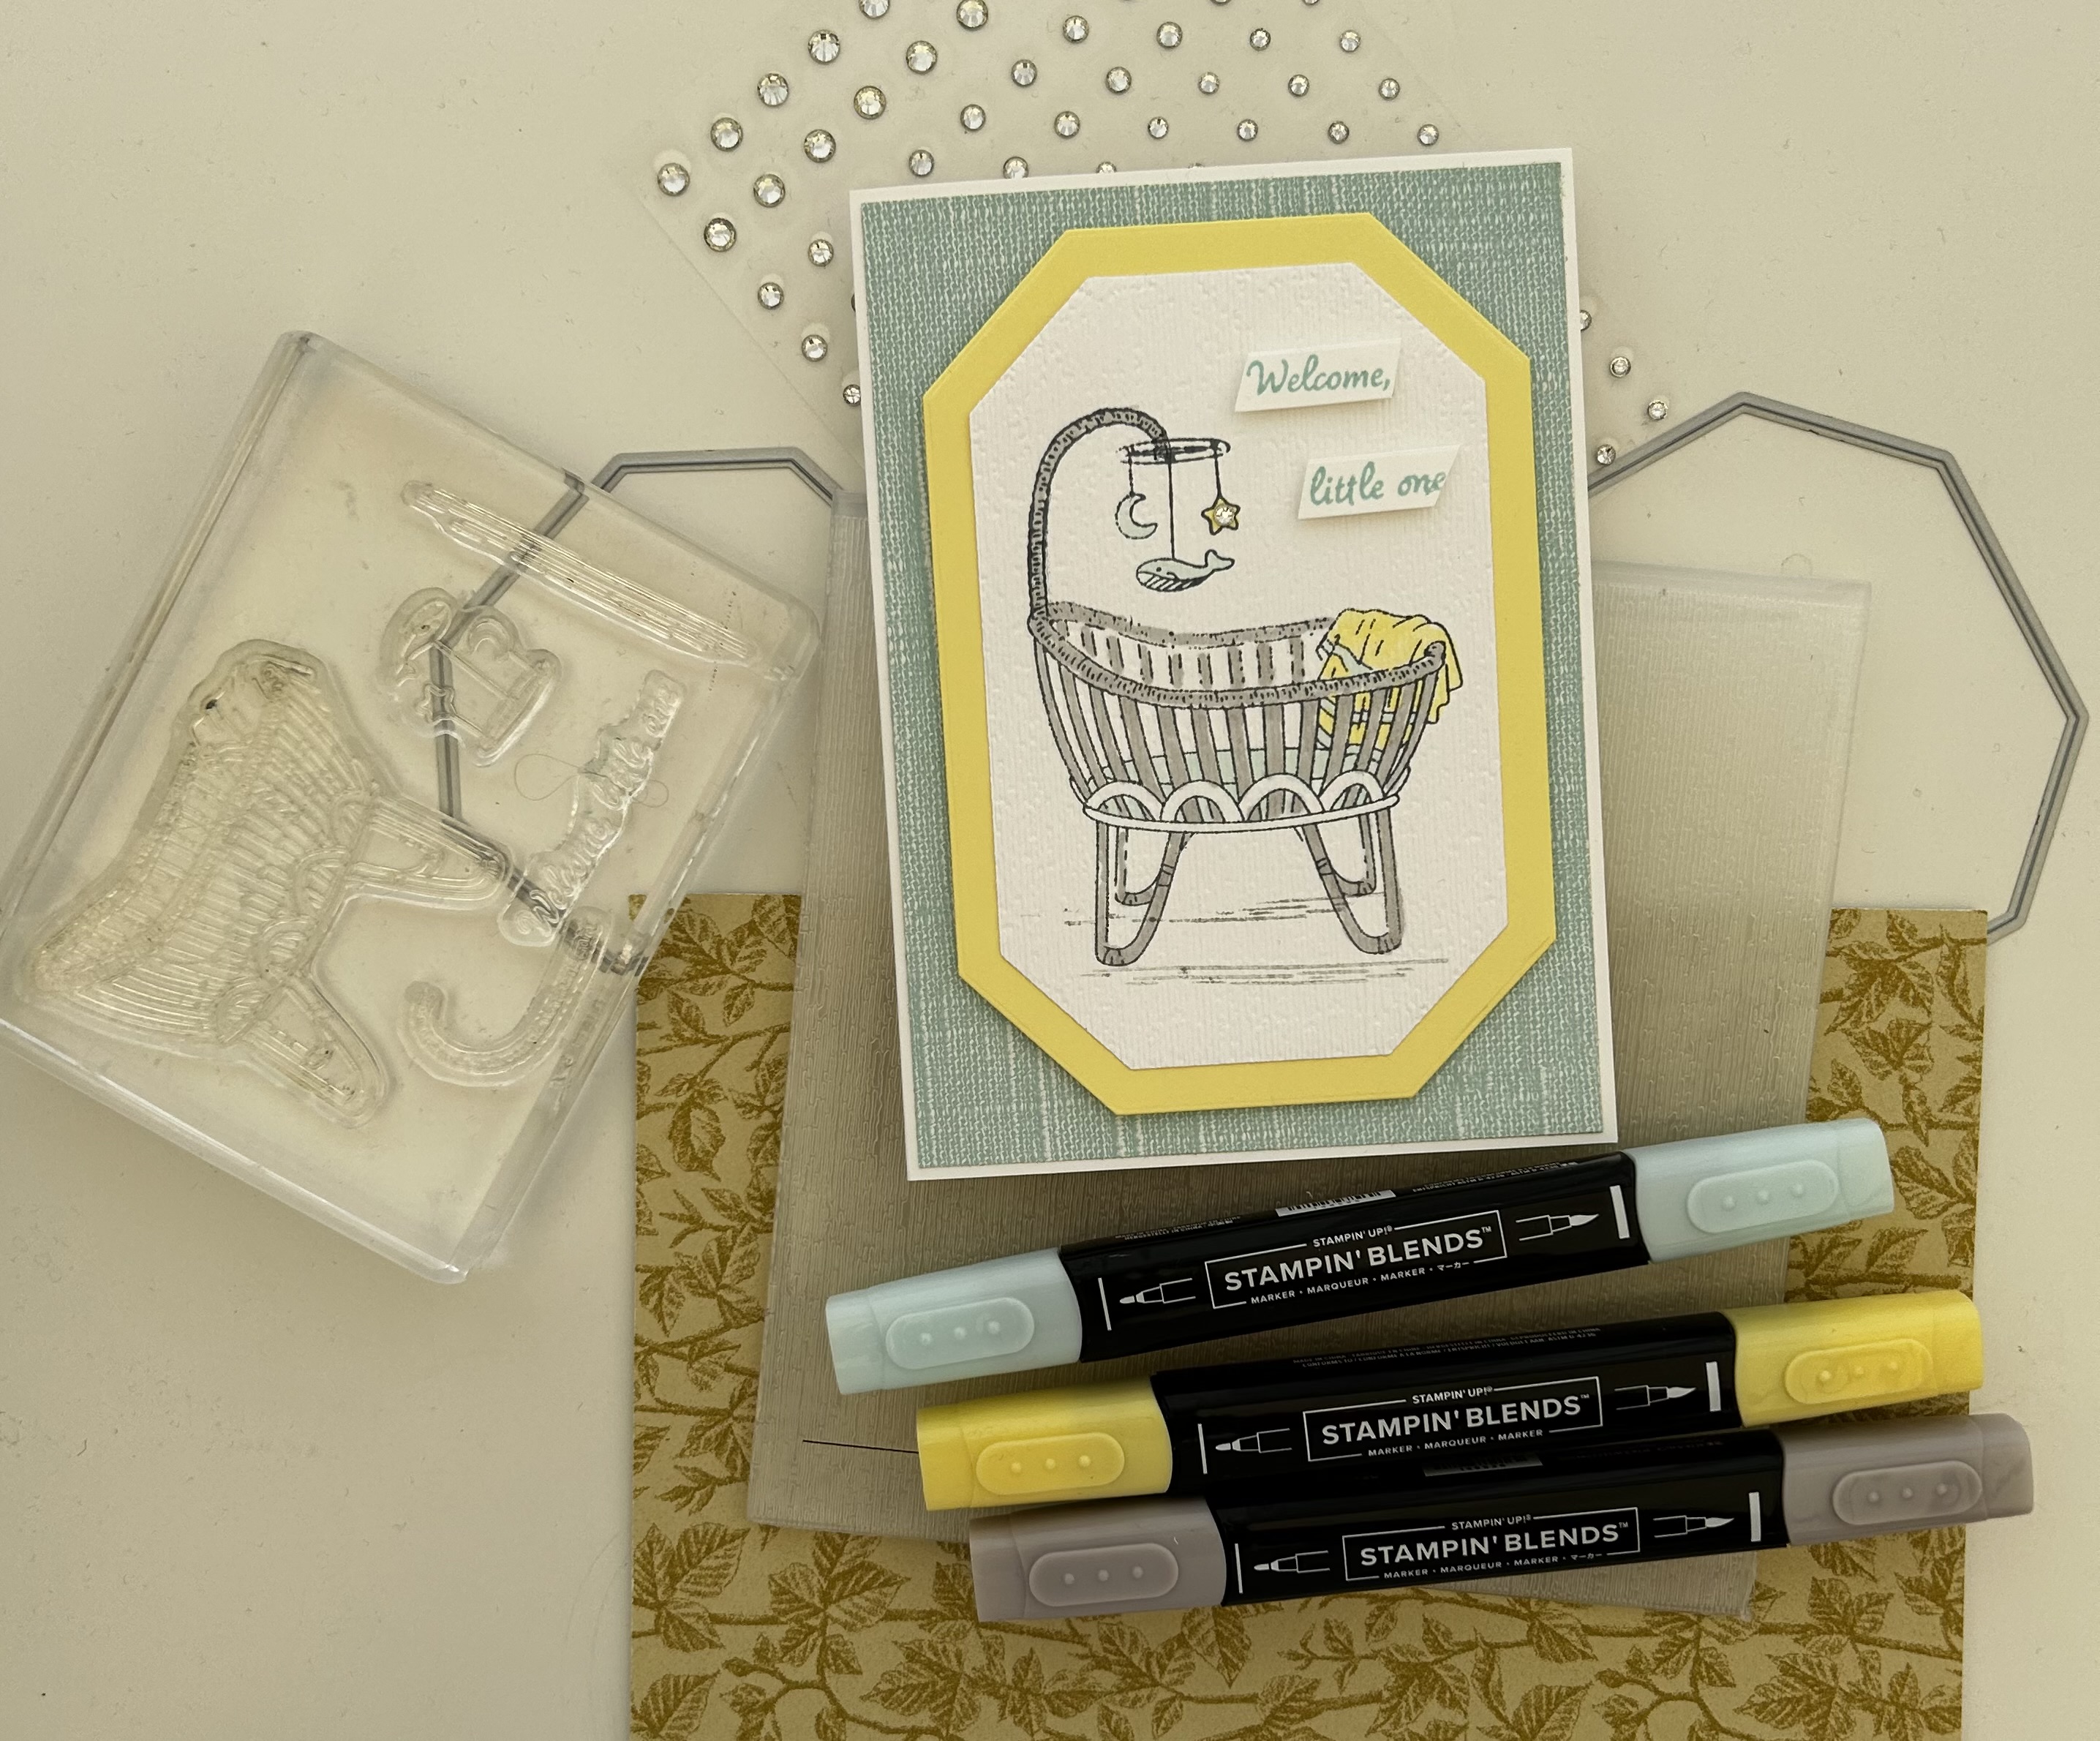
Welcome New Baby

Welcome to my blog

and  thank you for joining me today!

Welcoming a new Baby


Intermediate: colouring with alcohol ink, die cutting, dry embossing, layering, stamping

Materials required for this card are:

Card Stock: basic white, lemon lolly
Designer Series Paper: *softly stippled
Dies: countryside corners, (5,6)
Embossing Folders: *subtle 3D
Ink: momento tuxedo black, pool party, smoky slate (stamped off)
Stampin' Blends: gray granite, lemon lolly, pool party
Stamps: *cradled in love, trucking along
Accessories: rhinestone basics
 
* = no longer available, when using layering dies (1) is the smallest

  1. Start with a base card 14.5 x 21 scored at 10.5, dsp 14.1 x 10.1, rectangles 14 x 9.5, 12.5 x 8
  2. adhere the dsp using liquid glue 
  3. die cut the rectangles
  4. stamp the images and sentiment
  5. colour the images using the blends
  6. emboss the smaller rectangle
  7. adhere the 2 rectangles together using liquid glue
  8. attach the rectangles and sentiment to the base card using dimensional tabs
  9. add the rhinestone
Hope you liked today's card. If you would like more information on how to make it, please don't hesitate to contact me, I'd love to hear from you.

If you wish to buy any of the items used, go to contacting me at the top of the page for details of how to order.

Will be back again soon with more cards, in the meantime take care and have a great day.

Annette 😊  
Tuesday, April 30, 2024

Heartfelt Hexagon meets Stylish Shapes

 Welcome to my blog

and  thank you for joining me today!

Happy birthday Georgia


Quick & Easy - dry embossing, layering, punching, stamping

Materials required for this card are:

Bundles: heartfelt hexagon
Card Stock: basic white, blueberry bushel
Designer Series Paper: bright & beautiful
Dies: stylish shapes (2)
Embossing Folders: timeworn type 3D
Ink: berry burst, blueberry bushel
Stampin' Blends: berry burst 
Accessories: cotton combo ribbon, basic rhinestones
 
When using layering dies (1) is the smallest

My base card was from my old stash
  1. Start with a base card 12 x 24 scored at 12, first layer 11 x 11, backing for 2nd layer 10 x 10, dsp 5 x 10, basic white 5 x 10, pieces of white & blue for die cutting and punching
  2. The first sentiment is computer generated changing the colour to #B74984
  3. die cut the sentiment and put to one side
  4. colour 3 rhinestones using the alcohol blend marker and again put to one side
  5. adhere the second layer to the base card using liquid glue
  6. emboss the white rectangle using the folder, and adhere to the backing piece at the bottom using liquid glue
  7. adhere the dsp rectangle above the embossed one
  8. attach the ribbon across the middle of this layer securing it at the back with tape
  9. slide another piece of the ribbon under the first and tie a knot to create a faux knot bow 
  10. adhere this layer to the card
  11. stamp the second sentiment then punch it out using the hexagon, along with a blue hexagon
  12. adhere the 2 hexagons together using liquid glue and attach to the card using dimension pads
  13. add the die cut sentiment again using dimensional pads
  14. add the rhinestones
Hope you liked today's card. If you would like more information on how to make it, please don't hesitate to contact me, I'd love to hear from you.

If you wish to buy any of the items used, go to contacting me at the top of the page for details of how to order.

Will be back again soon with more cards, in the meantime take care and have a great day.
Annette 😊 

Wednesday, April 24, 2024

Painted Lavender meets Best Family Ever

 Welcome to my blog

and  thank you for joining me today!

Happy Birthday Pauline


Intermediate - die cutting, double dry embossing, layering, stamping

Materials required for this card are:

Bundle: painted lavender
Card Stock: basic white, gorgeous grape
Embossing Folders: strippes & splatters 3D, *subtle 3D
Ink: gorgeous grape, highland heather, old olive
Stamps: best family ever
Accessories: basic rhinestones, linen thread
 
* = no longer available, when using layering dies (1) is the smallest

  1. Start with a base card 14.5 x 21 scored at 10.5, white layer 10 x 14, off cuts of  white for stamping 
  2. stamp the leaves on the left side of the white panel, once full strength and 2 stamp offs either side
  3. emboss the white panel using both embossing folders, by only doing to half way for each folder, then adhere to the base card using liquid glue
  4. stamp the elements, 3 flower heads (2 gorgeous grape, one stamped off, 1 highland heather, 1 butterflies stamped off twice, 3 stems, 1 sentiment)
  5. die cut the flower pieces and butterflies
  6. layer the 3 stems onto the card using liquid glue
  7. attach the flower heads and butterfies using dimensional pads
  8. add the rhinestone and bow (use a glue dot to attach the bow)
Hope you liked today's card. If you would like more information on how to make it, please don't hesitate to contact me, I'd love to hear from you.

If you wish to buy any of the items used, go to contacting me at the top of the page for details of how to order.

Will be back again soon with more cards, in the meantime take care and have a great day.
Annette 😊 

Monday, January 29, 2024

Sentimental Park meets Mini Alphabet

  Welcome to my blog

and  thank you for joining me today!

Good luck in your new home Donna


Intermediate easy - die cutting, dry embossing, fussy cutting, layering, stamping

Materials required for this card are:

Card Stock: basic white, misty moonlight
Designer Series Paper: countryside inn
Dies: countryside corners (6,7), *home together, mini alphabet
Embossing Folders: exposed brick 3D
Ink: misty moonlight
Stamps: sentimental park
Accessories: basic rhinestones, *well suited twine
 * = no longer available, when using layering dies (1) is the smallest

  1. Start with a base card 29.6 x 10.5 scored at 14.8, white card matt 14.8 x 10.5, dsp 12 x 8, misty moonlight 13.5 x 9, scrap basic white and misty moonlight for extra die cutting
  2. dry emboss the white matt and adhere to the base card
  3. die cut all the pieces - 2 rectangles, letters, house, star
  4. adhere the 2 rectangles together using liquid glue, then adhere to the base card again using liquid glue
  5. stamp the sentiments and fussy cut round them 
  6. arrange all the pieces onto the rectangles and attach using dimensional pads
  7. wrap som twine around the spine of the card and tie with a bow, then add a rhinestone the the star.
Hope you liked today's card. If you would like more information on how to make it, please don't hesitate to contact me, I'd love to hear from you.

If you wish to buy any of the items used, go to contacting me at the top of the page for details of how to order.

Will be back again soon with more cards, in the meantime take care and have a great day.
Annette 😊 

Wednesday, November 8, 2023

Soft & Subtle Petal Park

  Welcome to my blog

and  thank you for joining me today!

Happy Birthday Gladys


I must have been in an aggressive mood today as I only used punches 😊
With a little stamping, layering and ribbon

Materials required for this card are:

Card Stock: basic white, lemon lolly
Designer Series Paper: bright & beautiful
Embossing Folders: *subtle, timeworn type 3D
Ink: bubble bath, lemon lolly, old olive
Punches: bough, 2⅜ circle, petal park builder
Stamp Sets: circle sayings, layering leaves, petal park
Accessories: basic rhinestones, sheer ribbon

  1. Start with a base card 14.5 x 21 scored at 10.5 - lemon lolly 14.1 x 10.1 - basic white 13.7 x 9.7
  2. adhere the lemon lolly layer to the base card using liquid glue
  3. emboss the basic white layer using the 3D folder
  4. cut the dsp 4.7 x 9.7 and adhere to the bottom of the white layer using liquid glue
  5. wrap the ribbon across the top of the dsp and attach at the back using tear & tape
  6. attach this layer to the base card using dimensional pads
  7. stamp the sentiment, now stamp the flowers and leaves using 2 step stamping with filler stamp stamped off once for the flowers and twice for the leaves
  8. Punch out all the pieces and emboss them using the subtle folder 
  9. attach the sentiment using dimensional tabs, the yellow and larger pink flower using dimensional tabs and the rest using glue dots
  10. add the rhinestones, make a bow and attach with glue dots
Hope you liked today's card. If you would like more information on how to make it, please don't hesitate to contact me, I'd love to hear from you.

If you wish to buy any of the items used, go to contacting me at the top of the page for details on how to order.

Will be back again soon with more cards, in the meantime take care and have a great day.

Annette 😘 

Thursday, October 26, 2023

Countryside Corners and more

   Welcome to my blog

and  thank you for joining me today!

Happy Birthday Jenny


die cutting, dry embossing, layering, stamping

So far I'm liking the new countryside corners bundle, again trying to use up some of my retired stash.
I'm about to change up my crafting space, so sorting everything out at the moment, moving the retired stash to a different location in the house and just keeping the current stash in the craft space.

Materials required for this card are:

Card Stock: basic white, moody mauve, soft sea foam
Designer Series Paper: hello irresistible
Dies: cheerful daisies, countryside corners (5,6), deckled rectangles (8)
Embossing Folders: exposed brick 3D
Ink: moody mauve
Stamp Sets: beautiful balloons, cheerful daisies, countryside corners
Accessories: *adhisived backed sequins, basic rhinestones
 * = no longer available, when using layering dies (1) is the smallest
  1. Start with a base card 14 x 21 scored at 10.5
  2. stamp the 2 flower centres
  3. die cut all the pieces, 3 frames, 2 flowers + centres, 3 leaves
  4. stamp the sentiment on the smaller frame
  5. emboss the background and smaller frame
  6. adhere the background and larger frame to the base card using liquid glue
  7. attach the small frame using dimensional pads
  8. adhere the 2 flowers and leaves using liquid glue, attach the 2 flower centres using glue dot
  9. attach the sequins and rhinestones 
Hope you liked today's card. If you would like more information on how to make it, please don't hesitate to contact me, I'd love to hear from you.

If you wish to buy any of the items used, go to contacting me at the top of the page for details on how to order.

Will be back again soon with more cards, in the meantime take care and have a great day.
Annette 😘

Saturday, September 2, 2023

Go To Greetings meets Nested Essentials

   Welcome to my blog

and  thank you for joining me today!

Sympathy card for Peggy

After losing my Father 4 weeks ago at the grand old age of 91, one of his close friends and neighbour has also lost her son of only 49. My heart goes out to her.


Dry and heat embossing, die cutting and stamping

Materials required for this card are:

Card Stock: basic white, pool party
Designer Series Paper: *simply marbleous
Dies: meadow, nested essentials (3)
Embossing Folders: exposed brick 3D, *subtle 3D (this is my go to, for a linen effect)
Ink: pool party, versamark
Punches: banner picka a punch
Stamp Sets: go to greetings
Accessories: bakers twine essentials, basic rhinestones
 * = no longer available, when using layering dies (1) is the smallest
  1. Start with a base card 14.5 x 21 scored at 10.5, white panel 10 x 14 and a strip of white card 7.5 x 1.2 (for sentiment)
  2. dry emboss the white panel using the exposed brick folder
  3. Ink up the sentiment in versamark and pool party in that order before stamping, then cover in embossing powder before using a heat gun
  4. Use the punch to flag each end of the sentiment
  5. die cut all the elements needed (4 in all)
  6. adhere the dsp rectangle to the white panel using liquid glue
  7. emboss the flowers, sentiment and butterfly using the subtle 3D folder
  8. adhere the flowers using liquid glue
  9. wrap the bakers twine 3 times around the white panel toward the bottom
  10. attach the sentiment using dimensional pads
  11. adhere the butterfly using liquid glue
  12. add the rhinestones.
Hope you liked today's card. If you would like more information on how to make it, please don't hesitate to contact me, I'd love to hear from you.

If you wish to buy any of the items used, go to contacting me at the top of the page for details on how to order.

Will be back again soon with more cards, in the meantime take care and have a great day.
Annette 😘

Friday, April 21, 2023

Beautifully Happy

  Welcome to my blog

and  thank you for joining me today!

Happy Birthday Peg


Something different I've used a fun fold layout. Reasonably quick and easy to make.

Materials required for this card are:

Card Stock: basic white, soft succulent
Designer Series Paper: *favoured flowers
Dies: deckled rectangles (5,6)
Ink: fresh freesia soft succulent
Stampin' Up Blends: fresh freesia
Stamp Sets: beautifully happy
Accessories: basic rhinestones, open weave ribbon 
* = no longer available, when using layering dies (1) is the smallest

  1. Base card 15 x 15.8 scored at 10.5 (along the 15.8 edge)
  2. Dsp 14.8 x 5, adhere to the narrow panel using wet glue
  3. die cut the two deckled rectangles
  4. stamp the image using soft succulent and fresh freesia onto the white panel
  5. wrap the ribbon around the bottom of this panel and tie with a knot
  6. adhere both panels together using wet glue
  7. on a strip of basic white stamp the two sentiments, then trim them down
  8. attach the rectangles to the base card (left side only) using dimensional's
  9. now attach the two sentiments, one at the top and one at the bottom again using dimensional's 
  10. colour a basic rhinestone and place it in the centre of the full flower (l added my rhinestone after the photograph taken and it looks so much better)
Hope you liked today's card. If you would like more information on how to make it, please don't hesitate to contact me, I'd love to hear from you.

If you wish to buy any of the items used, go to contacting me at the top of the page for details on how to order.

Will be back again soon with more cards, in the meantime take care and have a great day.
Annette 😘

Saturday, February 25, 2023

Framed Florets - birthday card

  Welcome to my blog

and  thank you for joining me today!

Happy birthday Ruth


Trying this set for the first time, and it's really nice!

Materials required for this card are:

Card Stock: basic white, evening evergreen, fresh freesia, polished pink, shimmery white
Designer Series Paper: lights aglow
Dies: framed florets
Ink: evening evergreen, memento black
Stampin' Up Blends: petal pink, polished pink
Stamp Sets: framed florets
Accessories: basic rhinestones, open weave ribbon, shimmer paint, spritzer
  1. card base 14.5 x 21 scored at 10.5, first layer 14.1 x 10.1, dsp 13.7 x 9.7
  2. adhere first layer to dsp using wet glue, wrap ribbon around and add the knot
  3. adhere these two layers to the base card
  4. stamp the 3 flowers and colour using the blends
  5. die cut all the pieces required, the 2 white leaves are cut using the shimmery white cs.
  6. stamp the sentiment on the large white oval
  7. Adhere the inner oval using wet glue
  8. position the die pieces and adhere using wet glue
  9. add the rhinestones 
  10. spritz the card with the shimmer paint
 Hope you liked today's card. If you would like more information on how to make it, please don't hesitate to contact me, I'd love to hear from you.

If you wish to buy any of the items used, go to contacting me at the top of the page for details on how to order.

Will be back again soon with more cards, in the meantime take care and have a great day.
Annette 😘

Tuesday, January 24, 2023

Butterfly Wings meets Go to Greetings

  Welcome to my blog

and  thank you for joining me today!

Happy Birthday Ashlie


Used a layout from Pinterest, using different products.

Materials required for this card are:

Card Stock: basic white, merry mertot
Designer Series Paper: *hydrangea hill mercury glass
Dies: brilliant wings, potted succulents
Ink: merry merlot
Punches: double oval
Stamp Sets: go to greetings
Accessories: metallic mesh ribbon, rhinestone basics

 * = no longer available
  1. base card 14.2 x 21 scored at 10.5, mercury glass 10.2 x 13.3 white matt 10.5 x 13.8
  2. die cut the white matt using the plate from potted succulent dies
  3. adhere the white die cut matt to the mercury glass using wet glue and trim round the edges
  4. wrap the mesh ribbon around the layered matts and tie with a bow, then adhere to base card using a strong adhesive tape
  5. die cut the intricate butterfly and the corresponding full butterfly, then adhere the two together by the body using wet glue
  6. stamp the sentiment and punch it out, then punch the corresponding scallop oval and adhere the two together using wet glue
  7. add a couple of strips of the mesh across the top of the card diagonally using adhesive tape, then attach the butterfly also using adhesive tape
  8. add the sentiment to the right of the bow using dimensionals
  9. add the rhinestones
Hope you liked today's card. If you would like more information on how to make it, please don't hesitate to contact me, I'd love to hear from you.

If you wish to buy any of the items used, go to contacting me at the top of the page for details on how to order.

Will be back again soon with more cards, in the meantime take care and have a great day.
Annette 😘

Sunday, October 2, 2022

bottled happiness meets Deckled Rectangles

  Welcome to my blog

and  thank you for joining me today!

Happy Birthday Karine


Just love  these colours together, stamping, die cutting, a little fussy cutting, add gems and a bow. Jobs done!
Just like Jackie said it would be. I always head for Jackie Bolhuis blog 'Klompen stampers' for quick and easy cards.


  1. base card 14.5 x 10.5, layer one 13.5 x 9.5, layer two 13 x 9
  2. die cut and emboss the deckled rectangle
  3. carryout all the stamping 
  4. die cut the sentiment 
  5. fussy cut the flowers and bottle
  6. adhere the first 3 layers using wet glue
  7. adhere the flowers, bottle and sentiment using dimensionals
  8. adhere the bow using a glue dot
  9. add gems to the flower centres
Materials required for this card are:

Card Stock: basic white, rich razzleberry, soft sea foam
Designer Series Paper: *pansy petals
Dies: deckled rectangles (6), sentiment silhouettes
Embossing Folders: painted texture
Ink: fresh freesia, rich razzleberry, soft sea foam 
Stamp Sets: bottled happiness, charming sentiments
Accessories: basic rhinestones, open weave ribbon
* = no longer available, when using layering dies (1) is the smallest.

Hope you liked today's card. If you would like more information on how to make it, please don't hesitate to contact me, I'd love to hear from you.

If you wish to buy any of the items used, go to contacting me at the top of the page for details on how to order.

Will be back again soon with more cards, in the meantime take care and have a great day.
Annette 😘

Wednesday, August 24, 2022

Happiness abounds meets Artistic Mix Masks with Double Embossing

  Welcome to my blog

and  thank you for joining me today!

Happy Birthday Donna


A quick and easy card to make, basic card base with the layer being 2cm smaller all round or for imperial ¼" all round.

Base card + layers

Materials required for this card are:

Card Stock: basic white, gorgeous grape
Embossing Folders: timeworn type, 
Ink: gorgeous grape, highland heather
Punches: *½" circle, lovely label, medium daisy
Stamp Sets: happiness abounds
Accessories: artistic mix decorative masks, basic rhinestones, blending brushes, *grosgrain ribbon
 
* = no longer available
  1. On the first layer using the flower mask blend the darker colour then swap to the second mask and lightly blend using the lighter colour.
  2. Now dry emboss this layer using the timeworn type 3D folder.
  3. Punch out 2 medium daisies and adhere together. Add a *½" punched circle in the darker colour.
  4. wrap some ribbon around the layer towards the bottom and adhere to the base card, then adhere the daisy where you want it.
  5. Stamp the sentiment on a ½" strip of card stock and use the lovely label punch to enhance the sides.
  6. Adhere sentiment across the ribbon and add rhinestones.

Hope you liked today's card. If you would like more information on how to make it, please don't hesitate to contact me, I'd love to hear from you.

If you wish to buy any of the items used, go to contacting me at the top of the page for details on how to order.

Will be back again soon with more cards, in the meantime take care and have a great day.
Annette 😘

Wednesday, June 29, 2022

Love & Happiness Anniversary

  Welcome to my blog

and  thank you for joining me today!

Happy 3rd Anniversary to Jenny & Leigh


Trying to use up some older stash. Notice the 3 flowers for the 3 years. I also used the wedding colours for this card so hopefully they will like it.

Materials required for this card are:

Card Stock: basic white thick, gorgeous grape, highland heather
Designer Series Paper: simply marbles
Dies: layering circles (5), *home together , scalloped contours (4)
Embossing Folders: stripes & splatters
Ink: highland heather
Punches: * bitty blooms
Stamp Sets: *love & happiness
Accessories: basic rhinestones, *gold hoops, *grosgrain ribbon
 
* = no longer available, when using layering dies (1) is the smallest

Hope you liked today's card. If you would like more information on how to make it, please don't hesitate to contact me, I'd love to hear from you.

If you wish to buy any of the items used, go to contacting me at the top of the page for details on how to order.

Will be back again soon with more cards, in the meantime take care and have a great day.
Annette 😘

Sunday, April 17, 2022

Arrange a Wreath Easter

  Welcome to my blog

and  thank you for joining me today!

Happy Easter Sheilah


This is the first of two cards for today, I've used the exiting In Colors and products no longer available.

This card was originally created by 'Kim Singdahlsen' and I just tweaked it a little.

Start by doing all the die cutting, stamp the sentiment, emboss the background, add the ribbon, tie the knot, place the elements, add the rhinestones

Materials required for this card are:

Card Stock: basic white, bumble bee, just jade, magenta madness, 
misty moonlight, shaded spruce                                                                                                                       
Dies: layering circles (6)P (for sentiment) *wreath builder
Embossing Folders: brick & mortar
Ink: bumble bee
Stamp Sets: *arrange a wreath
Accessories: basic rhinestones, *in color ribbon 2020
 
* = no longer available, when using layering dies (1) is the smallest, P = plain, 
S = scalloped

Hope you liked today's card. If you would like more information on how to make it, please don't hesitate to contact me, I'd love to hear from you.

If you wish to buy any of the items used, go to contacting me at the top of the page for details on how to order.

Will be back again soon with more cards, in the meantime take care and have a great day.
Annette 😘

Saturday, March 26, 2022

Every Chapter meets Scalloped Contours

    Thank you for joining me today!

Happiest of Birthday's to a dear friend

we met in 2006 on a coach touring holiday in America and just clicked as we have similar interests such as reading, we each buy books and swap them every so often and both love card making obviously. Luckily enough our other half's clicked too. Hence a beautiful friendship developed while we traveled through the  southern states. Once back home we visit each other regularly (covid permitting) and have the occasional holiday here at home. 


Thought she'd like this card, it was quite quick and easy to make.

Materials required for this card are:

Card Stock: basic white, pool party
Designer Vellum: *sheer perfection
Dies: scalloped contours (5)
Embossing Folders: *subtle 3D
Ink: memento black
Stampin' Blends: color lifter, fresh freesia, night of navy, pale papaya, petal pink, pool party real red, seaside spray, so saffron, soft succulent
Stamp Sets: Every Chapter
Accessories: basic rhinestones
 
* = no longer available, when using layering dies (1) is the smallest

Hope you liked today's card. If you would like more information on how to make it, please don't hesitate to contact me, I'd love to hear from you.

If you wish to buy any of the items used, go to contacting me at the top of the page for details on how to order.

Will be back again soon with more cards, in the meantime take care and have a great day.
Annette 😘

Delicate Whispers and more

Welcome to my blog and    t hank you for joining me today! Happy Anniversary to Sylvia & Bill Intermediate level - blending with a brush...