Showing posts with label embossing powder. Show all posts

Tuesday, February 25, 2025

Rooted in Nature meets Timber 3D


 Welcome to my blog

and  thank you for joining me today!

Happy Birthday Richard


Intermediate level - die cutting, dry & heat embossing, layering, stamping
Cased from Kate Bolt - inkstampshare.ink

Materials required for this card are:

Card Stock: basic white, pretty peacock, vellum
Designer Series Paper: *come to gather
Dies: *nature's roots
Embossing Folders: timber 3D
Embossing powder: clear, copper, silver
Ink: versaMark
Stamps: *perennial birthday, *rooted in nature
Accessories: *copper trim
 
* = no longer available
  1. Start with a base card 14.5 x 21 scored at 10.5, white layer 14 x 10, dsp layer 13.5 x 9.5, vellum layers 3 x 9.5 (sentiment), 7 x 13 leaves
  2. dry emboss the dsp layer and adhere to the the white layer using liquid glue
  3. adhere these to layers to the base card using liquid glue
  4. stamp the sentiment, cover with silver powder and heat emboss
  5. stamp the 2 sliver leaves and heat emboss
  6. stamp the 2 copper leaves and heat emboss
  7. for the green leaf load the stamp with clear versaMark then the pretty peacock  before stamping and heat emboss with clear powder
  8. die cut all the leaves
  9. arrange leaves and adhere to the base card using liquid glue
  10. adhere the sentiment using liquid glue
  11. make the copper trim bow and attach using a glue dot
Hope you liked today's card. If you would like more information on how to make it, please don't hesitate to contact me, I'd love to hear from you.

If you wish to buy any of the items used, go to contacting me at the top of the page for details of how to order.

Will be back again soon with more cards, in the meantime take care and have a great day.
Annette 😊

Tuesday, April 23, 2024

Cheerful Daisies meets Detailed Dogwood

Welcome to my blog

and  thank you for joining me today!

Happy birthday Heather


Avid - colouring, die cutting, dry & heat embossing, layering

Materials required for this card are:

Bundles: cheerful daisies
Card Stock: basic white, bubble bath, vellum
Dies: deckled rectangles (7)
Embossing Folders: *softly sophisticated
Embossing Powder: silver, white
Ink: versamark
Stamps: *detailed dogwood
Stampin Blends: bubble bath, flirty flamingo, lemon lime twist
Accessories: *gingham gala sequins, simply elegant trim
 
* = no longer available, when using layering dies (1) is the smallest
  1. Start with a base card 14.5 x 21 scored at 10.5, white 10 x 14, vellum 9 x 11.5, bubble bath off cut for sentiment
  2. dry emboss the white panel and adhere to the base card using liquid glue
  3. die cut the vellum rectangle and stamp the image using versaMark, then add the silver embossing powder and heat
  4. colour the image on the reverse side using the blends
  5. add the 3 sequins, then attach glue dots behind the sequins along with one where your sentiment is going to go on the reverse side and attach to the base card
  6. stamp the sentiment in versaMark, add white embossing powder and heat
  7. die cut the sentiment and attach the trim on the back before attaching it to the base card using dimensional pads
Hope you liked today's card. If you would like more information on how to make it, please don't hesitate to contact me, I'd love to hear from you.

If you wish to buy any of the items used, go to contacting me at the top of the page for details of how to order.

Will be back again soon with more cards, in the meantime take care and have a great day.

Annette 😊  

Sunday, June 20, 2021

Pretty Perennials final days!!

 Thank you for joining me today!

Thought I'd get out my watercolor pencils for a change and this is what I came up with, one that's bright, fun and funky! Need to practice more with the watercoloring.


There won't be many more of these cards as Sue and her family are moving soon 😞

Materials required for this card are:

Card Stock: basic white
Designer Series Paper: hand penned
Dies: floral gallery, scalloped contours (3)
Embossing Powder: white
Ink: memento tuxedo black, versamark
Ribbon: *mint macaron sheer
Stamp Sets: pretty perennials
Watercolor Pencils: bermuda bay, crushed curry, fairy flamingo, granny apple green, real red

Accessories: note cards, playing with patterns resin dots, water painters
* = no longer available, when using layering dies (1) is the smallest

Hope you liked today's card. If you would like more information on how to make it, please don't hesitate to contact me, I'd love to hear from you.

If you wish to buy any of the items used, go to contacting me at the top of the page for details on how to order.

Will be back again soon with more cards, in the meantime take care and have a great day.
Annette 😘

Tuesday, April 14, 2020

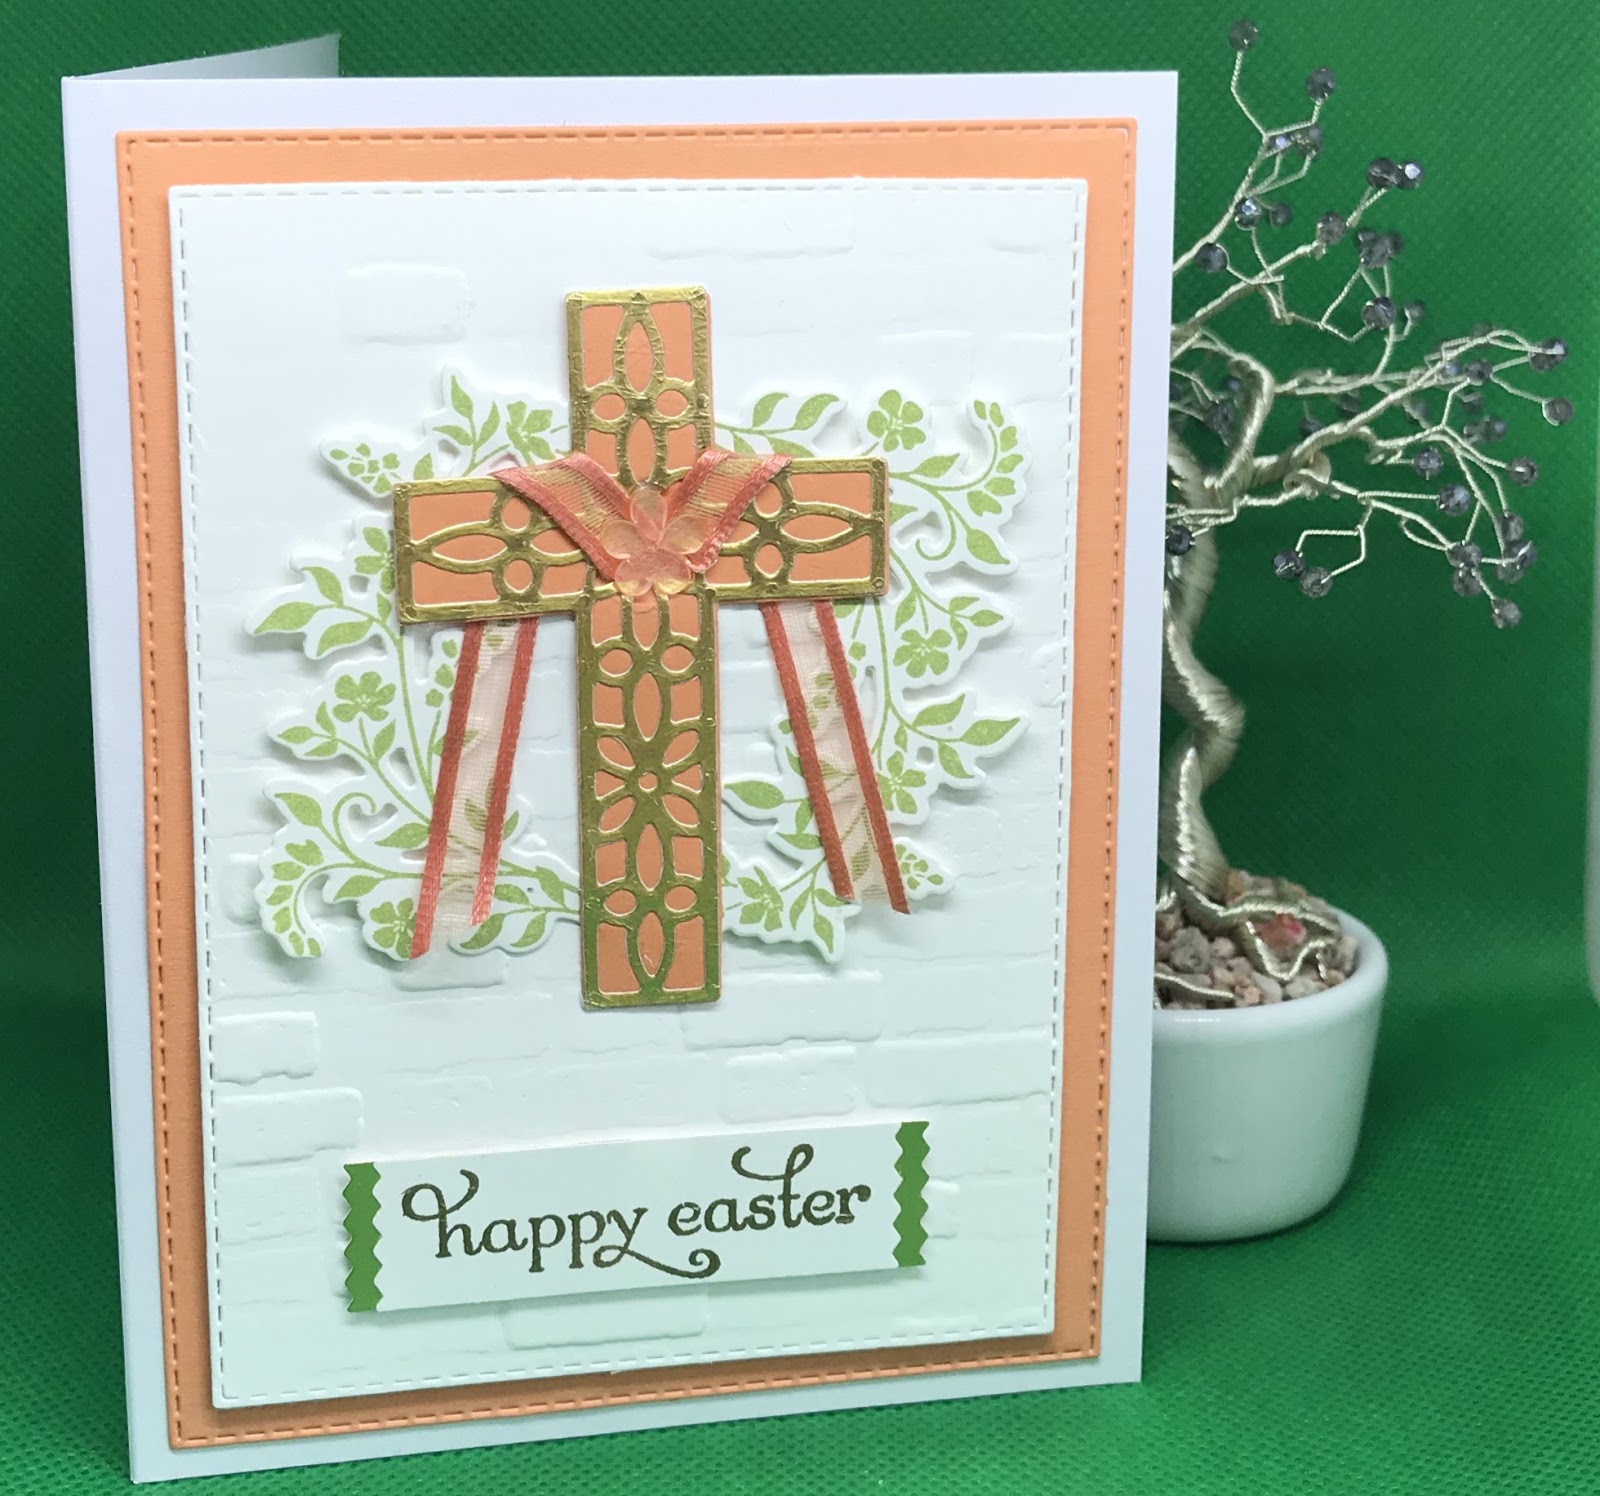
Cross of Hope meets Brick & Mortar 3D

Hi folks, welcome to my haven in a hectic world!

Happy Easter Sheilah!

I normally only do one Easter card each year for my Aunt, but from this year there will be two.
Liked the look of this card even though I dropped a booboo!

All measurements are in centimetres.

(cs) = card stock, (ef) = embossing folder, (ep) embossing powder, (r) = retired, (ss) stamp set

Grapefruit Grove 2 pieces,  9.5 x 13. 5 (1st layer), 5.5 x 7.5 (cross),
Gold foil 2 pieces, 5.5 x 2 (sentiment backing), 5.5 x 7.5 (cross),
Whisper White 4 pieces, 13.8 x 21 scored at 10.5 (card base), 9 x 12.5 (2nd layer), pieces, 5.5 x 2 (sentiment). 5.5 x 16 (2 foliage)
When using layering dies (1) is the smallest.
Colours are Grapefruit Grove, Gold, Pear Pizzazz.
  • With the stitched rectangles dies, die cut the grapefruit grove (cs) using the (8) wide frame, and the whisper white (cs) using the (7) wide frame.
  • Adhere the grapefruit grove rectangle to the base card using liquid glue.
  • Next, emboss the whisper white rectangle using the brick& mortar (ef), (this is what I forgot to do, hence my frosted flower was squashed). Now attach this rectangle to the card base using dimensional pads.
  • With the larger strip of whisper white (cs) stamp the foliage from the hold on to hope (ss) twice and die cut both of these using the cross of hope dies.
  • On the small piece of whisper white (cs) stamp the happy easter from the (r) delightful dozen (ss) using versaMark, then heat emboss using gold (ep).
  • Using the washi label punch, punch out the sentiment, then punch out a second one using the gold foil. Cut this one in half and adhere behind the sentiment leaving a slight edge on either side using liquid glue.
  • Using the cross of hope dies, die cut the 2 crosses, lattice cross in gold foil and grapefruit grove cross solid.
  • Adhere the gold cross to the solid cross using liquid glue.
  • Wrap a piece of the (r) organza ribbon around the cross using a glue dot at the front to adhere it and also at the back on either side to hold the ribbon in place.
  • Add one of the frosted flower embellishments over the ribbon to finish off the front of the cross.
  • Adhere the very top and the very bottom of the foliage behind each side of the cross to make a wreath.
  • Attach to the card base, along with the sentiment using dimensional pads.
  • I felt it needed a little something extra after completing it and writing the blog, so added some random (r) gold sequins.
Will be back again soon with more cards.
Annette X

Thursday, January 2, 2020

Snowman Season & more

Hello and welcome to my little haven, hope you're having a good day!

This card is for one of my Grand Daughters who is very girlie.
All measurements are in centimetres
(cs) = card stock, (r) = retired

Card stock: 3 pieces of Whisper White 21 x 14.5 (card base) scored at 10.5, 10 x 14 (first mat), 8 x 2 (sentiment), Seaside Spray 7 x 3.5 (globe base)
Colours:  Pool Party, Seaside Spray, Smoky Slate, VersaMark
Stampin' Blends: Balmy Blue, Gray Granite, Pumpkin Pie

  • Start with the first mat and die cut the dome leaving about 1.5 cm from each side.
  • Place the mat on the base card and trace the dome shape onto the card base using a light pencil.
  • Now emboss the mat with the the brick & mortar folder then add the ribbon and lay to one side for now.
  • Stamp the snowman in memento ink, and the globe using 2nd generation stamping in smoky slate. Then erase the pencil marks.
  • Colour the snowman using the stampin' blends. Then sponge lightly with pool party round the globe edges.
  • Stamp the globe base pattern on the seaside spray (cs) in versamark and cover it with the silver embossing powder then heat set it.
  • Stamp the sentiment in veramark & seaside spray then cover it with clear embossing powder and heat set it. Die cut this with the label from the petals & more dies.
  • Remove the backing from the top side of the dome and adhere to the back of the first layer and press down so it is firmly secured.
  • Now lay some snowflake sequins and a little stampin' glitter on top of the snow man, remove the second backing from the back of the dome, add some liquid glue around the rest of the first mat and then adhere down onto the card base without moving the card base so the sequins and glitter stay inside the dome area. Once in place secure dome firmly.
  • Using liquid glue adhere the globe base to the card, then using dimensional pads add  the sentiment to the bottom.
Will be back again soon with more cards!
Annette X

Saturday, December 21, 2019

Itty Bitty Christmas meets Still Scenes and more

Hi folks, hope you're having a good day!

I just love the new snow globes Stampin' Up! have this year and here's one from me.
To recreate the card, this is what you'll need:
(dsp) = Designer Series Paper, (ep) = embossing powder
(1,2) = Narrow rectangles with 1 being the smallest

Card Stock: Night of Navy 2 pieces 4 x 7 (snow globe base) 2 x 7.5 (sentiment), Seaside Spray 2 pieces 2.5 x 1.2 (church window backing) 3.7 x 1.1 (steeple window backing), Silver Foil 4 pieces 4 x 7 (base scroll) 3 x 8.5 (sentiment backing) 4 x 4 (church base) 2 x 6 (steeple), Whisper White 21 x14.8 scored at 10.5 (card base)
DSP: Feels Like Frost 2 pieces 14.2  x 9.8 (first mat) 9.3 x 8 snowy sky (dome backing)
Dies: Snow Globe Scenes, Stitched Rectangle x 2 (1 & 2) narrow
Stamp Sets: Itty Bitty Christmas, Still Scenes
Accessories: Night of Navy ink, Silver Embossing Powder, Snowflake Sequins, Snow Globe Shaker Domes, VersaMark.

Now with the snowy sky (dsp) and stamping in the middle of the piece of (dsp), stamp the dome refection from the still scenes (ss) using versamark and then heat emboss using the silver (ep).
Next stamp the sentiment from the itty bitty christmas (ss) onto the night of navy (cs) using versamark and heat emboss with the silver (ep).

Die cut the dome shape from the snow globe scenes dies towards the top of the feels like frost (dsp).

Carry out all the rest of the die cutting (church pieces, dome base pieces and sentiment pieces).

Adhere together the 2 pieces for the dome base, and the 2 pieces for the sentiment using liquid glue.

Now trim the 2 pieces of seaside spray (cs) to fit inside the 2 church pieces and adhere them together using liquid glue.

Again with liquid glue adhere the church  to the steeple using the 2 nodules on both the steeple and church for perfect alignment, then again using liquid glue adhere the completed church to the snowy scene background.

Peel off the backing for the top of the snow globe shaker dome, position the  feels like frost (dsp) first mat opening, over the dome and adhere down securely.

Place a spoonful of snowflake sequins over the church scene.

Remove the backing from the back of the snow globe shaker dome and align the dome with the church scene and adhere down, making sure it's secure all the way round.

Adhere the dome base using liquid glue and the sentiment using dimensional pads.

Will be back again soon with more cards!
AnnetteX

Monday, December 16, 2019

Frosted Foliage

Hello and welcome to my haven in a hectic world!

This is a card required quickly as when we received Edward and Janine's card this year there was a new address included and I'd sent a card to their old address.
Measurement are in centimetres, (cs = card stock, (dsp) = designer series paper, (ef) = embossing folder, (ss) = stamp set

Colours are: Seaside Spray, Silver Foil, Whisper White.

Card base is whisper white 21 x 14.85 scored at 10.5, Feels Like Frost (dsp) 2.5 x 14.85, silver foil 11 x 13 (foliage frame), 2 pieces of seaside spray  8.5 x 8 (foliage frame minus the leaves), 6.5 x 7 (extra leaves), whisper white 8 x 7 (sentiment frame).
  • Stamp the sentiment from the frosted foliage (ss) using versamark ink onto the small piece of  whisper white (cs) and emboss using silver embossing powder.
  • Now die cut the sentiment using the smaller frame from the frosted frames dies.
  • Using the silver foil piece die cut the foliage frame from the frosted frames dies.
  • Now with the seaside spray (cs) die cut another foliage frame but omitting the leaves.
  • You will need to tidy up the edges around this frame.
  • Adhere the sentiment using liquid glue and with the ½  circle punch mimic the curve on each of the corners.
  • Attach this to the silver foil foliage frame using glue dots (these will better stick to the foil).
  • Die cut the extra leaves from the frosted frames dies in seaside spray.
  • Emboss the card base using the subtle folder.
  • Adhere the feels like frost (dsp) across the middle of the card base using liquid glue.
  • Add a strip of seaside spray metallic ribbon along each side of the (dsp) using double sided sided tape.
  • Arrange the extra foliage around the sentiment using liquid glue.
  • Colour 4 basic rhinestones using the seaside spray stampin' blends.
  • Attach the rhinestones in the 4 corners of the sentiment.
Thanks for popping by.

Will be back again soon with more cards.
Annette X

Wednesday, August 28, 2019

Let it Ride and more

Welcome to my world

Hope wherever you are, you're having a great day!

Here it's overcast but very warm still, just how I like it (but my inks and things like glue don't).

I'm posting this blog a little early as her birthday isn't until October, but I want to send a link to a fabulous fellow demonstrator within her competition time frame.  I put a slightly different spin on it, as the recipient for the card is very mindful of the environment and so I tend to use scraps and recycled elements, when making her cards.

So less of the waffle, here's today's card, inside and out.

Again being mindful of the planet, the greeting label is placed using removable tape so it can swapped out and another one written and then the card can be passed on if she wishes.

You will find a video of how to make this kind of card over on 

(dsp) = designer series paper, (ss) = stamp set

For this card I used soft suede for the card base, soft sea foam for the outside layer and the inside panel. Black for the scalloped square, whisper white for the greeting label (this was computer generated), pressed petals (dsp) for the top layer, the let it ride (ss), versamark ink and gold embossing powder for the horses head and the main sentiments inside. Soft suede for the trees and linen thread for the bow.

Will be back again soon with more cards
Annette X

Delicate Whispers and more

Welcome to my blog and    t hank you for joining me today! Happy Anniversary to Sylvia & Bill Intermediate level - blending with a brush...