Showing posts with label memento ink. Show all posts

Tuesday, December 29, 2020

Snowman Season meets Itty Bitty Christmas

Hello and welcome to my haven in a hectic world!


This is the Fourth of my Christmas cards for 2020.  As stated before they are all creations taken from Pinterest last year. So for all of you who first made them a big thank you.


All measurements are in centimetres.
(cs) = card stock, (ef) = embossing folder, (r) = retired, (ss) = stamp set

Card Stock: 4 pieces whisper white 14.5 x 21 scored at 10.5 (card base), 13.5 x 9.5 (embossed layer), 7 x 7 (stamped layer) 1.5 x 6 (sentiment)
2 pieces purple posy/soft seaside spray 14 x 10 (1st layer), 10.5 x 13 (leaves frame)
  • Emboss the larger whisper white (cs) using the subtle (ef).
  • Stamp the snowman from the snowman seasons (ss) using memento ink and then colour it using the light stampin' blends for the scarf and nose, pumpkin pie, purple posy/seaside spray.
  • Die cut the 2 frames (this can be done at the same time) using the frosted frames dies.
  • Staple the seaside spray metallic / organdy combo ribbon at top of the image frame, making a banner.
  • Stamp the sentiment from the itty bitty Christmas (ss) and punch out using the classic label punch.
  • To put together, adhere the embossed (cs) to the purple posy (1st layer) using liquid glue and attach to the card base using dimensional pads. Then attach the other two layers on top again using dimensional pads, finishing with the sentiment.
  • Add a rhinestone to the sentiment.
Thanks for dropping by and hopefully see you again soon
Annette X

Sunday, July 19, 2020

Free As A Bird

Hello and welcome to my haven in a hectic world!

Hello to Sue, week 18

Nearly forgot to do this one, it's now Saturday morning and I need it for tomorrow, so it needed to be quick and easy but not like any of the others!!!


Materials required for this card are:

Card stock: whisper white
DSP: bird ballad
Dies: all dressed up
Embossing folders: subtle
Ink: memento tuxedo black
Ribbon: organdy striped 
Stamp sets: free as a bird
Accessories: basic & champagne rhinestones

* = retired and when using layering dies (1) is the smallest

Hope you liked today's card. If you would like more information on how to make it, please don't hesitate to contact me, I'd love to hear from you.

If you wish to buy any of the items used, go to contact me at the top of the page for details on how to order.

Will be back again soon with more cards, in the meantime have a great day.
Annette 😘

Friday, June 19, 2020

Forever Blossoms meets So Sentimental

Hello and welcome to my haven in a hectic world

Sue's thank you card for week 14

I nearly forgot to do a card for this week, so made a very quick one!


Materials required for this card are:

Card stock: whisper white
DSP: 19/21 in colors
Dies: cherry blossoms, stitched so sweetly
Embossing folder: subtle
Ink: memento tuxedo black, rococo rose
Ribbon: (r) sheer (whisper white, dyed call me clover)
Stampin' blends: (r) call me clover, rococo rose
Stamp sets: forever blossoms, so sentimental
Accessories: basic pearls (dyed rococo rose)

(r) = retired and when using layering dies (1) is the smallest
The larger nested label was die cut a second time on one side to make it narrower.

Hope you liked today's card if you need more information please don't hesitate to contact me, I'd love to hear from you.

If you wish to buy any of the items used, go to contact me at the top of the page for details on how to order.

Will be back again soon with more cards, in the meantime have a good day.
Annette 😘

Wednesday, April 22, 2020

New Wonder meets Dandelion Wishes and more!

Hi and welcome to my haven in a hectic world, thanks for popping by.

It's now week 5 of the lockdown and this is Sue's card for this week. I cased this card from one I saw on facebook and just added the ribbon on the right.
Measurements are in centimetres.

Card Stock: Very Vanilla 14.8 x 21 scored at 10.5 (card base), 10.5 x 7 (2nd layer) 5 x 6 (fairy).
DSP: 11.5 x 9 (1st layer).
 (cs) = card stock, (dsp) = designer series paper,  (ss) = stamp set), (nsu) = non stampin' up, (r) = retired, when using layering dies (1) is the smallest.
  • Die cut the very vanilla 1st layer (cs) with the Stitched rectangles dies - wide (5) rectangle.
  • Stamp the dandelion from the dandelion wishes (ss) and the just a note from the flourishing phrases (ss) on the left hand side using highland heather ink.  
  • Die cut the perennial essence 1st layer (dsp) with the Stitched rectangles dies - wide (7) rectangle.
  • Adhere the (dsp) rectangle to the very vanilla card base (cs) (mine is a (nsu) base) using liquid glue, leaving more room on the right than the left.
  • Now adhere the very vanilla rectangle using liquid glue.
  • Colour a basic rhinestone using the dark highland heather stampin' blends then adhere to the centre of the flower.
  • With the very vanilla fairy (cs), stamp the fairy from the new wonders (ss) in memento black ink.
  • Using crumb cake, granny apple green, highland heather, lovely lipstick, mango melody, old olive, petal pink and pool party stampin' blends colour in the fairy.
    • hair crumb cake light and dark
    • face & hand light petal pink
    • wings light pool party
    • top granny apple green light and dark
    • skirt highland heather light and dark
    • feet old olive
    • Nib mango melody light and dark
    • pen lovely lipstick light and dark
  • Fussy cut the fairy and add wink of stella to the wings.
  • Attach to the card base using dimensional pads.
  • Make a bow with long tails using (r) organdy combo ribbon and attach using glue dots.
Will be back again soon with more cards, until then keep well and safe.
Annette X

Tuesday, April 21, 2020

Lovely Lily Pad meets New Wonders

Hi, welcome to my haven in a hectic world, thanks for joining me today.

Happy Birthday Peg!

I'm always nervous doing Peg's card as she's my Stampin' Up upline and of course I want to impress. Hope she likes it.
All measurements are in centimetres.

(cs) = card stock, (ef) = embossing folder, (ss) = stamp set,

Petal Pink 21 x 14.5 scored at 10.5 (card base), 15 x 5 (wavy lines), 7.5 x 8 (swirls), Whisper White 14 x 10 (1st layer), 6 x6 (flower), 5 x 5 (circle).
  • Using the swirly scribbles dies and the petal pink (cs) die cut the waves and swirls.
  • With the 6 x 6 whisper white (cs) stamp the outline flower from the lovely lily pads (ss) using memento black ink, then flip the stamp on the block so the flat side up and stamp again using petal pink ink. As you can see it doesn't fit the outline stamp perfectly, but that's how its supposed to be.
  • With the smallest piece of whisper white (cs) stamp the happy birthday from the new wonders (ss) in petal pink ink.
  • Now die cut the flower using the lily pad dies, and the happy birthday using the stitched labels dies.
  • Lightly sponge down the left hand side of the 1st layer whisper white (cs) using petal pink ink. If I was doing this card again I'd take the sponging right to the edge.
  • Emboss this layer using the stone 3D (ef).
  • Adhere the waves to the 1st layer using liquid glue.
  • Wrap a piece of the petal pink metallic edged ribbon across the 1st layer at the bottom adhering to the back using glue dots, then tie a faux bow at the front.
  • Attach this layer to card base using dimensional pads.
  • Place the swirls where you want it to be and adhere down, again using liquid glue.
  • Attach the happy birthday sentiment using dimensional pads along with the lily.
  • Add some champagne rhinestones. 
Will be back again soon with more cards, enjoy the rest of your day!
Annette X

Monday, April 13, 2020

Welcome Easter meets Whacky Wishes

Hello and welcome to my haven in a hectic world.

Happy Easter to all!

This is a card I made for my Son, Daughter in law and Grandson, who live in Plymouth, I send our Grandson money instead of an Easter Egg (I feel chocolate eggs might not travel well).

I found this card on Pinterest made by Angie at chicknscratch, I adapted it slightly as I only have the German version of the Welcome Easter stamp set and wanted the words in English. Plus I've done it using centimetres instead of inches.

There are two pictures as I printed a greeting and added an embellishment on the inside, which I don't usually do.

Card Stock: Old Olive 4.5 x 4.5 (leaf), So saffron 10.5 x 14.5 (card base), 17 x 14 (1st layer) 6 x 6 (scalloped square), Whisper White 12 x 8 (overlay), 6 x 6 (chick), 2.5 x 9.5 (large sentiment), 3 x 3 (flower), 3 x 8 (small sentiment).
DSP: 7.5 x 10.5.

All measurements are in centimetres.
(cs) = card stock, (ef) = embossing folder, (ss) = stamp set, (r) = retired, when using layering dies  (1) is the smallest.
  • Start with the so saffron (cs) 1st layer and the 17cm across the top of the scoreboard, score down at 7cm and burnish.
  • Now with the whisper white (cs) overlay and the 12cm across the top of the scoreboard, score down at 1cm and burnish.
  • Stamp the chick from the welcome easter (ss) in memento black ink onto the whisper white (cs) square.
  • Colour in the chick using so saffron and pumpkin pie stampin' blends.
  • Stamp the happy easter sentiment on the whisper white (cs) larger sentiment in memento black ink from the welcome easter (ss) (I used the (r) wacky wishes (ss)).
  • Now stamp the second greeting for  the inside of the card on the whisper white (cs) small sentiment using the A wish for everything (ss).
  • All the following pieces can be die cut with one pass through the cutting machine of your choice.
    • Chick, stitched shapes dies, square (3)
    • Happy Easter, (r) cards & labels dies
    • the 2nd sentiment, stitched rectangles dies narrow (2)
    • Scallop square (cs) layering squares, scalloped square (7)
  • Stamp the flower from the thoughtful blooms (ss) and punch out using the small bloom punch
  • Punch the leaves using the old olive (cs) and the leaf punch.
  • Emboss the lefthand side of the 1st layer using the parisian flourish (ef).
  • Emboss the chick using the subtle (ef).
  • Adhere the best dressed (dsp) to the front of the whisper white layover (cs).
  • Adhere the layover to the back of 1st layer using liquid glue.
  • Adhere the 1st layer to the card base using liquid glue.
  • Adhere the chick to the scalloped square using liquid glue.
  • Attach the scalloped square to the layover using dimensional pads.
  • Attach the happy easter to the layover using dimensional pads.
  • Adhere the smaller sentiment to the inside of the card using liquid glue.
  • Add a (r) gingham gala sequin to the inside sentiment.
  • Colour a basic rhinestone with a daffodil delight stampin' blend then place in the centre of the sequin.
  • Adhere the flower to the leaves using liquid glue.
  • Attach the leaves and flower to the top sentiment using a glue dot.
  • Again colour a basic rhinestone with the daffodil delight stampin' blend and place in the centre of the flower.
Will be back again soon with more cards, thanks for stopping by.
Annette X

Sunday, April 12, 2020

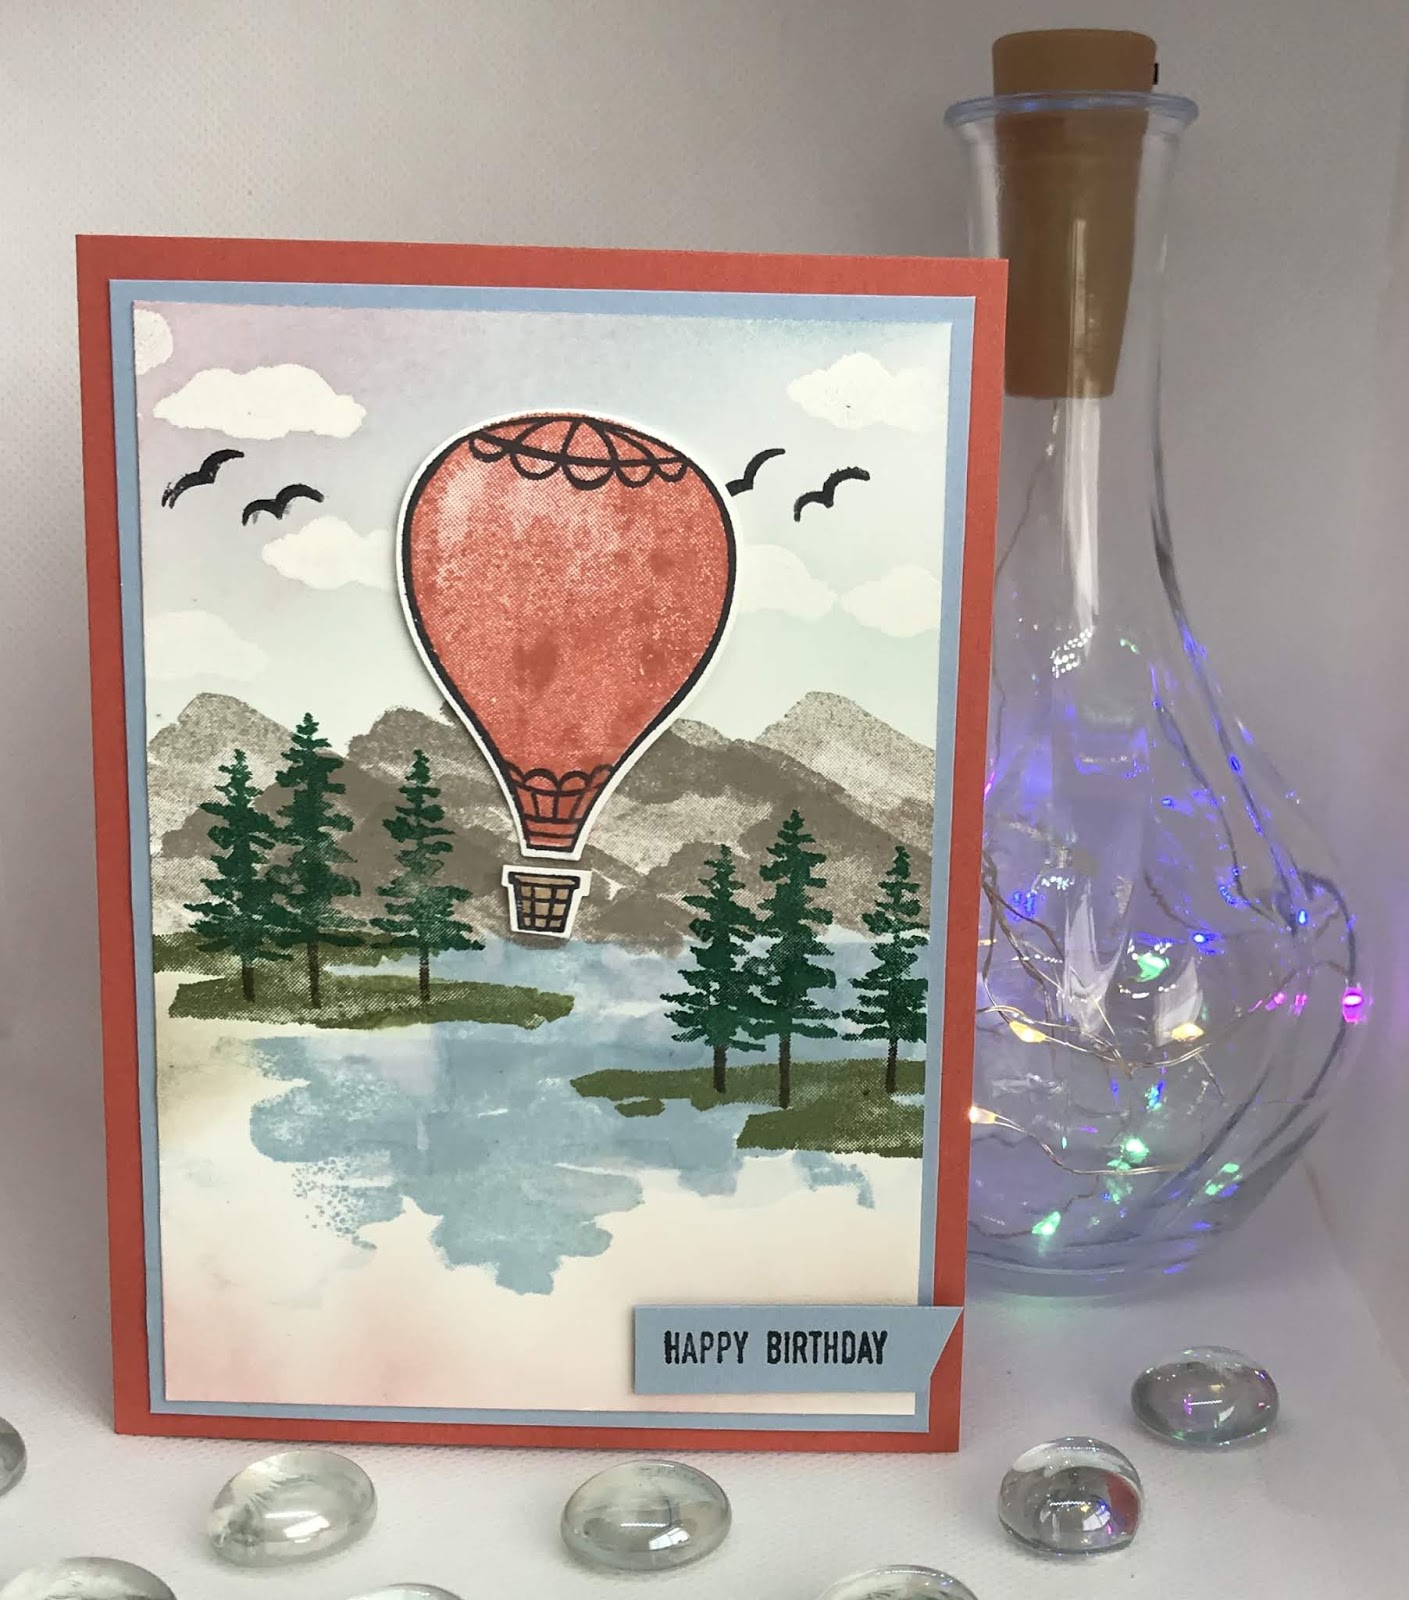
Above the Clouds meets Waterfront

Hello and welcome to my haven in a hectic world, hope you're having a great day!

Happy Birthday Duncan!

I have a few of the "waterfront" type stamp sets now and feel I'm starting to get better with them.
I really enjoyed making this one.

All measurements are in centimetres.

(cs) = cardstock, (ep) = embossing powder, (ss) = stamp set.

Terracotta Tile 21 x 14.5 scored at 10.5 (card base), Seaside Spray 9.7 x 13.7 (1st layer), sWhisper White 13.3 x 9.3 (2nd layer), 7 x 4.5 Balloon.
  • Stamp the sentiment from the itty bitty greetings (ss) in memento black ink onto the seaside spray 1st layer and punch out using the classic label punch (this is called gutting, the hole that is left doesn't get seen).
  • Adhere the 1st layer to the card base using liquid glue.
  • Prime the top half of the whisper white 2nd layer with your embossing buddy and then stamp the clouds from the above the clouds (ss) in versaMark and heat emboss using clear (ep).
  • Stamp your scene making sure there's a top, middle and bottom area, using the waterfront (ss) and appropriate colours. I used balmy blue and pool party for the sky (sponge method), gray granite for the mountains, seaside spray for the water, mossy meadow for grass, shaded spruce & early espresso for the trees, then more sponging at the bottom using sahara sand and terracotta tile (very lightly). The birds are stamped in memento black.
  • With the small piece of whisper white (cs) stamp the full balloon in terracotta tile and then over stamp with one of the outline balloons in memento black and punch out using the hot air balloon punch. Stamp the outline of the basket in memento black and punch out too.
  • Colour the basket using a bronze stampin' blend.
  • Adhere the second layer to the card base using liquid glue.
  • Attach the balloon using dimensional pads.
  • Cut the sentiment straight on the left and diagonal on the right, then attach to the card base using dimensional pads.
Will be back again soon with more cards. Thanks for stopping by.
Annette X

Tuesday, March 31, 2020

Daisy Lane meets Forever Blossoms and more

Hello and welcome to my haven in a hectic world, thanks for dropping by.

A thank you card for Sue!

Sue is the proprietor of our local Cafe/restaurant, where we go quite often for breakfast or Sunday lunch, she has turned her business into a take away delivery service for the time being in this very uncertain world we're living in. So each Sunday hubby and I sit down to a lovely Sunday Roast without any of the work and stress!
This is my way of sending back the payment and the following week's order. Our thanks also goes out to her lovely daughter Holly, who drops off the food in our porch and picks up the envelope.

All measurements are in inches.
Card Stock: Grapefruit Grove Foil 5 x ½ 2 pieces, Vellum 5 x 2¾ , off cut for flower.
DSP: 5 x 2¾.
Note Card: 5 x 7 scored at 3½.

(cs) = card stock, (sdsp) = specialty designer series paper, (r) = retired, (ss) = stamp set.
  • Adhere the (r) grapefruit grove foil strips down each side of the note card using liquid glue.
  • Stamp the sentiment from the (r) part of my story (ss) in memento black ink towards the bottom of the larger piece of vellum (cs).
  • Now towards the top of the same piece of vellum stamp the Smile sentiment from the Daisy Lane (ss) in memento black ink.
  • Using a sponge lightly dab some liquid glue on the back of the vellum and adhere to the flowering foils (sdsp).
  • With the off cut of vellum (cs) colour an area large enough for the single flower in the forever blossoms (ss) using a petal pink stampin' blend, now stamp the flower over the top in memento black ink and leave to one side to dry for a few minutes. It's best to lay the colour down first before stamping on vellum, as there can be a little bleeding.
  • Wrap a piece of organdy striped ribbon around the vellum just above the bottom sentiment and adhere with tape of glue dots. Cut another piece of the ribbon and tie a faux bow around the first piece towards the right side.
  • Die cut the flower using the cherry blossoms dies and adhere to the ribbon on the left side using a glue dot.
  • To finish off colour a medium basic rhinestone with the petal pink stampin' blend and attach to the middle of the flower.
Will be back again soon with more cards, and have a great day!
Annette X

Friday, February 14, 2020

Little Ladybug meets Tiny Tiny Sentiments

Hi folks and welcome to my haven in a hectic world.

Today's card is one I created for a friend I haven't seen in a while, and just thought I'd let her know I'm thinking of her by sending her a little valentines card.
The layout came from lisa's stamp studio. I had an idea in my head of what I wanted to do and used some old stash.

Card Stock:
Whisper White 3 pieces 21 x 14.5 scored at 10.5 (card base), 6.5 x 6.5 (square), 6 x 2.5 (sentiment)
Poppy Parade 2 pieces 14.5 x 6.5 (1st layer), 7 x 7 (scallop square).
DSP 14.5 x 5.5 (2nd layer).

Measurements are all in centimetres.
(cs) = card stock, (dsp) = designer series paper, (r) = retired, (ss) = stamp set, when using layering dies (1) is the smallest.

  • Adhere the poppy parade (cs) down the centre of the card base using liquid glue.
  • Now adhere the (r) sunny garden (dsp) down the middle of the central panel using liquid glue.
  • With the  square piece of whisper white (cs) stamp the lady bug from the little ladybug (ss) using memento black ink.
  • With the smaller piece of whisper white (cs) stamp the sentiment from the tiny tiny sentiments (ss) in poppy parade ink.
  • Die cut the ladybug stamped image using the stitched shapes dies and the (3) square, the poppy parade (cs) with (7) scalloped square from the layering squares dies, and the sentiment using the rectangle from the (r) build it dies.
  • Using the black, smoky slate and poppy parade stampin' blends colour the ladybug.
  • Dye a piece of the whisper white crinkled seam binding ribbon green, using the old olive stampin' blends and make a bow with tails.
  • Attach the ladybug to the scalloped square using dimensional pads.
  • Now adhere the sentiment to the bottom of the scalloped square at the back using liquid glue.
  • Then attach the scalloped square to the card base.
  • Adhere the green bow using glue dots and then randomly arrange some (r) gingham gala sequins (I used 3).
Will be back again soon with more cards
Annette X

Tuesday, February 4, 2020

Beauty Abounds meets Itty Bitty Birthdays

Hi folks, hope you're having a great day!

And welcome to my haven in a hectic world.

Happy Birthday Jill x

I picked out two stamp sets for this card and wanted to use the 18 - 20 in colours, so this is what I came up with.
All measurements are in centimetres.

(cs) = card stock, (dsp) = designer series paper, (ef) = embossing folder, (r) = retired, (ss) = stamp set.

Colours are: call me clover, lovely lipstick, memento black, pineapple punch, whisper white.

Card Stock: lovely lipstick 21 x 14.85 scored at 10.5 (card base), pineapple punch 2 pieces 10 x 14.2 (1st layer) 5.5 x 11.7 (3rd layer), whisper white 3 pieces 6.6 x 13.6 (2nd layer, left side) 5.2 x 11.1 (image) 1.5 x 7 (sentiment).
DSP: 3 x 13.6 (second layer, right side)
  • Using the 18-20 in color (dsp) adhere down the right hand side of the larger pineapple punch (cs) leaving an even gap top, bottom and right side, using liquid glue.
  • Emboss the larger piece of whisper white (cs) with the scripty 3D (ef) and adhere down the left hand side of the larger pineapple punch (cs).
  • Adhere a strip of the pineapple punch grosgrain ribbon down the join of these two pieces using glue dots or sticky tape, then attach to the card base using dimensional pads.
  • To create the background for the main image and using the beauty abounds (ss) Stamp the larger of the circle blobs down the centre in alternate call me clover and pineapple punch using the 3rd generation stamping off method.
  • Next stamp the main image in memento black, then colour using the appropriate stampin' blends.
  • Adhere the image piece to the smaller pineapple punch (cs) using liquid glue, then attach these pieces to the main card base using dimensional pads.
  • Stamp the sentiment from the itty bitty birthday (ss) in memento black on the smallest piece of whisper white, then flag both ends (i used my (r) bunch of banners dies. Attach to the card base with a dimension pad on the left side and liquid glue on the right.
  • Add some random basic rhinestones around the image (remembering an odd number is the norm).
Hope you liked today's card, I will be back again soon with more.
Annette X

Wednesday, January 29, 2020

Get back on your feet count down

Hello, and welcome to my haven in a hectic world.

Well my world's got a busier since last week, as we are now collecting our grandson (which we love to do)  from school 3 days a week for the next 7 weeks, as our son came off his bike a week ago last Saturday and has broken his hip.

He had an operation on the Sunday and came home on the Monday, he's not allowed to put any weight on it for 8 weeks, a week and a half of which has already gone so I thought I'd make him a count down get back on your feet card.
I looked on the Internet for a perpetual calendar and adjusted Candace Gillespie's to make the frame and boxes. I needed to make 4 boxes for the numbers needed, I'm quite pleased with how it turned out.

Colours: Basic Black 9 pieces 17 x 12.5 base, 14 x 12 boxes 4 needed, 7 x 7 scallop circle, 16 x 7 numbers (you can use the discarded pieces from the boxes for this), 3.5 x 6 label, Whisper White 2 pieces 7 x 7 tortoise, 7 x 3.5 sentiment.
DSP:  Lily Impressions 24 pieces all 2.8 x 2.8 (box sides), 13.8 x 6.3 (backing for base)

(cs) = Card Stock, (dsp) = Designer Series Paper, (nsu) Not Stampin' Up, when using layering dies (1) is the smallest.
  • Using the back on your feet (ss) stamp the tortoise in memento black ink and colour using the granny apple green and soft suede stampin' blends on whisper white (cs).
  • from the same (ss) stamp the "ouch!" using granny apple green ink.
  • Die cut using the stitched shapes circle die (3). 
  • Die cut the basic black scalloped circle (6) using the layering circles dies.
  • Adhere the 2 circles together using liquid glue.
  • Stamp the sentiment again from the same (ss) in memento black on whisper white (cs) and die cut using the stitched so sweetly dies.
  • The "day's to go"was generated using my computer and punched out using the classic label punch.
  • Score the 3.5 x 6 piece of basic black (cs) in half, down the long edge so as to slot in between the top and bottom boxes.
  • Attach the "days to go" to this piece using dimensional pads.
  • To create the base score down the long edge at 3cm and 9.5cm then down the short edge at 3cm.
  • 3cm above the score line on the short edge make a mark on each side.
  • Now cut from the score line at the top of the base down to the mark, on each side.
  • Fold and burnish all the score lines.
  • Now cut up the long length score line to the 3cm score line on either side, when folded in and adhered, this creates the base for the boxes to sit on.
  • To create the boxes score down the long length at 1, 4, 7 and 10cm.
  • On the short length score down at 1, 4, 7, 10 and 13cm.
  • Now go back to 5cm and score down to the second long length score mark, flip the cs and do the same on the other side.
  • Now cut away the 5 pieces as shown below marked with an X.
  • Burnish all the score lines and adhere each square around the tabs to form a box using liquid glue.
  • Adhere the lily impressions (dsp) to each side of all the boxes, (matching up pattern if required).
  • Adhere the larger piece of lily impressions (dsp) to the back of the base.
  • Die cut all the numbers (nsu) in basic black (cs) required and adhere to the boxes using liquid glue (do not use the top and bottom squares). Full set of 0 to 9 and then any other numbers needed for 11, 22, 33 etc. 
It sounds difficult but it really isn't!

I wasn't sure he would like it but even before I had this up on my blog, he's got it on his facebook page so I think he does 😊.

Will be back again soon with more cards.
Annette X

Sunday, November 10, 2019

A Little Lace meets Easy Events

Hello and welcome to my craft haven,

Todays card is a quicky, as I needed to make it and give it out today! (well yesterday really).

My eldest Granddaughter got engaged a few weeks ago in Spain, but decided to have party yesterday.

Her engagement card went out a few weeks ago but you can't turn up to a party with nothing in your hand can you?

So here's the one I made to take with us, with just a little something inside. It's new and a blast from the past, but I thought it was quite cute!
The card is quite simple and only 4 pieces, note card, scrap of Whisper White, scrap of Seaside Spray and some flax ribbon.

Colours for this card are cherry cobbler, old olive, seaside spray.
(cs) = card stock, (ef) = embossing folder, (r) = retired, (ss) = stamp set.
When using layering dies (1) is the smallest.

Along the bottom in the middle of card front stamp the sentiment from the a little lace (ss) I used cherry cobbler for this.
Emboss the front of the note card using the subtle folder, then emboss again across the middle using the non flowery petal pair folder.
Stamp the image from the easy events (ss) in memento black ink, on white (cs) and colour using seaside spray, old olive and cherry cobbler stampin' blends'. Now die cut using the layering ovals (2), at the same time cut a seaside spray scalloped (2) oval.
Cut a strip of flax ribbon and adhere to the card front.
Adhere the two ovals together and attach to the card front using dimensional pads.
Adhere 3 hearts from the (r) metallic enamel shapes.

This card took me about 15 minutes to make, once I decided what I was going to do, and that took a bit longer.

Will be back again soon with more cards.
Annette X

Blast from the past - You are amazing meets Alphabet a la mode

  Welcome to my blog and    t hank you for joining me today! Happy Birthday Stuart  Quick Intermediate  level - die cutting, layering, punch...