Wednesday, May 8, 2024

Thoughtful Expressions meets Cheerful Daisies & more

 Welcome to my blog

and  thank you for joining me today!

Happy Birthday Jim


mixture of old and new - colour with blends, die cutting, layering, stamping

At first I made the card without the bird and hubby wasn't impressed. So I had a think and this is what I came up with

Materials required for this card are:

Bundles: cheerful daisies, thoughtful expressions
Card Stock: basic white, misty moonlight, vellum
Designer Series Paper: *new horizons
Dies: *aspen trees, enduring beauty
Ink: misty moonlight, stazon black
Stampin' Blends: misty moonlight, *purple posy
 
* = no longer available

  1. Start with a base card 14.5 x 21 scored at 10.5, white panel 14 x 10, dsp panel 9.9 x 13.9, vellum 11 x 8, off cuts for sentiment
  2. place the aspen die in the centre of the white panel and die cut
  3. adhere to the dsp and white panels together using liquid glue then adhere to the base card
  4. stamp the bird onto the vellum and the sentiment onto a white off cut
  5. colour the bird using stampin' blends on the reverse side of the image
  6. die cut the sentiment, bird and and the backing for the sentiment
  7. adhere the bird to the card using a little bit of spread out liquid glue and then slightly curve the wings
  8. attach the sentiment to its backing using dimensional pads
  9. adhere the sentiment to the base card using liquid glue
Hope you liked today's card. If you would like more information on how to make it, please don't hesitate to contact me, I'd love to hear from you.

If you wish to buy any of the items used, go to contacting me at the top of the page for details of how to order.

Will be back again soon with more cards, in the meantime take care and have a great day.
Annette 😊 

Tuesday, May 7, 2024

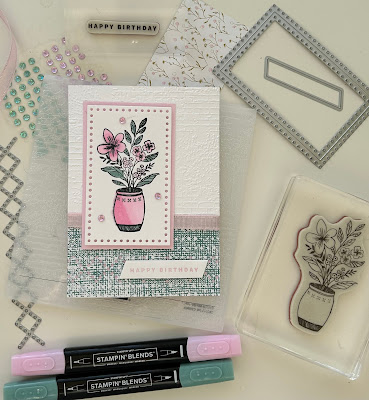
Everyday Details meets Something Fancy

 Welcome to my blog

and  thank you for joining me today!

Happy Birthday Idwin


Intermediate level - colouring, die cutting, dry embossing, layering and stamping

Materials required for this card are:

Bundles: everyday details (4), something fancy
Card Stock: basic white, bubble bath
Designer Series Paper: *poetic expressions
Embossing Folders: exposed brick 3D
Ink: bubble bath, memento black 
Stampin' Blends: bubble bath, lost lagoon
Accessories: *adhesive backed sequins & gems, blending brush
 
* = no longer available, when using layering dies (1) is the smallest
  1. Start with a base card 14.5 x 21 scored at 10.5, dsp 5.5 x 10.5, white layer 9 x 10.5, pink 6.4 x 10.1, white 6.4 x 10.1, strip of white for the sentiment
  2. dry emboss the white layer using the folder
  3. die cut the crosses across the bottom of the dsp
  4. Join the dsp layer to the embossed layer at the back using some tape
  5. add the ribbon across and adhere at the back
  6. using the bubble bath ink, colour  across the base card towards the bottom using a blending brush (for the pink behind the crosses in the dsp
  7. adhere this layer to the base card using liquid glue
  8. die cut the white rectangle, stamp and colour the flowers and leaves using the blending markers
  9. attach this to the pink rectangle using dimensional pads and adhere to base card
  10. stamp the sentiment and die cut, then attach to the base card using dimensional pads
  11. add the sequins
Hope you liked today's card. If you would like more information on how to make it, please don't hesitate to contact me, I'd love to hear from you.

If you wish to buy any of the items used, go to contacting me at the top of the page for details of how to order.

Will be back again soon with more cards, in the meantime take care and have a great day.
Annette 😊 
Days To Remember meets Zoo Crew

 Welcome to my blog

and  thank you for joining me today!

Happy Birthday Alasdair


Quic and easy card - die cutting, layering, stamping

Materials required for this card are:

Card Stock: basic black & white
Designer Series Paper: zoo crew
Dies: stylish shapes (1,2,3) squares
Ink: memento black
Stamps: days to remember
Accessories: opaque faceted gems
 
When using layering dies (1) is the smallest

  1. Start with a base card 14.8 x 21 scored at 10.5, dsp panel 10.1 x 14.4, white off cut for stamping, dsp off cut for image, black off cut for square and 4 strips of .5 x 14 for fracture effect
  2. stamp the sentiment
  3. die cut the central image, sentiment and black square
  4. position the central image onto the dsp layer and adhere down using liquid glue
  5. adhere the black strips around the central image and cut off the excess
  6. adhere the dsp layer to the base card using liquid glue
  7. adhere the sentiment to the black square and adhere to the card 
  8. add the faceted gems
Hope you liked today's card. If you would like more information on how to make it, please don't hesitate to contact me, I'd love to hear from you.

If you wish to buy any of the items used, go to contacting me at the top of the page for details of how to order.

Will be back again soon with more cards, in the meantime take care and have a great day.
Annette 😊 

Thursday, May 2, 2024

Beautiful Balloons meets Best Family Ever

 Welcome to my blog

and  thank you for joining me today!

Happy Birthday Freddie


Fun card - die cutting, dry embossing, layering, stamping
Sorry to see these stamp sets going, just love them

Materials required for this card are:

Bundles: *beautiful balloons bundle
Card Stock: azure afternoon, basic white
Designer Series Paper: *bright & beautiful
Embossing Folders: basics 3D
Ink: azure afternoon, berry burst, lemon lime twist, misty moonlight
Stamps: *best family ever
Accessories: *gingham gala sequins, linen thread
 
* = no longer available

  1. Start with a base card 14.5 x 21 scored at 10.5, white layer 14 x 5.5, dsp 14 x 4.5, off cuts for sentiments and balloons
  2. dry emboss the white panel using the folder and adhere down the right side of the base card using liquid glue
  3. adhere the dsp the same way on the left side meeting in the middle (mine slightly overlapped as I cut the middle edge down the edge of the coloured strip)
  4. stamp the balloons and sentiments
  5. fussy cut  the sentiments and die cut the balloons
  6. adhere the large balloon using liquid glue, the middle balloon using a glue dot
  7. cut 3 lengths of linen thread and tie them together with a bow, gather them together at one end and attach them to the bottom of the 2 balloons using a dimension pad
  8. add a glue dot to the back of the bow and attach to the card leaving the balloon end quite loose so you can see all three threads at the top
  9. attach the 3rd balloon using the thread dimension pad plus one or two more
  10. attach the sentiments using dimensional pads
  11. add the sequins
Hope you liked today's card. If you would like more information on how to make it, please don't hesitate to contact me, I'd love to hear from you.

If you wish to buy any of the items used, go to contacting me at the top of the page for details of how to order.

Will be back again soon with more cards, in the meantime take care and have a great day
Annette 😊 

Thoughtful Expressions meets Cheerful Daisies & more

  Welcome to my blog and    t hank you for joining me today! Happy Birthday Jim mixture of old and new - colour with blends, die cutting, la...