Thursday, March 30, 2023

Season of Chic meets Sunkissed

  Welcome to my blog

and  thank you for joining me today!

60th birthday for a friend


It took a while for the mojo to get going for this one, and there's lots going on.

Materials required for this card are:

Card Stock: basic white, petal pink
Designer Series Paper: texture chic
Dies: alphabet a la mode, chic, deckled rectangles (5), split card textures
Embossing Folders: timeless type
Ink: petal pink, soft succulent, versamark
Stamp Sets: season of chic, sunkissed
Accessories: gold embossing powder, polished dots, soft polyester ribbon, heat tool

dsp = designer series paper 
  1. base card 14.5 x 21 scored at 10.5  
  2. dsp cut at 8 x 14.2
  3. die cut the split card texture, then trim it down to 10 x 14.2 and adhere the dsp to the back of it.
  4. emboss this layer and adhere to the base card
  5. add the ribbon as a background for the flowers
  6. stamp the flowers (emboss just the one flower) and leaves then die cut them 
  7. stamp the sentiments (these need to be stamped separately and cut down to size) 
  8. attach the flowers and sentiments with dimensionals and the leaves and numbers with wet glue
  9. add a polished dot to the un embossed flower
Hope you liked today's card. If you would like more information on how to make it, please don't hesitate to contact me, I'd love to hear from you.

If you wish to buy any of the items used, go to contacting me at the top of the page for details on how to order.

Will be back again soon with more cards, in the meantime take care and have a great day.
Annette 😘

Monday, March 27, 2023

Best Family Ever and more

  Welcome to my blog

and  thank you for joining me today!

Happy Anniversary to the best Husband in the world


This is a mixture of old and new, didn't have a clue what I was going to do and this was the result.

Materials required for this card are:

Card Stock: basic white, *champagne foil, real read, 
Designer Series Paper: *pattern party
Dies: *playful alphabet, sentiment silhouettes, stylish shapes (2)
Embossing Folders: *subtle 3D
Ink: memento tuxedo black
Stamp Sets: best family ever
Accessories: basic pearls, *glittered organdy
 
* = no longer available, when using layering dies (1)

Hope you liked today's card. If you would like more information on how to make it, please don't hesitate to contact me, I'd love to hear from you.

If you wish to buy any of the items used, go to contacting me at the top of the page for details on how to order.

Will be back again soon with more cards, in the meantime take care and have a great day.
Annette 😘

Sunday, March 26, 2023

Go To Greetings meets Two-Tone Flora

 Welcome to my blog

and  thank you for joining me today!

Happy Birthday Jean


This was the first time of using this bundle and I was pleasantly surprised how nice it all comes together. The ribbon is a real blast from the past though.

Materials required for this card are:

Card Stock: basic white, rich razzleberry
Designer Series Paper: dainty flowers (sab)
Dies: meadow, two-tone flora
Ink: blushing bride, old olive, rich razzleberry
Stampin' Up Blends: old olive
Stamp Sets: go to greetings, two-tone flora
Accessories: *grosgrain stitched ribbon
 
* = no longer available, (sab) = sale-a-bration item
  1. base card 21 x 14.5 scored at 10.5
  2. stamp the flowers, leaves and sentiment
  3. die cut the background, flowers, leaves and sentiment
  4. trim down the background to just a narrow edge (roughly 10 x 14)
  5. cut a piece of the dsp to fit behind the background and adhere using wet glue
  6. Adhere the background to the base card using wet glue
  7. adhere the leaves, flowers and sentiment using wet glue
  8. make a bow and attach using glue dots
Hope you liked today's card. If you would like more information on how to make it, please don't hesitate to contact me, I'd love to hear from you.

If you wish to buy any of the items used, go to contacting me at the top of the page for details on how to order.

Will be back again soon with more cards, in the meantime take care and have a great day.

Annette 😘 

Tuesday, March 14, 2023

Covered In Sunshine meets Dainty Delight dies

 Welcome to my blog

and  thank you for joining me today!

Happy Birthday Sharon


just love this card, I CASed it from Pinterest and just used different colours and paper, and it was so easy to make. The original was created by Meg from "lovenstamps.com" 

Materials required for this card are:

Card Stock: basic white, calypso coral, granny apple green, fresh freesia, mango melody
Designer Series Paper: dandy designs
Dies: dainty delight
Embossing Folders: raindrops
Ink: memento tuxedo black
Stamp Sets: covered in sunshine
Accessories: *white perfect accents

* = no longer available
  1. Base card 14.8 x 21 scored at 10.5, dsp 14.8 x 5, dsp 7.5 x 8 plus off cuts for the flowers and leaves
  2. emboss the right hand side of the base card (aprox 5.5 x 14.8
  3. adhere the two pieces of dsp using wet glue
  4. stamp the sentiment using memento black and fussy cut round it
  5. stamp the three words and trim down to size then adhere using wet glue
  6. die cut the leaves and flowers
  7. position the leaves and attach at the bottom using a dimensional
  8. adhere the rest of the leaves with wet glue
  9. add more dimensionals to the back of the sentiment and stick it down
  10. adhere the flowers using wet glue and add the white accent.
Hope you liked today's card. If you would like more information on how to make it, please don't hesitate to contact me, I'd love to hear from you.

If you wish to buy any of the items used, go to contacting me at the top of the page for details on how to order.

Will be back again soon with more cards, in the meantime take care and have a great day.

Annette 😘 

Sunday, March 12, 2023

Art Gallery meets Alphabet A La Mode

  Welcome to my blog

and  thank you for joining me today!

Happy Birthday Gemma


A mixture of stamping, die cutting and the baby wipe technique, this card is so simple to do.

Materials required for this card are:

Card Stock: basic white
Designer Series Paper: *sunshine rainbows
Dies: alphabet a la mode, basic borders, floral gallery
Embossing Folders: *subtle 3D
Ink: fresh freesia
Ink refills: fresh freesia, pale papaya, pool party
Stamp Sets: art gallery
Accessories: adhesive-backed snowflakes, baby wipe, open weave ribbon
 
* = no longer available
  1. base card 29.7 x 10.5 scored at 14.85, dsp 14.85 x 5, layer one 14.85 x 9, letters basic white 9 x 5
  2. load a baby wipe with 3 colours using re-inkers (only a couple of spots of each colour needed)
  3. swipe the baby wipe across the card stock for the letters.
  4. stamp the sentiment
  5. Adhere the dsp to the top of the card using wet ink.
  6. Die cut the clouds, letters and sentiment pieces.
  7. Emboss the clouds using the subtle 3D folder (or similar)
  8. Adhere the letters across the clouds 
  9. Add ribbon to clouds and adhere to the base card
  10. Add the snowflakes, then the sentiment using dimensional's
Hope you liked today's card. If you would like more information on how to make it, please don't hesitate to contact me, I'd love to hear from you.

If you wish to buy any of the items used, go to contacting me at the top of the page for details on how to order.

Will be back again soon with more cards, in the meantime take care and have a great day.
Annette 😘
Saturday, March 11, 2023

On the Horizon

  Welcome to my blog

and  thank you for joining me today!

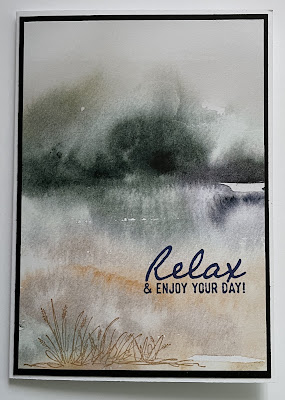
Happy Birthday Sid


My New Years resolution is to try and use up some of my old DSP papers. So here we go. I've  I CASED this from Pinterest and it's so simple just cutting card and DSP then stamping the image and sentiment.

Materials required for this card are:

Card Stock: basic white, basic black
Designer Series Paper: *new horizons
Ink: crumb cake, pale papaya, starry sky
Stamp sets: *on the horizon
* = no longer available
  1. base card 14.8 x 21 scored at 10.5, layer one 14.4 x 10.1
  2. layer 2 dsp 14 x 9.1
  3. stamp the reeds in pale papaya and then stamp again in crumb cake
  4. stamp the sentiment
  5. adhere each layer 
Hope you liked today's card. If you would like more information on how to make it, please don't hesitate to contact me, I'd love to hear from you.

If you wish to buy any of the items used, go to contacting me at the top of the page for details on how to order.

Will be back again soon with more cards, in the meantime take care and have a great day.
Annette 😘

Saturday, March 4, 2023

Friends Are Like Seashells meets Wonderful World

  Welcome to my blog

and  thank you for joining me today!

Happy Birthday Margaret


Thought I'd use some of my new goodies for this card, and loved the result!

  1. Start with a normal base card (half an A4)
  2. The contrasting layer is die cut and embossed
  3. Flowers are inked up using Stampin' markers, then die cut using a frame
  4. wind bakers twine round the frame, then tie with a bow
  5. Stamp the sentiment using a ¾''  strip of cardstock, then use the punch on each side.
  6. Adhere elements to the card base and add some rhinestones.

Materials required for this card are:

Card Stock: basic white, highland heather
Dies: painted labels, split card
Embossing Folders: timeworn type 3D
Ink: highland heather
Punches: lovely labels
Stampin' Markers: highland heather, pear pazzazz
Stamp Sets: friends are like seashells, wonderful world
Accessories: bakers twine essentials, iridescent rhinestones


Hope you liked today's card. If you would like more information on how to make it, please don't hesitate to contact me, I'd love to hear from you.

If you wish to buy any of the items used, go to contacting me at the top of the page for details on how to order.

Will be back again soon with more cards, in the meantime take care and have a great day.
Annette 😘

Blast from the past Perennial Birthday

  Welcome to my blog and    t hank you for joining me today! Happy Birthday Stephen For this card I was inspired by one i'd seen on Pint...