Showing posts with label clear ep. Show all posts

Saturday, August 5, 2023

Layering Leaves goes to town

   Welcome to my blog

and  thank you for joining me today!

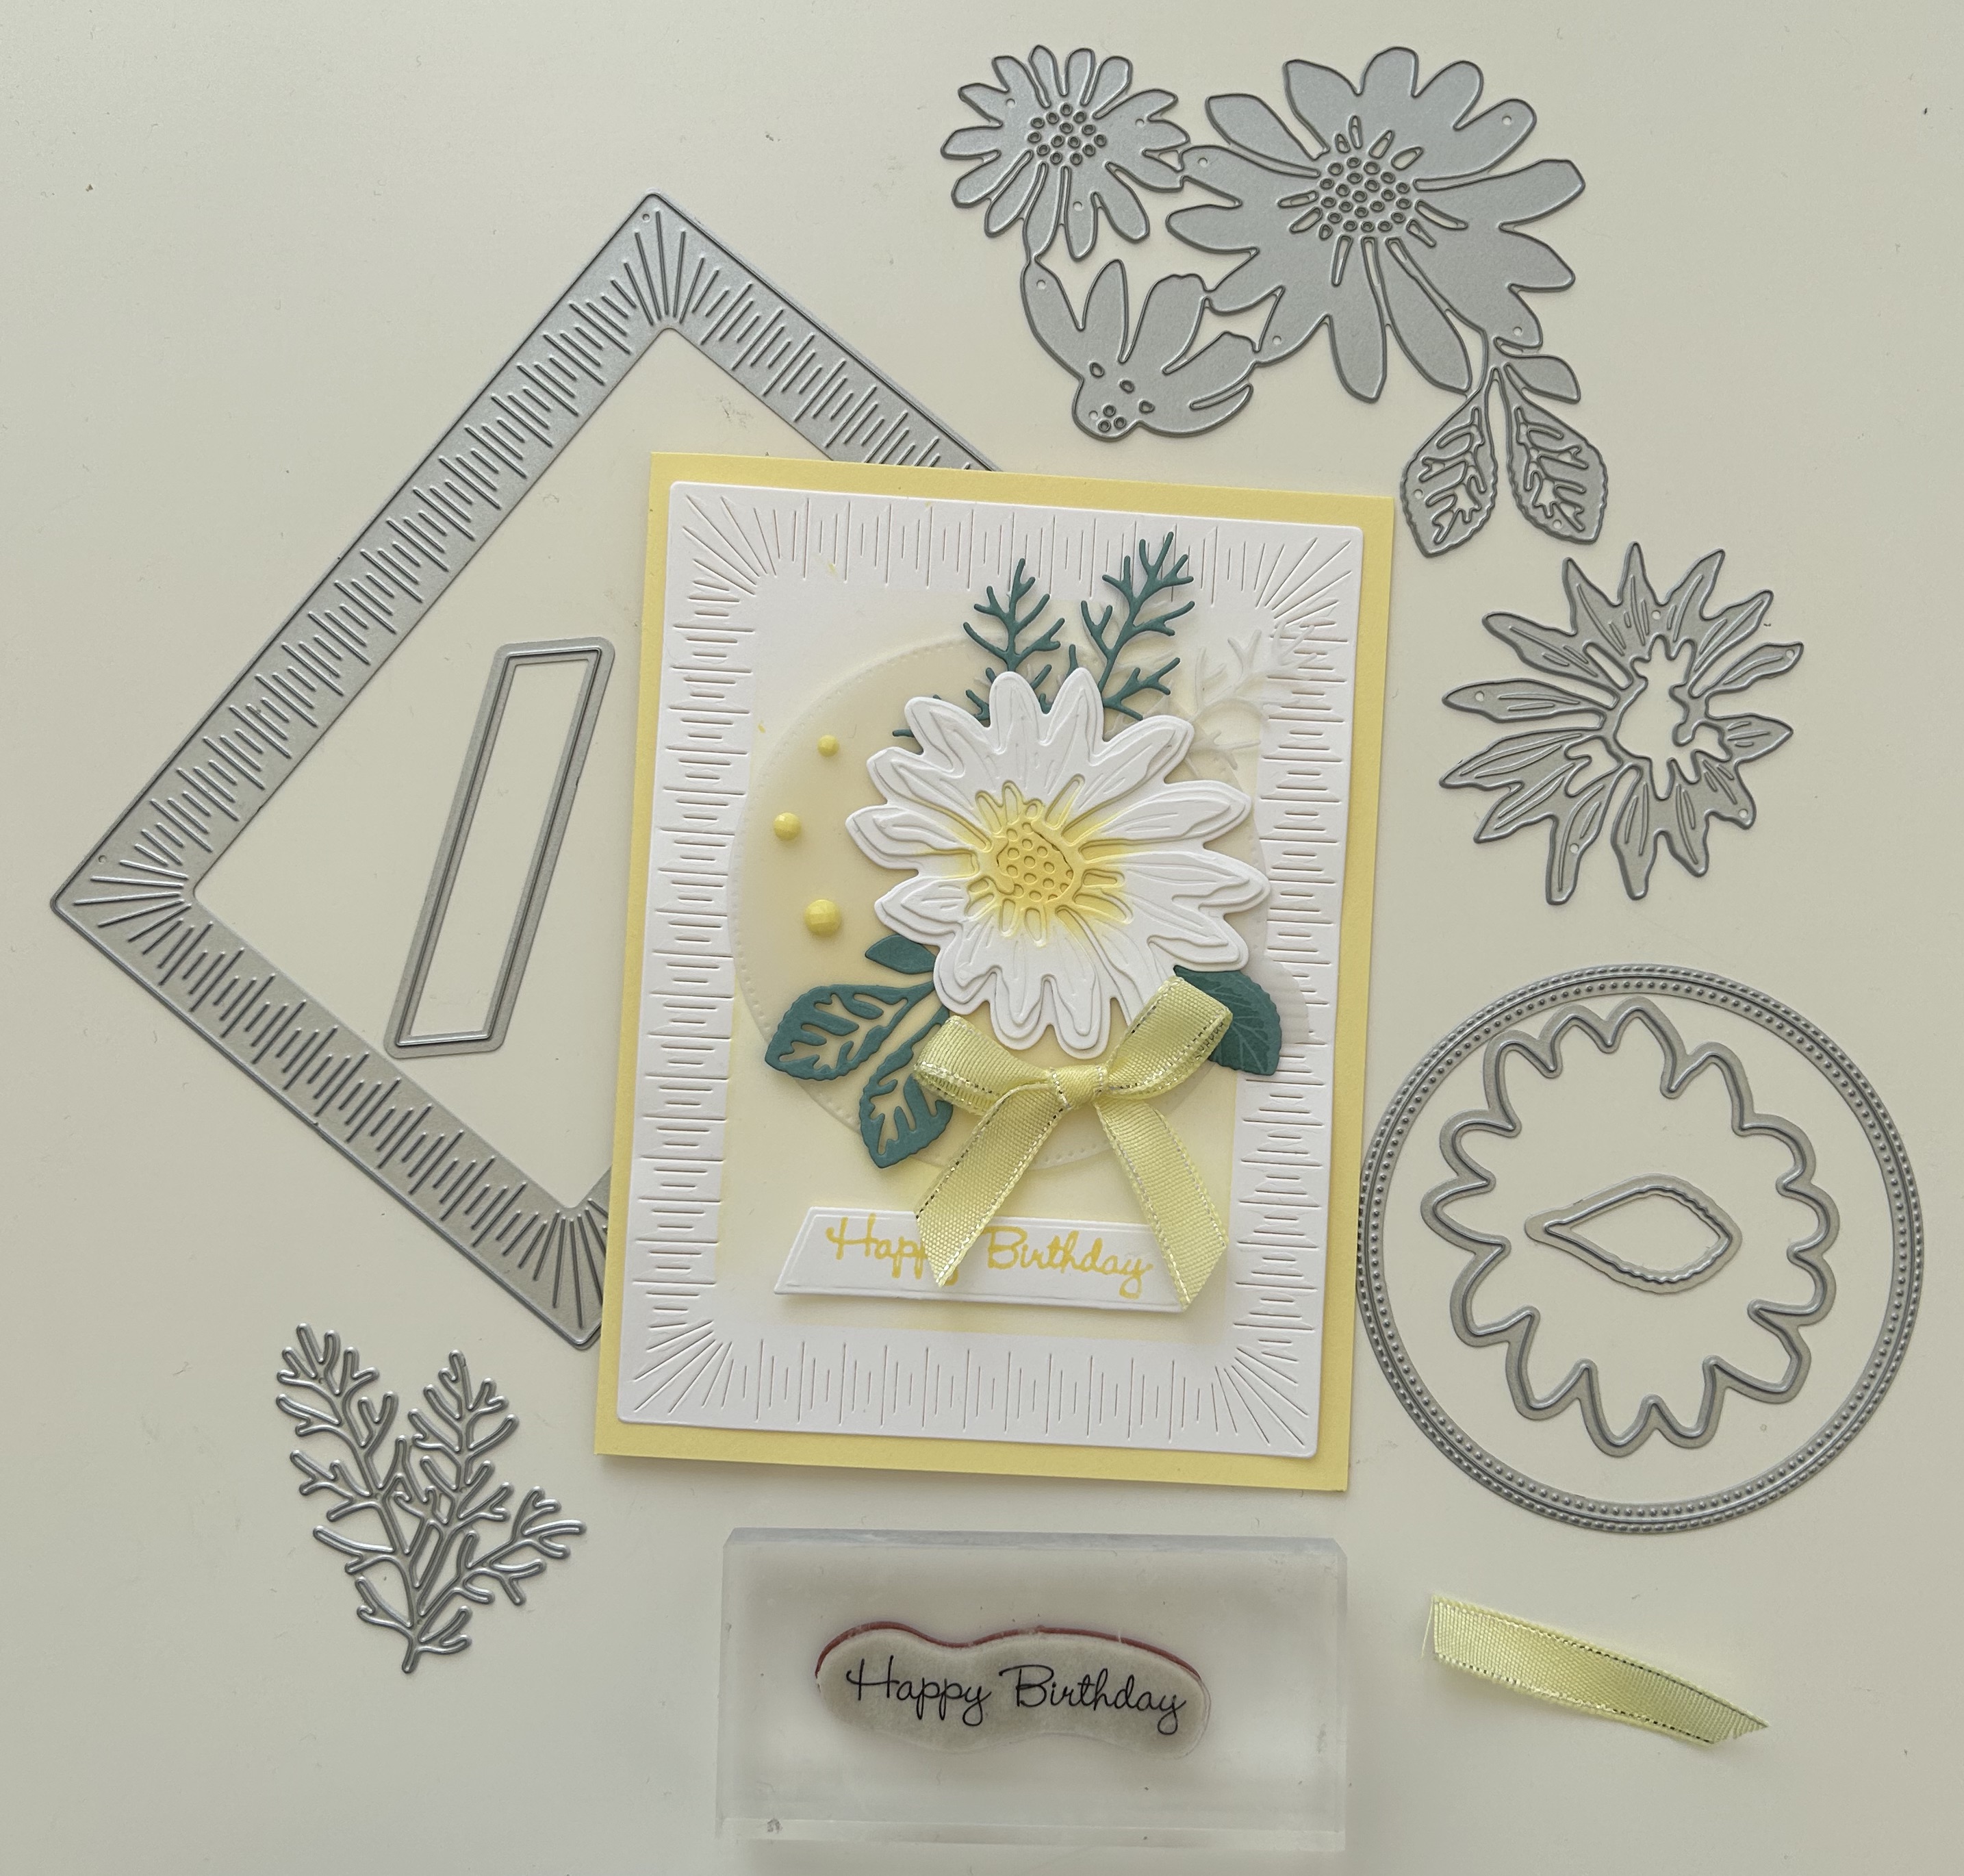
Happy Birthday Sylvia


A few techniques - 2 step stamping, dry embossing, heat embossing, punching and die cutting

Materials required for this card are:

Card Stock: basic white, flirty flamingo, vellum
Designer Series Paper: distressed gold
Dies: *layering circles (6)
Embossing Folders: basic 3D, Cane weave 3D
Embossing Powder: Clear
Ink: flirty flamingo, granny apple green, lemon lime twist, shaded spruce, versamark
Punches: Bough, circle 2⅜"
Stamp Sets: layering leaves
Stampin' Blends: flirty flamingo
Stampin' Markers: flirty flamingo, shaded spruce
Accessories: bakers twine essentials pack
 * = no longer available, when using layering dies (1) is the smallest
  1. Start with a base card 14.5 x 21 scored at 10.5, basic white 10 x 14, flirty flamingo .5 x 10.5
  2. emboss the white layer using the cane weave folder and adhere  to the base card using stampin' seal
  3. add the strip of flirty flamingo across the base card about 5cm from the bottom of the white layer using stampin' seal
  4. stamp the 3 green leaves using 2 step stamping for the lemon lime twist leaf
  5. for the flowers use the markers to ink up the stem and buds and then stamp (don't forget to huff before stamping)
  6. punch out these pieces and then punch out a further 2 sets in vellum
  7. die cut a scalloped circle with the dsp
  8. to stamp the sentiment, ink the stamp first in versamark and then flirty flamingo before stamping
  9. add the embossing powder and heat
  10. punch out the sentiment using the circle punch
  11. adhere the sentiment to the scalloped circle using liquid glue
  12. emboss the vellum leaves and buds using the basic 3D folder
  13. arrange the leaves and buds at the back of the scalloped circle and attach using glue dots
  14. using dimensional pads attach the topper to the base card
  15. colour a length of bakers twine using the stampin' marker, then make a double bow. Once made separate strands below the bow knot, add a glue dot and attach to the card.
Hope you liked today's card. If you would like more information on how to make it, please don't hesitate to contact me, I'd love to hear from you.

If you wish to buy any of the items used, go to contacting me at the top of the page for details on how to order.

Will be back again soon with more cards, in the meantime take care and have a great day.
Annette 😘

Sunday, July 23, 2023

Cheerful Daisies meets Go to Greetings

   Welcome to my blog

and  thank you for joining me today!

Happy Birthday Anne


easy decoupage, layering, die cutting and stamping

Materials required for this card are:

Card Stock: basic white, lemon lolly, lost lagoon 
Dies: cheerful daisies, radiating stitches, something fancy, stylish shapes
Ink: lemon lolly, lost lagoon, versamark
Stamp Sets: cheerful daisies, go to greetings
Accessories: adhesive-backed solid gems, clear embossing powder, sheer ribbon
  1. Start with a base card 14 x 21 scored at 10.5, white layer 14 x 11, lost lagoon, vellum, basic white for leaves and flower and sentiment
  2. die cut the background layer and use a blending brush to colour the centre
  3. adhere this layer to the base card using liquid glue
  4. stamp the sentiment using versamark & lemon lolly ink, add the clear embossing powder and heat emboss.
  5. stamp the single leaf 
  6. die cut all the pieces - flower layers (3), leaves (2) one green and one vellum, sentiment label, large vellum circle 
  7. using a blending brush, colour the centre of the flower pieces and then build the layers using glue dot
  8. adhere the circle to the base card using liquid glue
  9. adhere the leaves around the vellum circle using liquid glue
  10. add the flower to the top using glue dots
  11. make a bow and attach using a glue dot
  12. attach the sentiment using dimensional pads
  13. add the gems
Hope you liked today's card. If you would like more information on how to make it, please don't hesitate to contact me, I'd love to hear from you.

If you wish to buy any of the items used, go to contacting me at the top of the page for details on how to order.

Will be back again soon with more cards, in the meantime take care and have a great day.
Annette 😘

Wednesday, December 28, 2022

Faux Leather meets Color Contour

    Thank you for joining me today!

Happy 3rd Anniversary Heather & Mike


Tried a new technique today, creating faux leather. 

I used the simple method of dry embossing and then heat embossed using versaMark and clear embossing powder, which believe it or not has got a leather look about it.

Materials required for this card are:

Card Stock: basic white, evening evergreen, pale papaya 
Dies: scalloped contour, stitched rectangles (2,3,4) wide
Embossing Folders: *stone
Embossing Powder: clear
Ink: evening evergreen, pale papaya fresh freesia, polished pink, versaMark
Stamp Sets: color & contour, *beautiful Bouque
 * = no longer available, and when using layering dies (1) is the smallest

Hope you liked today's card. If you would like more information on how to make it, please don't hesitate to contact me, I'd love to hear from you.

If you wish to buy any of the items used, go to contacting me at the top of the page for details on how to order.

Will be back again soon with more cards, in the meantime take care and have a great day.
Annette 😘

Tuesday, April 12, 2022

Create With Friends meet Whiskey Business

    Thank you for joining me today!

Happy Birthday Duncan


This was a quick and easy card to make except for the fussy cutting (hate doing that). There's also dry embossing, die cutting, heat embossing and colouring with blends.

Materials required for this card are:

Card Stock: basic black, basic white
Designer Series Paper: in good taste
Dies: tasteful labels
Embossing Folders: painted texture 3D
Embossing Powder: clear
Ink: & memento black, *rococo rose, versamark
Stampin' Blends: mango melody
Stamp Sets: create with friends, whiskey business
Accessories: faux suede trim, wink of stella
 
* = no longer available

Hope you liked today's card. If you would like more information on how to make it, please don't hesitate to contact me, I'd love to hear from you.

If you wish to buy any of the items used, go to contacting me at the top of the page for details on how to order.

Will be back again soon with more cards, in the meantime take care and have a great day.
Annette 😘

Monday, January 10, 2022

Handsomely Suited meets Tailored Tag

    Thank you for joining me today!

Happy Birthday Kieran


Kieran is a Wolves fan so I thought orange and black was a good combo for his card this year. There was'nt  a lot of planning as I CASed it from Karen Young's blog, so thank you Karen.

Materials required for this card are:

Card Stock: basic black, basic white, pumpkin pie
Embossing Powder: clear
Ink: memento black, versa mark
Punches: tailored tag
Stamp Sets: handsomely suited
Accessories: *black cord, clear embossing powder, stamparatus
 * = no longer available

Hope you liked today's card. If you would like more information on how to make it, please don't hesitate to contact me, I'd love to hear from you.

If you wish to buy any of the items used, go to contacting me at the top of the page for details on how to order.

Will be back again soon with more cards, in the meantime take care and have a great day.
Annette 😘

Wednesday, November 10, 2021

Dandelion Wishes meets Darling Donkeys

    Thank you for joining me today!

Clean and Simple blast from the Past


Although I've stated this is a clean and simple card, I did slightly step it up, by heat embossing the dandelion. By doing that I suppose I've made it a step up card from basic, but still very simple to make. 

Materials required for this card are:

Card Stock: very vanilla, soft suede
Embossing powder: clear 
Ink: so saffron, soft succulent, soft suede, versamark
Stamp Sets: *dandelion wishes, *darling donkeys
* = no longer available
Accessories: basic rhinestones, blending brushes, note cards

Hope you liked today's card. If you would like more information on how to make it, please don't hesitate to contact me, I'd love to hear from you.

If you wish to buy any of the items used, go to contacting me at the top of the page for details on how to order.

Will be back again soon with more cards, in the meantime take care and have a great day.
Annette 😘

Sunday, January 31, 2021

Dragonflies on Vellum

Hello and welcome to my haven in a hectic world!
Thanks for joining me today!

Another thank you for Sue! It's week 44


I've really gone on DL cards at the moment, and just loved this one. It includes some blending, which is another thing I'm enjoying just now, our new brushes are just fantastic.

Materials required for this card are:

Card Stock: basic white, highland heather, vellum
Dies: stitched so sweetly
Embossing Folders: subtle 3D
Embossing Powder: clear
Ink: balmy blue, bermuda bay, highland heater, pear pizzazz, smoky slate, versamark
Punches: dragonflies
Ribbon: *snowflake splendor
Stampin' Markers: bermuda bay, highland heater, pear pizzazz
Stamp Sets: dragonfly garden
Accessories: blending brushes, wink of stella (small dragonflies)
* = retired, when using layering dies (1) is the smallest

Hope you liked today's card. If you would like more information on how to make it, please don't hesitate to contact me, I'd love to hear from you.

If you wish to buy any of the items used, go to contacting me at the top of the page for details on how to order.

Will be back again soon with more cards, in the meantime take care and have a great day.

Annette 😘 

Monday, January 25, 2021

Family Party with lots of die cutting

 Hello and welcome to my haven in a hectic world!

Thanks for joining me today!

This is the 2nd card for my Granddaughter, Jenny asked if I would do A Daughter card for my Granddaughter and also a sister card which you will see tomorrow!


I made this card using a layout from Pinterest and mostly retired products. Plus, the daughter and numbers which are NSU!

Materials required for this card are:

Card Stock: Basic White, *glimmer
Designer Series Paper: *falling in love
Dies: be mine stitched, butterflies, ornate frames, smooth sailing
Embossing Folders: meadow moments
Embossing Powder: clear
Ink: bermuda bay, versamark
Stamp Sets: family party
* = retired, NSU = non stampin' up!

Hope you liked today's card. If you would like more information on how to make it, please don't hesitate to contact me, I'd love to hear from you.

If you wish to buy any of the items used, go to contacting me at the top of the page for details on how to order.

Will be back again soon with more cards, in the meantime take care and have a great day.
Annette 😘

Thursday, December 17, 2020

Toile Christmas meets Snowflake Spendor

 Hello and welcome to my haven in a hectic world!

Thanks for joining me today!

This is the card I made for special friends this year


There's a lot going on but it came together nicely!

Materials required for this card are:

Card Stock: balmy blue glimmer, whisper white
Designer Series Paper: snowflake splendor
Dies: *christmas cardinal, stitched so sweetly (3)
Embossing Folders: winter snow
Embossing Powder: clear
Ink: balmy blue, versamark
Punches: banner triple, detailed trio
Ribbon: crinkled seam binding
Stampin' Blends: balmy blue, just jade, old olive
Stamp Sets: *toile chiasmas
Accessories: champagne spritzer
* = retired, when using layering dies (1) is the smallest

Hope you liked today's card. If you would like more information on how to make it, please don't hesitate to contact me, I'd love to hear from you.

If you wish to buy any of the items used, go to contacting me at the top of the page for details on how to order.

Will be back again soon with more cards, in the meantime take care and have a great day.
Annette 😘

Monday, December 14, 2020

Toile Christmas meets Feels Like Frost

Hello and welcome to my haven in a hectic world!
Thanks for joining me today!

Happy Christmas to Dave & Jill, our lovely neighbours


I kinda CASEd this card from Karenscardkorner so thank you for the inspiration

Materials required for this card are:

Card Stock: *dazzling diamonds glimmer, whisper white
Designer Series Paper: feels like frost
Dies: *christmas cardinal, stitched rectangles (2)wide cut down
Embossing Folders: winter snow
Embossing Powder: clear
Ink: seaside spray, versamark
Punches: banner triple, detailed trio
Ribbon: metallic
Ribbon: just jade, old olive, seaside spray
Stamp Sets: *toile christmas
Accessories: champagne spritzer
* = retired, when using layering dies (1) is the smallest

Hope you liked today's card. If you would like more information on how to make it, please don't hesitate to contact me, I'd love to hear from you.

If you wish to buy any of the items used, go to contacting me at the top of the page for details on how to order.

Will be back again soon with more cards, in the meantime take care and have a great day.

Annette 😘 

Saturday, October 31, 2020

Family Party meets Peaceful Moments & Under My Umbrella

 Hello and welcome to my haven in a hectic world!

Thanks for joining me today!

Happy birthday Rachael

Loved the under my umbrella bundle, so it went on my order but it has taken me some time to actually use it. Love the result though!


Materials required for this card are:

Card stock: pool party, whisper white
Dies: ornate borders, stitched rectangles (4), tasteful labels
Embossing folders: subtle 3D
Embossing Powder: clear
Ink: pool party
Punches: umbrella builder
Ribbon: *taffeta
Stampin' blends: flirty flamingo, granny apple green, mango melody
Stamp sets: family party, peaceful moments, under my umbrella
Accessories: *woven threads sequins

* = retired, when using layering dies (1) is the smallest

Heat embossed the two sentiments using pool party ink and clear embossing powder.

Hope you liked today's card. If you would like more information on how to make it, please don't hesitate to contact me, I'd love to hear from you.

If you wish to buy any of the items used, go to contacting me at the top of the page for details on how to order.

Will be back again soon with more cards, in the meantime have a great day.
Annette 😘

Sunday, October 25, 2020

Tasteful Touches meets Ornate Frames

 Hello and welcome to my haven in a hectic world!

Thanks for joining me today!

I'm starting to get really fed up with not being able to go out and see family and friends now, and the only thing that's keeping me sane is spending time in my craft room each morning. 

Sunday Dinner card for Sue & family


Decided to look at retired DSP for this weeks card and liked what I came up with!

Materials required for this card are:

Card Stock: Petal Pink, Very Vanilla
Dies: ornate frames
Embossing Folders: tasteful textiles 3D
Embossing Powder: clear
Ink: petal pink, versamark
Laser Cut Speciality Paper: *beautifully detailed
Ribbon: organdy striped
Stampin' Blends: 
Stamp Sets: tasteful touches
Accessories: champagne rhinestones
* = retired

Hope you liked today's card. If you would like more information on how to make it, please don't hesitate to contact me, I'd love to hear from you.

If you wish to buy any of the items used, go to contacting me at the top of the page for details on how to order.

Will be back again soon with more cards, in the meantime take care and have a great day.
Annette 😘

Monday, August 24, 2020

Floral Essence and more!!

Hello and welcome to my haven in a hectic world!

Happy Birthday Donna

I made a  fun fold card the other day and thought the layout used might be nice for a basic card with an added flower and I think it is, what do you think?


Materials required for this card are:

Card stock: *perennial essence vellum, petal pink, very vanilla
DSP:perennial essence
Dies: layering circles (2), stitched shapes (1)
Embossing powders: clear
Ink: craft white, blackberry bliss
Ribbon: *ombre calypso coral 
Stamp sets: by the dock, floral essence, peaceful moments
Accessories: *white perfect accents

Once I'd stamped the flower petals and leaf I heat embossed using clear embossing powder, to make sure the ink didn't smudge.
* = retired

Hope you liked today's card. If you would like more information on how to make this card please don't hesitate to contact me, I'd love to hear from you.

If you wish to buy any of the items used, go to contact me at the top of the page for details on how to order.

Will be back again soon with more cards, in the meantime have a great day.
Annette 😘

Thursday, May 14, 2020

Timeless Tulips meets Stitched So Sweetly and more

Hi, welcome to my haven in a hectic world, thanks for dropping by!

This will be my card for Sue a week on Sunday.
This card came about from seeing a colour challenge in "stamping for all" which I decided to have a go at!
All measurements are in centimetres.
(cb) = card base, (cs) = card stock, (ef) = embossing folder, (ep) = embossing powder, when using layering dies (1) is the smallest,  w = wide and n = narrow.
Colours: Calypso Coral, Early Espresso, Gray Granite, Very Vanilla.
  • Start with very vallnilla (cs) 29 x 10.5 scored at 14.5 to form the (cb).
  • Cut a piece of early espresso (cs) 10 x 14 and adhere to the front of the(cb) using liquid glue.
  • Cut a piece each of early espresso, calypso coral and gray granite (cs) 1 x 10, then die cut each piece using the filigree die in the nature's thoughts dies. 
  • Cut a piece of very vanilla (cs) 9.5 x 13.5 and adhere the filigree about 1cm in and then 1cm apart. Adhere this layer to the (cb) using liquid glue.
  • Using a piece of very vanilla (cs) 8 x 10 die cut a scalloped rectangle (6) from the stitched so sweetly dies.
  • Stamp the tulips from the timeless tulips (ss) in calypso coral and gray granite. At the same time stamp a second large tulip and large leaf on a scrap piece of very vanilla (cs) then punch out both of these using the tulip builder punch.
  • Emboss the tulips rectangle using the subtle (ef), then attach to the (cb) using dimensional pads.
  • Using very vanilla (cs) 3 x 7 stamp the sentiment from the timeless tulips (ss)  in early espresso and heat emboss using clear (ep), then die cut using the stitched rectangles dies (1) w.
  • Attach the sentiment using dimension pads.
  • Attach the tulip and leaf using liquid glue at the bottom and dimensional pads at the top to give a little extra dimension.
  • Add a small bow. Mine is (r) ombre ribbon, but you can use crinkle seam binding and colour it any colour you want using stampin' blends.
Will be back again soon with more cards, enjoy the rest of your day & happy stampin'
Annette X

Sunday, May 3, 2020

Peaceful Moments meets Painted Poppies

Welcome to my haven in a hectic world, thanks for dropping by.

Another card for Sue, it's now week 7 of the pandemic lockdown.
All measurements are in centimetres.

(cs) = card stock, (dsp) = designer series paper, (ep) = embossing powder, (nsu) = non stampin' up!, (r) = retired, (ss) = stamp set, when using layering dies (1) is the smallest. n and w means narrow or wide rectangles.
  • Start with a card base of thick whisper white (cs) 14.5 x 21 scored at 10.5 (my card base is (nsu) card stock).
  • Adhere a layer of (r) peaceful poppies (dsp) 14 x 10, using liquid glue.
  • The poppy layer, is whisper white (cs) 5 x 9 using the painted poppies (ss) old olive & rich razzleberry markers. Then die cut using the (3)w stitched rectangles dies.
  • Adhere this layer to the card base using liquid glue.
  • Stamp the thank you from the peaceful moments (ss) using versamark ink on a piece of rich razzleberry (cs) 3 x 8, then heat emboss using the (r) pool party (ep) or stamp the thank you in pool party and versamark then heat emboss using clear (ep).
  • Die cut the thank you using the (2)n stitched rectangles dies, then emboss using the subtle (ef).
  • Attach this layer to the card base using dimensional pads.
  • Make a bow using the braided linen trim and adhere to the card base using glue dots.
The little bag in the picture was made following the directions from one of Amanda Fowlers video's.

Will be back again soon with more cards, goodbye for now and enjoy the rest of your day!
Annette X

Sunday, April 12, 2020

Above the Clouds meets Waterfront

Hello and welcome to my haven in a hectic world, hope you're having a great day!

Happy Birthday Duncan!

I have a few of the "waterfront" type stamp sets now and feel I'm starting to get better with them.
I really enjoyed making this one.

All measurements are in centimetres.

(cs) = cardstock, (ep) = embossing powder, (ss) = stamp set.

Terracotta Tile 21 x 14.5 scored at 10.5 (card base), Seaside Spray 9.7 x 13.7 (1st layer), sWhisper White 13.3 x 9.3 (2nd layer), 7 x 4.5 Balloon.
  • Stamp the sentiment from the itty bitty greetings (ss) in memento black ink onto the seaside spray 1st layer and punch out using the classic label punch (this is called gutting, the hole that is left doesn't get seen).
  • Adhere the 1st layer to the card base using liquid glue.
  • Prime the top half of the whisper white 2nd layer with your embossing buddy and then stamp the clouds from the above the clouds (ss) in versaMark and heat emboss using clear (ep).
  • Stamp your scene making sure there's a top, middle and bottom area, using the waterfront (ss) and appropriate colours. I used balmy blue and pool party for the sky (sponge method), gray granite for the mountains, seaside spray for the water, mossy meadow for grass, shaded spruce & early espresso for the trees, then more sponging at the bottom using sahara sand and terracotta tile (very lightly). The birds are stamped in memento black.
  • With the small piece of whisper white (cs) stamp the full balloon in terracotta tile and then over stamp with one of the outline balloons in memento black and punch out using the hot air balloon punch. Stamp the outline of the basket in memento black and punch out too.
  • Colour the basket using a bronze stampin' blend.
  • Adhere the second layer to the card base using liquid glue.
  • Attach the balloon using dimensional pads.
  • Cut the sentiment straight on the left and diagonal on the right, then attach to the card base using dimensional pads.
Will be back again soon with more cards. Thanks for stopping by.
Annette X

Wednesday, March 4, 2020

Petals & More meets Stitched Lace

Hello and welcome to my haven in a hectic world.

My Niece had her big 40 last week and I forgot to post the blog! Oops....

When I'd completed the card I was quite pleased with it, then realised it was her 40th  this year so had to quickly add the little bit at the bottom. Just glad there was room.
All measurements are in centimetres and nested dies start with (1) being the smallest.
(cs) = card stock, (dsp) = designer series paper, (ep) = embossing powder, (nsu) = not stampin' up, (r) = retired, (ss) = stamp set,

Card Stock: Lovely Lipstick 2 pieces 14.85 x 21 scored at 10.5 (card base),  6 x 6 (scallop circle), Whisper White 3 pieces 10.5 x 14.8 (stitched lace), 6 x 6 (stitched circle), small scrap (today).
DSP: 18-20 In Color Pack 4.1 x 10.
Foil: (r) lovely lipstick 2 x 5
  • Using the birthday cheer stamp from the parcels & petals (ss) add first versamark and then lovely lipstick before stamping on the  6 x 6 whisper white (cs) then heat emboss using clear (ep).
  • With the Stitched lace dies and the 10.5 x 14.8 whisper white (cs) die cut the front panel (this may need to go through the die cutting machine more than once). Then use the edge piece to cut off the bottom piece.
  • Adhere the 18/20 in color (dsp) across the bottom of the card base using liquid glue.
  • Dye a piece of white metallic edge ribbon using the dark lovely lipstick blends approximately 21cms is needed
  • Cut a piece of the dyed ribbon to about 13cm and adhere to the card base using glue dots at the back of each edge. Then with the rest of the ribbon tie a loose knot at the front right side. (the tighter the knot the fatter the card).
  • Die cut the following
    • scallop circle 6 x 6 lovely lipstick (cs) layering circles dies scallop (4) 
    • birthday sentiment (cs) stitched shapes dies circle (2)
    • (nsu) numbers  in (r) lovely lipstick foil 2 x 5 
  • Using the well said (ss), stamp the today using the to, and the day from "mothers day", then trim down to make a small tag.
  • Adhere the birthday cheer to the scallop circle using liquid glue, then attach to the card base using dimensional pads.
  • Adhere the age using liquid glue and the today using dimensional pads.
  • Colour a basic rhinestone with the lovely lipstick stampin' blends and adhere to the greeting.
Thanks for popping by and have a great day!

Will be back again soon with more cards.
Annette X

Daisies meets Nature's Symphony

  Welcome to my blog and    t hank you for joining me today! Happy birthday Serenia Intermediate level - die cutting, dry embossing, layerin...