Showing posts with label stampin' blends.. Show all posts

Thursday, April 30, 2026

Banner Sayings meets Artistic Dies

  Welcome to my blog

and  thank you for joining me today!

Happy Birthday Georgia


Intermediate level - bow making, die cutting, dry embossing, layering, stamping
I took inspiration from a card on Pinterest (sorry can't remember who)

Materials required for this card are:
 
Bundles: banner sayings
Card Stock: basic white pretty in pink
Designer Series Paper: in color 2024/6
Dies: *artistic, stylish shapes (4-6)
Embossing Folders: birch wood 3D
Ink: pretty in pink
Stampin' Blends: pretty in pink
Accessories: adhesive sheets, bakers twine essentials, *party dots
 * = no longer available, when using layering dies (1) is the smallest

Start with a basic card base 14.5 x 21 scored at 10.5, white 14.1 x 10.1, 6.5 x 6.5, off cut for sentiment, pink 14 x 7, 7.5 x 7.5, dsp 8.5.x .8.5
  1. put adhesive sheeting on the back of the pink 14 x 7 piece
  2. die cut the 3 circles, and the leaves
  3. dry emboss the white layer and small circle
  4. adhere the white layer to the base card using liquid glue
  5. adhere the 3 circles together using liquid glue, then cut in half
  6. attach each half circle to the card using dimensional pads
  7. remove the backing from the leaves and adhere to the top of the circles
  8. cut some bakers twine for a bow and colour it using the alcohol blends and let it dry
  9. make a bow
  10. stamp the sentiment, use the punch to shape it
  11. Attach the sentiment using dimensional pads
  12. add the dots
  13. adhere the bow using glue dots
Hope you liked today's card. If you would like more information on how to make it, please don't hesitate to contact me. I'd love to hear form you.

If you wish to buy any of the items used, go to contacting me at the top of the page for details of how to order.
 
Will be back again soon with more cards, in the meantime take care and have a great day.
Annette 😊

Sunday, March 22, 2026

Spotlight on Nature meets Nature's Symphony

  Welcome to my blog

and  thank you for joining me today!

Sympathy card for my Uncle & his wife who lost his elder sister last week


Easy level - bow making, die cutting, dry embossing, layering, stamping

Materials required for this card are:
 
Card Stock: basic white, mossy meadow
Stampin' blends: mossy meadow
Dies: nature's symphony, spotlight on nature (slots 2)
Embossing Folders: basics 3D
Ink: mossy meadow
Stamps: loveliest tree
Accessories: bakers twine essentials, natural matte dots
when using layering dies 1 is the smallest

Start with a basic card base 14.5 x 21 scored at 10.5, mossy meadow 11 x 10, white 10 x 14, 6.5 x 6.5, white bakers twine 20cm
  1. use the stampin' blend, dye the bakers twine and put to one side to dry
  2. die cut the leaves and circle
  3. stamp the sentiment in the circle
  4. dry emboss the white layer
  5. adhere the white layer to the base card using liquid glue
  6. adhere the leaves using liquid glue
  7. attach the circle using dimensional pads
  8. make the bow and attach using a glue dot
  9. add the dots
Hope you liked today's card. If you would like more information on how to make it, please don't hesitate to contact me. I'd love to hear form you.

If you wish to buy any of the items used, go to contacting me at the top of the page for details of how to order.
 
Will be back again soon with more cards, in the meantime take care and have a great day.

Annette 😊 


Saturday, January 17, 2026

Beautiful Gallery meets Everyday Arches and more

  Welcome to my blog

and  thank you for joining me today!

Happy Birthday Mick


level Intermediate - die cutting, dry embossing, layering, stamping

Materials required for this card are:
 
Bundles: delightful wishes
Card Stock: basic beige, secret sea,
Designer Series Paper: beautiful gallery
Dies: everyday arches (6,8)
Embossing Folders: mini corrugated
Ink: secret sea
Stampin' Blends: secret sea
Accessories: linen thread
when using layering dies (1) is the smallest

Start with a basic card base 14.5 x 21 scored at 10.5, beige layer 14 x 10, blue 9 x 12, dsp 7.5 x 11, linen thread 45cm (the last 10cm is needed for the faux bow at the front)

  1. in the middle of the beige layer (landscape) stamp the sentiment and die cut it, then crop to sentiment required
  2. dry emboss the beige layer
  3. dye the linen thread using the stampin blend and cut off 10cm
  4. wrap the rest around the beige layer so there are 2 strands at the front and secure at the back using tape
  5. thread the rest through the 2 strands at the front and tie with a knot, then trim
  6. adhere this to the base card using liquid glue
  7. with both arch dies cut out the big arch (the smaller blue arch is not now needed)
  8. die cut the dsp arch with the smaller die
  9. attach the large open arch to the base card using dimensional pads 
  10. Adhere the smaller arch using liquid glue inside the bigger arch

Hope you liked today's card. If you would like more information on how to make it, please don't hesitate to contact me. I'd love to hear form you.

If you wish to buy any of the items used, go to contacting me at the top of the page for details of how to order.
 
Will be back again soon with more cards, in the meantime take care and have a great day.
Annette 😊

Saturday, March 30, 2024

Petal Park bundle and more

 Welcome to my blog

and  thank you for joining me today!

Happy Easter Sheilah


Intermediate level - This is my version on a card created by 'stampwithamyk'.

die cutting, dry embossing, layering, punching, stamping, two step stamping

Materials required for this card are:

Bundles: petal park
Card Stock: basic white, *mint macaron
Designer Series Paper: *country gingham
Dies: scalloped contours (4)
Embossing Folders: *subtle 3D
Ink: lost lagoon, *mint macaron
Punches: heartfelt hexagon
Stamps: petal park, *heartfelt hellos
Stampin' Blends: daffodil delight
Accessories: satin edged ribbon, take your pick tool (this is a must have in every crafters craft room)
 
* = no longer available, when using layering dies (1) is the smallest

  1. Start with a base card 14.5 x 21 scored at 10.5, dsp layer 10.5 x 14.5, basic white off cuts for stamping
  2. adhere the dsp layer to the base card using liquid glue
  3. die cut the rectangle and stamp the leaves (two step stamping)
  4. now emboss this layer using the folder and adhere to the base card using liquid glue
  5. stamp the flowers in lost lagoon, and then punch them out. colour the centres using the stampin' blends, emboss the flowers using an embossing stylus and adhere to the card using liquid glue
  6. To stamp the happy easter, first stamp the Easter and then the Happy above, punch out using the hexagon punch
  7. adhere the ribbon at the back of the sentiment using tear & tape then  attach to the  base card using dimensional pads
Hope you liked today's card. If you would like more information on how to make it, please don't hesitate to contact me, I'd love to hear from you.

If you wish to buy any of the items used, go to contacting me at the top of the page for details of how to order.

Will be back again soon with more cards, in the meantime take care and have a great day.
Annette 😊 

Sunday, April 12, 2020

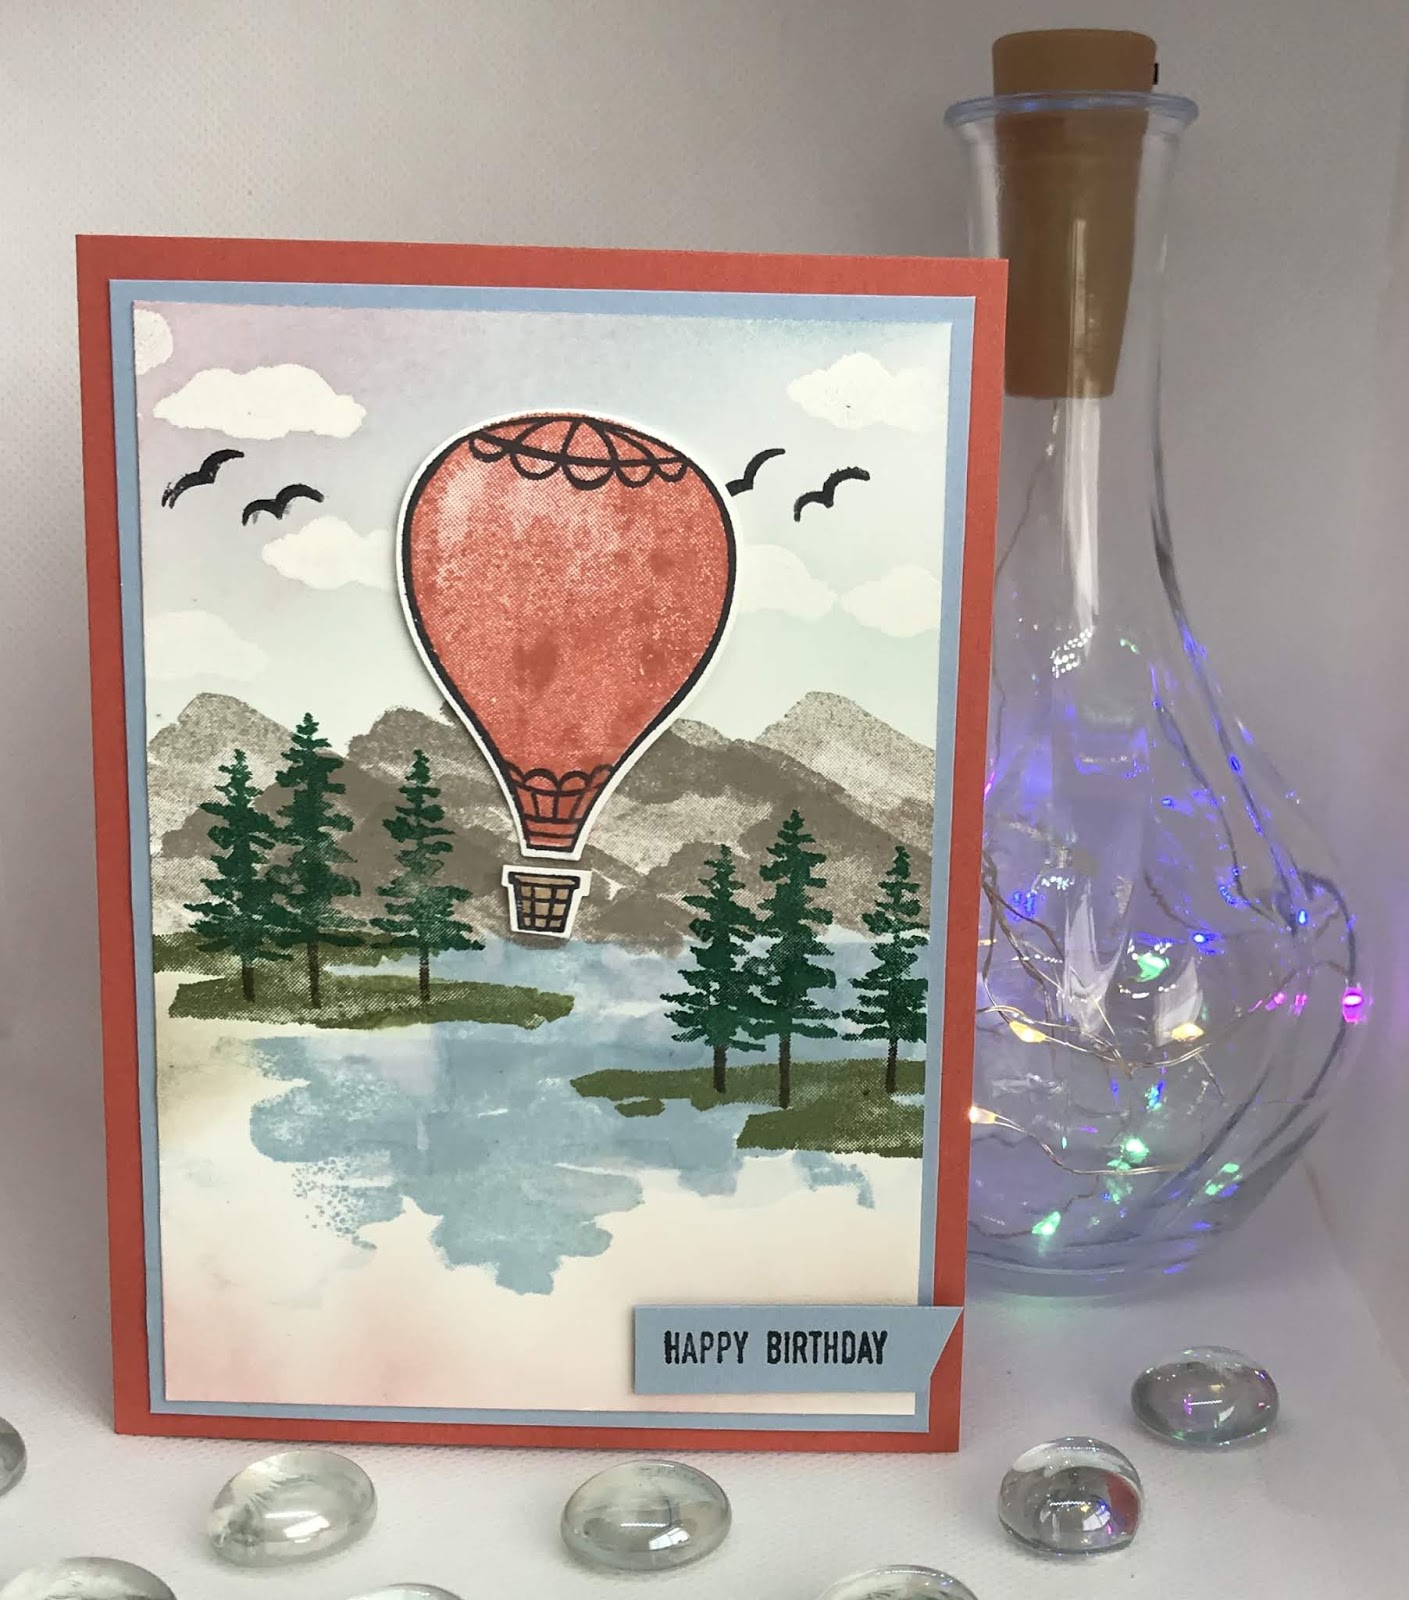
Above the Clouds meets Waterfront

Hello and welcome to my haven in a hectic world, hope you're having a great day!

Happy Birthday Duncan!

I have a few of the "waterfront" type stamp sets now and feel I'm starting to get better with them.
I really enjoyed making this one.

All measurements are in centimetres.

(cs) = cardstock, (ep) = embossing powder, (ss) = stamp set.

Terracotta Tile 21 x 14.5 scored at 10.5 (card base), Seaside Spray 9.7 x 13.7 (1st layer), sWhisper White 13.3 x 9.3 (2nd layer), 7 x 4.5 Balloon.
  • Stamp the sentiment from the itty bitty greetings (ss) in memento black ink onto the seaside spray 1st layer and punch out using the classic label punch (this is called gutting, the hole that is left doesn't get seen).
  • Adhere the 1st layer to the card base using liquid glue.
  • Prime the top half of the whisper white 2nd layer with your embossing buddy and then stamp the clouds from the above the clouds (ss) in versaMark and heat emboss using clear (ep).
  • Stamp your scene making sure there's a top, middle and bottom area, using the waterfront (ss) and appropriate colours. I used balmy blue and pool party for the sky (sponge method), gray granite for the mountains, seaside spray for the water, mossy meadow for grass, shaded spruce & early espresso for the trees, then more sponging at the bottom using sahara sand and terracotta tile (very lightly). The birds are stamped in memento black.
  • With the small piece of whisper white (cs) stamp the full balloon in terracotta tile and then over stamp with one of the outline balloons in memento black and punch out using the hot air balloon punch. Stamp the outline of the basket in memento black and punch out too.
  • Colour the basket using a bronze stampin' blend.
  • Adhere the second layer to the card base using liquid glue.
  • Attach the balloon using dimensional pads.
  • Cut the sentiment straight on the left and diagonal on the right, then attach to the card base using dimensional pads.
Will be back again soon with more cards. Thanks for stopping by.
Annette X

Delicate Whispers and more

Welcome to my blog and    t hank you for joining me today! Happy Anniversary to Sylvia & Bill Intermediate level - blending with a brush...