Wednesday, January 29, 2020

Get back on your feet count down

Hello, and welcome to my haven in a hectic world.

Well my world's got a busier since last week, as we are now collecting our grandson (which we love to do)  from school 3 days a week for the next 7 weeks, as our son came off his bike a week ago last Saturday and has broken his hip.

He had an operation on the Sunday and came home on the Monday, he's not allowed to put any weight on it for 8 weeks, a week and a half of which has already gone so I thought I'd make him a count down get back on your feet card.
I looked on the Internet for a perpetual calendar and adjusted Candace Gillespie's to make the frame and boxes. I needed to make 4 boxes for the numbers needed, I'm quite pleased with how it turned out.

Colours: Basic Black 9 pieces 17 x 12.5 base, 14 x 12 boxes 4 needed, 7 x 7 scallop circle, 16 x 7 numbers (you can use the discarded pieces from the boxes for this), 3.5 x 6 label, Whisper White 2 pieces 7 x 7 tortoise, 7 x 3.5 sentiment.
DSP:  Lily Impressions 24 pieces all 2.8 x 2.8 (box sides), 13.8 x 6.3 (backing for base)

(cs) = Card Stock, (dsp) = Designer Series Paper, (nsu) Not Stampin' Up, when using layering dies (1) is the smallest.
  • Using the back on your feet (ss) stamp the tortoise in memento black ink and colour using the granny apple green and soft suede stampin' blends on whisper white (cs).
  • from the same (ss) stamp the "ouch!" using granny apple green ink.
  • Die cut using the stitched shapes circle die (3). 
  • Die cut the basic black scalloped circle (6) using the layering circles dies.
  • Adhere the 2 circles together using liquid glue.
  • Stamp the sentiment again from the same (ss) in memento black on whisper white (cs) and die cut using the stitched so sweetly dies.
  • The "day's to go"was generated using my computer and punched out using the classic label punch.
  • Score the 3.5 x 6 piece of basic black (cs) in half, down the long edge so as to slot in between the top and bottom boxes.
  • Attach the "days to go" to this piece using dimensional pads.
  • To create the base score down the long edge at 3cm and 9.5cm then down the short edge at 3cm.
  • 3cm above the score line on the short edge make a mark on each side.
  • Now cut from the score line at the top of the base down to the mark, on each side.
  • Fold and burnish all the score lines.
  • Now cut up the long length score line to the 3cm score line on either side, when folded in and adhered, this creates the base for the boxes to sit on.
  • To create the boxes score down the long length at 1, 4, 7 and 10cm.
  • On the short length score down at 1, 4, 7, 10 and 13cm.
  • Now go back to 5cm and score down to the second long length score mark, flip the cs and do the same on the other side.
  • Now cut away the 5 pieces as shown below marked with an X.
  • Burnish all the score lines and adhere each square around the tabs to form a box using liquid glue.
  • Adhere the lily impressions (dsp) to each side of all the boxes, (matching up pattern if required).
  • Adhere the larger piece of lily impressions (dsp) to the back of the base.
  • Die cut all the numbers (nsu) in basic black (cs) required and adhere to the boxes using liquid glue (do not use the top and bottom squares). Full set of 0 to 9 and then any other numbers needed for 11, 22, 33 etc. 
It sounds difficult but it really isn't!

I wasn't sure he would like it but even before I had this up on my blog, he's got it on his facebook page so I think he does 😊.

Will be back again soon with more cards.
Annette X

Saturday, January 25, 2020

Piece of Cake meets Tufted


Hello, and thank you for stopping today

Happy birthday Ashlie!
What do you do when they start getting older? I find it harder to come up with ideas.

Measurements are in centimetres, (cs) = card stock, (dsp) = designer series paper, (ef) = embossing folder, (ep) = embossing powder), (r) = retired, when using layering dies (1) is the smallest.

Card base is 14.85 x 21 scored at 10.5, (r) winter frost (dsp) 14.85 x 4.5, so saffron (cs) strip 14.85 x 1, whisper white (cs) 9 x 6.5 (plain oval), silver foil 9.5 x 7 (scalloped oval),  scrap whisper white (cake) and (sentiment), scrap silver foil (cake base), scrap pool party and so saffron (label).

Colours are, coastal cabana, pool party, so saffron, memento tuxedo black (use of all outline stamping).
  1. With the tufted (ef) emboss the first 6 centimetres of the card base, adhere the (r) winter frost (dsp) down the left hand side and add the so saffron strip using liquid glue. Now add the glittered organza ribbon on top of the so saffron strip and tidy up the edges. I used snail to attach the ribbon.
  2. Stamp all the outline pieces using the piece of cake (ss) the candles are stamped on the whisper white (cs) for the oval.
  3. Using the layering ovals dies, die cut the plain oval (6) and the scalloped oval (7).
  4. The happy birthday sentiment was stamped using coastal cabana ink and heat embossed using clear (ep). Once embossed cut using the classic label punch. Then cut 2 more labels, one each of pool party and so saffron. Cut these two labels in half and adhere to the sentiment label at each end using liquid glue.
  5. Adhere the scalloped oval to the card base using liquid glue.
  6. Using stampin' blends colour the candles and cake, then add some clear wink of stella to the flowers and flames. Now cut both the cake and the cake stand using the cake builder punch.
  7. Attach both the cake and cake stand using dimensional pads.
  8. Then using dimensional pads attach both the plain oval, and the sentiment.
Will be back again soon with more cards
Annette X

Friday, January 17, 2020

Colorful Seasons meets Parcels & Petals

Hello and welcome, hope you're having a great day!

This is the second post for today.

Happy Birthday Mick!
Apart from my family, Mick is the person I've known the longest, he was my best friend's husband, and the girl who got me hooked on card making just before she died, some too many moons ago.

Measurements are in centimetres, (cs) = card stock, (dsp) = designer series paper, (r) = retired, (ss) = stamp set, when using layering dies (1) is the smallest.

Card base is 21 x 14.85 scored at 10.5, (r) Wood textures (dsp) 4 x 14.85 and scraps of all the colours below.

Colours are: cajun craze, crumb cake, crushed curry, early espresso, old olive, merry merlot, very vanilla
  • Using the parcels & petals (ss) stamp the sentiment in cajun craze, then using the colorful seasons (ss) stamp the leaves in the various colours and sizes.
  • With the basic pattern decorative masks, sponge the trees across the front of the card base using crumb cake ink. Then spritz lightly using an early espresso marker.
  • Now with the stitched nested labels (2 & 3), and the seasonal layers dies, die cut all the leaves and labels.
  • Attach the (dsp) to the card base using dimensional pads.
  • Arrange and glue down the leaves using liquid glue.
  • Arrange some (r) copper metallic thread across the front of the old olive label, then adhere the  sentiment label on top using liquid glue. Once done adhere to the (dsp) using liquid glue.
  • Add some random candy dots.
Will be back again soon with more cards.
Annette X

Floral Essence meets Well Said

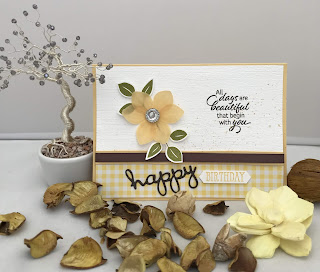
Hi Folks welcome to my happy place, hope you're having a great day!

I will be posting twice today as there are to birthdays.

Happy Birthday Heather x

This is a mixture of old and current products, hope you like it.
The card base is 21 x 14.85 scored at 10.5, the first layer is 10 x 14.3, second layer (dsp) is 3.5 x 14.3.
Colours are daffodil delight, early espresso, old olive and whisper white.
(cs) = card stock, (dsp) = designer series paper, (r) - retired, (ss) = stamp set
All measurements are in centimetres.

  • Starting with the first layer of (cs) and the floral essence (ss), stamp the sentiment in early espresso then lightly spritz with daffodil delight.
  • Emboss this layer using the subtle (ef), and adhere the second layer (r) gingham gala (dsp) using liquid glue.
  • Add the ribbon across the top of the (r) gingham gala (dsp). For this I used (r) taffeta and (r) grosgrain.
  • Attach to the card base using dimensional pads and put to one side for now.
  • Stamp 2 of the leaves from the floral essence (ss) using old olive and cut using the co-ordinating leaf punch.
  • Stamp 2, of the 3 petal stamp on perennial essence velum using daffodil delight allow to dry for a few minutes then cut using the co-ordinating perennial flower punch, layer these together using glue dots.
  • Position the flower and leaves where you want them and stick down using glue dots (vellum sticks easier with glue dots).
  • Die cut the happy using the well written dies, adhere using liquid glue of adhesive sheet.
  • stamp the birthday from the well said (ss) and cut using the classic label punch, then attach using dimensional pads.
  • Add a (r) iced rhinestone to the centre of the flower.
Thank you for dropping by.

Will be back again soon with more cards
Annette X


Friday, January 10, 2020

Geared Up Garage meets Perennial Birthday and more

Hello, and thank you for popping by today!

It's our eldest Grandson's birthday today, and oh it makes me feel old, but he's adorable and we are blessed to have him.
All measurements are in centimetres.
Terracotta tile 2 pieces, 21 x 14.85, scored at 10.5 (card base) 4 x 9 (car), very vanilla 10 x 14.3 (mat).
the colours are black, smoky slate, terracotta tile, very vanilla
(cs) = cardstock, (ef) = embossing folder, (ss) = stamp set
  • First, with the very vanilla (cs) mat and using first and second generation stamping stamp down the left hand side using the happy birthday from the perennial birthday (ss). I used my stamparatus for this. Then in between the happy birthday's stamp the second sentiment using the itty bitty birthday (ss).
  • With the geared up garage (ss) stamp the splodge of oil down the right hand side of the mat using the stamped off method to attain different shading.
  • Distress the mat by ripping around all four edges and sponging with smoky slate ink (if you slightly dampen the edges it's easier to rip).
  • Then emboss using the subtle (ef) and adhere to the card base.
  • With the smaller terracotta tile (cs) piece stamp the car from geared up garage.
  • Die cut the car using the garage gear dies and attach to the card using dimensional pads.
  • Add the faceted gems and black rhinestone.
Will be back again soon with more cards.
Annette X

Thursday, January 9, 2020

Bird Ballad Laser-Cut Cards meets Free As A Bird

Thank you for stopping by my crafting haven today,

Happy Birthday Cheryl!!!

Although at the time of creating this post it's a cold wet miserable day, I'm feeling really good.

Have had  this stamp set for a while now but don't use it enough, so thought I'd have a go with it today.
Card base is one of the bird ballad laser-cut cards 10.8 x 14,  2 pieces of pineapple punch (cs) 10.6 x 14 (backing for the front), 8 x 4.5 stitched nested label 4, 2 pieces of very vanilla 3.5 x 6.5 stitched nested label 3,  21 x 7 all other stamping.

All measurements are in centimetres, and when using nested dies (1) is the smallest.

Colours for the card are pineapple punch, shaded spruce, very vanilla.
(cs) = card stock, (r) = retired,  (ss) = stamp set

  • Adhere the front backing to the card base using liquid glue around the outside edge only.
  • Stamp the greeting from the free as a bird (ss) on the smaller very vanilla piece.
  • Die cut the sentiment and the smaller pineapple punch (cs) using the stitched nested labels (3 & 4).
  • Stamp 4 of the leaves, 2 of the larger flowers, 2 of the buds and 1 of the smaller flowers using memento tuxedo black ink.
  • Use shaded spruce and pineapple punch stampin' blends to colour the flowers and leaves, and then fussy cut them. Use a black stampin' marker to go round the edges if needed.
  • Attach the 2 labels together using dimensional pads and then attach to the card front, again using dimensional pads.
  • Adhere the flowers and leaves using liquid glue, tucking the leaves behind the label.
  • Add some basic rhinestones as flower centres.
  • Tie a bow using the (r) yellow organdy combo ribbon and attach using a glue dot.

After completing and photographing the card I decided to add some wink of stella to the flowers, which looked quite nice.

Will be back again soon with more cards
Annette X

Wednesday, January 8, 2020

Itty Bitty Christmas meets Wrapped in Plaid

Hi folks, this is the last of my 2019 Christmas cards.

I saw a similar card on Pinterest but can't remember who originally made it (sorry).
I've done it slightly differently but also thought the (r) spider webs could act as snowflakes.
It was a fairly easy card to make.

Standard A4 card cut in half with .5 increment for matting.
(cs) = card stock, (dsp) = designer series paper, (ef) = embossing folder, (r) = retired

  • Emboss the top 5 cm of the first mat with the subtle (ef) and then adhere a 10 x 9.5 piece of wrapped in plaid (dsp) at the bottom, then attach to the card base.
  • Adhere the spider web doily to the card in the middle only.
  • Stamp the sentiment from the itty bitty christmas (ss) on a scrap of whisper white (cs) and die cut using the stitched label dies and  attach to the card.
  • Make a bow with the bakers twine and adhere to the card beside the sentiment label.
  • Colour some basic rhinestones using the shaded spruce blends marker and add to the card.

Hope you liked the card and have a great day!

Will be back again soon with more cards
Annette X

Tuesday, January 7, 2020

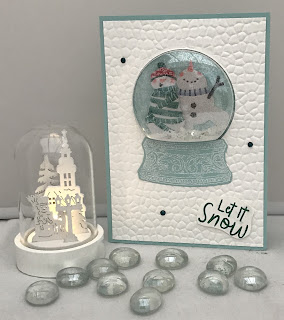
Snow Season and more

Hello and welcome, hope you're having a great day!

This card was Evie's my youngest Granddaughter.


All measurements are in centimetres.
(cs) = card stock, (r) = retired

Card stock: 3 pieces of Whisper White 21 x 14.5 (card base) scored at 10.5, 7 x 3.5 (globe base) 10 x 2 (sentiment), Coastal Cabana 7 x 3.5 (globe base pattern)

  • Start with the first mat and die cut the dome leaving about 1.5 cm from each side.
  • Place the mat on the base card and trace the dome shape onto the card base using a light pencil.
  • Stamp the snowman in memento ink, colour the snowman using the stampin' blends., then erase the pencil marks.
  • Now lay some snowflake sequins and a little stampin' glitter on top of the snowman, remove the second backing from the back of the dome, add some liquid glue around the rest of the first mat and adhere to the card base without moving the card base so the sequins and glitter stay inside the dome area. Once in place secure dome firmly.
  • Die cut  both the solid base and the patterned base and adhere them together.
  • Using liquid glue adhere the globe base to the card.
  • Adhere the (r) pompom trim using a thin stripe of tear & tape.
  • Stamp the sentiment and flag the end, then using dimensional pads adhere at the bottom of the card and add some rhinestones.

Will be back again soon with more cards!
Annette X

Monday, January 6, 2020

Beautiful Promenade meets Beautiful Layers

Hi folks, and welcome to my haven in a hectic world, hope you're having a great day!

Happy Birthday Aunty Val x

I made a card for her months ago and can't find it now so had to make a new one (maybe the one I thought I'd made was last years).

But I must say though, I enjoyed making this one.
To recreate this card follow the guide below:

All measurements are in centimetres, colours are Old Olive, Petal Pink Whisper White
(cs) = card stock, (ef) = embossing folder, (ep) = embossing powder. (ss) = stamp set

Card Stock: Petal Pink 21 x 14.85 scored at 10.5 (card base), Perennial Essence velum 14.4 x 10.1 (first layer), Whisper White 2 pieces 14.4 x 10.1 (flowers, leaves & sentiment). 9.5 x 9.5 (lattice).
  • Starting with the perennial essence velum emboss using the tufted (ef).
  • Attach a strip of the organdy striped ribbon across the embossed layer (I used glue dots) and adhere to the card base using liquid glue.
  • Using the beautiful promenade (ss) stamp the 3 flowers using petal pink, in full strength for the outline and stamping off once for the centres.
  • Next ink up the sentiment from the itty bitty birthdays (ss) using versamark and Petal pink before stamping then heat emboss with the clear (ep).
  • Now stamp the leaves in old olive.
  • Punch out the sentiment using the classic label punch.
  • Die cut the leaves, petals and lattice using the beautiful layers dies.
  • Arrange as desired and then using both liquid glue and dimensional pads attach to the card base.
  • Add some basic rhinestones.
  • For some sparkle I used wink of stella on the flower stamen.
Card completed.

Thank you for joining me today, hope you have a good one!

Will be back again soon with more cards.
Annette X

Sunday, January 5, 2020

Snowman Season & more

Hi folks, glad you dropped by!

This card was sent to Kayden one of my Grandsons
All measurements are in centimetres
(dsp) = designer series paper, (r) = retired

Card stock: Pool Party 2 pieces 21 x 14.5 scored at 10.5 (card base), 7 x 3.5 (globe base), Whisper White 2 pieces  10 x 14 (first mat) 3 x 4 (sentiment)

  • Start with the first mat and die cut the dome leaving about 1.5 cm from each side.
  • Place the mat on the base card and trace the dome shape onto the card base using a light pencil.
  • Now emboss the mat with the the hammered metal folder and lay to one side for now.
  • Using the snow flake stamp and the white craft ink, stamp some snow flakes as a background for the snow globe directly onto the card base.
  • Fussy cut 2 of the snowmen from a sheet of the let it snow (dsp), adhere the first snowman to the card base within the globe shape using liquid glue and then the second one using dimensional pads.
  • Now erase the pencil mark.
  • Stamp the globe base pattern on the pool party (cs) in versamark and cover it with the shimmery white embossing powder then heat set it. Now die cut it and lay it to one side.
  • Stamp the sentiment in shaded spruce and fussy cut around it.
  • Remove the backing from the top side of the dome and adhere to the back of the first layer and press down so it is firmly secured.
  • Now lay some snowflake sequins and a little stampin' glitter on top of the snow men, remove the second backing from the back of the dome, add some liquid glue around the rest of the first mat and then adhere down onto the card base without moving the card base so the sequins and glitter stay inside the dome area. Once in place secure dome firmly.
  • Using liquid glue adhere the globe base to the card, then using dimensional pads add  the sentiment to the bottom.
  • Finish off with a few pretty peacock rhinestones.

Will be back again soon with more cards!
Annette X

Thursday, January 2, 2020

Snowman Season & more

Hello and welcome to my little haven, hope you're having a good day!

This card is for one of my Grand Daughters who is very girlie.
All measurements are in centimetres
(cs) = card stock, (r) = retired

Card stock: 3 pieces of Whisper White 21 x 14.5 (card base) scored at 10.5, 10 x 14 (first mat), 8 x 2 (sentiment), Seaside Spray 7 x 3.5 (globe base)
Colours:  Pool Party, Seaside Spray, Smoky Slate, VersaMark
Stampin' Blends: Balmy Blue, Gray Granite, Pumpkin Pie

  • Start with the first mat and die cut the dome leaving about 1.5 cm from each side.
  • Place the mat on the base card and trace the dome shape onto the card base using a light pencil.
  • Now emboss the mat with the the brick & mortar folder then add the ribbon and lay to one side for now.
  • Stamp the snowman in memento ink, and the globe using 2nd generation stamping in smoky slate. Then erase the pencil marks.
  • Colour the snowman using the stampin' blends. Then sponge lightly with pool party round the globe edges.
  • Stamp the globe base pattern on the seaside spray (cs) in versamark and cover it with the silver embossing powder then heat set it.
  • Stamp the sentiment in veramark & seaside spray then cover it with clear embossing powder and heat set it. Die cut this with the label from the petals & more dies.
  • Remove the backing from the top side of the dome and adhere to the back of the first layer and press down so it is firmly secured.
  • Now lay some snowflake sequins and a little stampin' glitter on top of the snow man, remove the second backing from the back of the dome, add some liquid glue around the rest of the first mat and then adhere down onto the card base without moving the card base so the sequins and glitter stay inside the dome area. Once in place secure dome firmly.
  • Using liquid glue adhere the globe base to the card, then using dimensional pads add  the sentiment to the bottom.
Will be back again soon with more cards!
Annette X

Wednesday, January 1, 2020

Snowman Season

HAPPY NEW YEAR!

Hello and welcome, thanks for popping by!

I still have a few of my Christmas cards to show you, so will carry on with them until my birthdays for this year start.

This card was for Freddie, my youngest grandson.
All measurement are in centimetres
When dealing with nesting dies the smallest is 1
(nsu) = non stampin' up!, (r) = retired

Card Stock: Real Red 8.5 x 8.5 (scallop circle:, Thick Whisper White 29.7 x 10.5 scored at 14.85, Whisper White 3 pieces 8.5 x 8.5 (snowman), 10.5 x 2 (merry christmas), 11 x 4 (large banner)
DSP: Let it Snow 10.5 x 14.85 (cut down at 3 cm and reversed)
Dies: Layering Circles (scalloped 8) Stitched Nested Labels (3 and straight strip), Stitched Shapes (circle 4)
Inks: Coastal Cabana, Real Red, Tuxedo Black Memento
Punches: Triple Banner
Stamp Sets: Snowman Season
Stampin' Blends: Coastal Cabana, Gray Granite, Pumpkin Pie, Real Red
Accessories: Glitter (r), Stampin' Glitter
Grand Son sentiment (nsu)

Having created this card I feel the dsp layout would have been better the other way round (the short piece on the right) but I left it to late to change.

  • Adhere the dsp using liquid glue to the front of the card base and add the ribbon to hide the join.
  • Lightly sponge the large banner with coastal cabana, flag the one end using the triple banner punch and adhere with liquid glue just above the middle of the card.
  • Stamp the snowman in memento ink and lay to one side, then stamp the Merry Christmas and do the same.
  • Go back to the snowman and die cut using the stitched circle die,  colour the snowman using stampin' blends, once dry dab some liquid glue across the front gently then cover with the stampin' glitter (if you still have some, adhesive sheets are good for this).
  • Use the triple banner punch to flag the ends of the Merry Christmas sentiment.
  • Die cut the scalloped circle and adhere the snowman using liquid glue, then attach to the card base using dimensional pads.
  • I then die cut the Grand Son (nsu) and adhered toward the bottom of the card.

Will be back again soon with more cards!
Annette X

Inspirational Sketches meets Go To Greetings

  Welcome to my blog and    t hank you for joining me today! Happy Birthday Duncan Intermediate card for men -    brush blending,   die cutt...