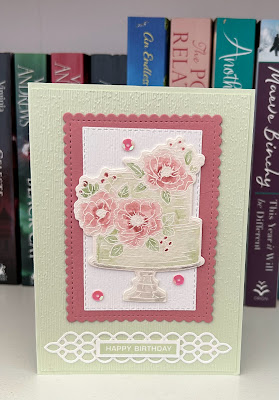
Monday, January 29, 2024

Sentimental Park meets Mini Alphabet

  Welcome to my blog

and  thank you for joining me today!

Good luck in your new home Donna


Intermediate easy - die cutting, dry embossing, fussy cutting, layering, stamping

Materials required for this card are:

Card Stock: basic white, misty moonlight
Designer Series Paper: countryside inn
Dies: countryside corners (6,7), *home together, mini alphabet
Embossing Folders: exposed brick 3D
Ink: misty moonlight
Stamps: sentimental park
Accessories: basic rhinestones, *well suited twine
 * = no longer available, when using layering dies (1) is the smallest

  1. Start with a base card 29.6 x 10.5 scored at 14.8, white card matt 14.8 x 10.5, dsp 12 x 8, misty moonlight 13.5 x 9, scrap basic white and misty moonlight for extra die cutting
  2. dry emboss the white matt and adhere to the base card
  3. die cut all the pieces - 2 rectangles, letters, house, star
  4. adhere the 2 rectangles together using liquid glue, then adhere to the base card again using liquid glue
  5. stamp the sentiments and fussy cut round them 
  6. arrange all the pieces onto the rectangles and attach using dimensional pads
  7. wrap som twine around the spine of the card and tie with a bow, then add a rhinestone the the star.
Hope you liked today's card. If you would like more information on how to make it, please don't hesitate to contact me, I'd love to hear from you.

If you wish to buy any of the items used, go to contacting me at the top of the page for details of how to order.

Will be back again soon with more cards, in the meantime take care and have a great day.
Annette 😊 

Wednesday, January 24, 2024

Notes of Nature meets Mini Alphabet

   Welcome to my blog

and  thank you for joining me today!

Happy 21st Ashlie

This is a card I've CASed from Pinterest, but can't remember who the original designer is (sorry)


Die cutting, dry embossing, layering, stamping
Mostly an easy card to make, the hardest part is getting the sentiment in the right place. 

Materials required for this card are:

Card Stock: basic white
Designer Series Paper: more dazzle (gold)
Dies: alphabet a la mode, deckled circles (5,6), mini alphabet
Embossing Folders: basics 3D, cheery patterns
Ink: moody mauve
Stamps: notes of nature
Accessories: *gold thread

* = no longer available, when using layering dies (1) is the smallest
  1. Start with a base card 14.8 x 21 scored at 10.5, matte 10 x 14.3, white & more dazzle pieces for the die cutting and a strip for the embossing 10 x 3
  2. die cut the circles, letters and numbers
  3. emboss the white circle and strip
  4. stamp the sentiment about 5 centimetres up from the bottom of the matte
  5. adhere the embossed strip to the matte about 3.3 centimetres down from the top and wind the gold thread around it securing it with tape 
  6. adhere the matte layer to the base card using liquid glue 
  7. adhere the numbers to the white circle and then the circle to the base card using liquid glue
  8. position the letters and attach using dimensional pads.
Hope you liked today's card. If you would like more information on how to make it, please don't hesitate to contact me, I'd love to hear from you.

If you wish to buy any of the items used, go to contacting me at the top of the page for details of how to order.

Will be back again soon with more cards, in the meantime take care and have a great day.
Annette 😊

Wednesday, January 10, 2024

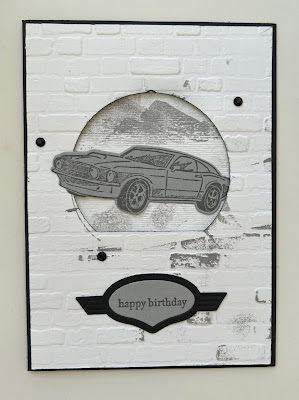
Need for Speed meets Waterfront

 Welcome to my blog

and  thank you for joining me today!

Happy Birthday Kieran


I'd class this as a more intermediate level than beginner - die cutting - embossing - fussy cutting -  layering and stamping


Materials required for this card are:

Card Stock: basic black, basic white, smoky slate
Dies: *garage gears, *snow globe scenes
Embossing Folders: *brick wall 3D, subtle 3D
Ink: basic gray 
Stamps: *need for speed, *teeny tiny sentiments, waterfront
Accessories: *black gems

* = no longer available

  1. Start with a base card 21 x 14.5 scored at 10.5, white 10 x 14, white 7.5 x 6.5, small pieces of gray and black
  2. die cut the tunnel shape from the white layer, emboss it using the brick wall folder, then lightly drag the gray ink pad over it
  3. stamp the waterfront scene onto the smaller piece of white in gray, then emboss it using the subtle folder
  4. Using dimensional pads, attach the smaller layer behind the tunnel shape then attach these two layers to the base card again using dimensional pads
  5. stamp the car and fussy cut round it, then adhere it in the tunnel using liquid glue.
  6. stamp the sentiment, die cut it using the 2 badge shapes then adhere to the bottom of the base card
  7. attach the black gems
Hope you liked today's card. If you would like more information on how to make it, please don't hesitate to contact me, I'd love to hear from you.

If you wish to buy any of the items used, go to contacting me at the top of the page for details of how to order.

Will be back again soon with more cards, in the meantime take care and have a great day.

Annette 😊 
Tuesday, January 9, 2024

Happy Birthday To You meets Label Me Bold

  Welcome to my blog

and  thank you for joining me today!

Happy Birthday Cheryl


Sharing some older cards I haven't used at the moment as my work space is under a revamp and I can't get to craft at the moment. Most products are no longer available, except for a couple of the card stock colours.

Materials required for this card are:

Card Stock: basic white, fluid 100 water colour paper, soft sea foam, *sweet sugarplum  
Dies: *birthday, *stitched so sweetly, *petals & more
Embossing Folders: *subtle 3D
Ink: *sahara sand, soft sea foam. *sweet sugarplum, versamark
Stamp Sets: *happy birthday to you, *label me bold
Accessories: *adhesive backed sequins, white embossing powder and heat gun
 * = no longer available
  1. Start with a base card 14.5 x 21 scored at 10.5, a mat of 10 x 14, scraps for die cutting and stamping
  2. stamp the main image on the fluid 100 using vesamark and white embossing powder, the heat up with the gun
  3. stamp the sentiment and trim around it
  4. die cut the main image, rectangles and fancy band
  5. dry emboss the rectangles and the mat using the subtles folder
  6. using a painter brush colour in the main image
  7. adhere all the layers using liquid glue and add the sequins
Hope you liked today's card. If you would like more information on how to make it, please don't hesitate to contact me, I'd love to hear from you.

If you wish to buy any of the items used, go to contacting me at the top of the page for details on how to order.

Will be back again soon with more cards, in the meantime take care and have a great day.
Annette 😘

Blast from the past Perennial Birthday

  Welcome to my blog and    t hank you for joining me today! Happy Birthday Stephen For this card I was inspired by one i'd seen on Pint...