Showing posts with label ornate thanks. Show all posts

Tuesday, January 25, 2022

Biggest Wishes meets Ornate Thanks

    Thank you for joining me today!

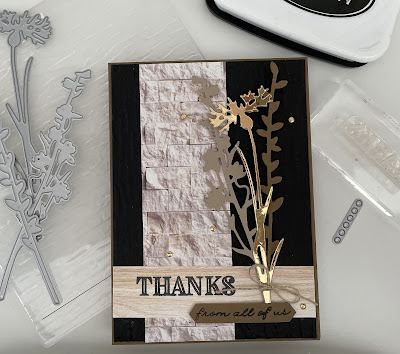
A little note, sending a big thanks


I just love the stitched dies we have, you can mix and match and it always looks great. I've combined two stamp sets and gone for a monochromatic style. 

Materials required for this card are:

Card Stock: basic black & white
Designer Series Paper: All together
Dies: stitched rectangles (4) wide, taylor made tags (1) round edge
Ink: bermuda bay
Stamp Sets: biggest wish, ornate thanks
Accessories: gingham ribbon, matte black dots, note cards
 
When using layering dies (1) is the smallest

Hope you liked today's card. If you would like more information on how to make it, please don't hesitate to contact me, I'd love to hear from you.

If you wish to buy any of the items used, go to contacting me at the top of the page for details on how to order.

Will be back again soon with more cards, in the meantime take care and have a great day.
Annette ๐Ÿ˜˜

Wednesday, October 27, 2021

Ornate Thank meets Meadow Dies & more

  Thank you for joining me today!


Pauls card week 10


A fairly quick and simple card, lots of die cutting and just a little stamping. With some dsp and dry embossing thrown in!

Materials required for this card are:

Card Stock: basic black, *brass foil, crumb cake, soft suede
Designer Series Paper: in good taste
Dies: meadow, christmas trimmings
Embossing Folders: bark 3D (black layer)
Ink: memento black
Stamp Sets: ornate thanks
Accessories: linen thread
* = no longer available

Hope you liked today's card. If you would like more information on how to make it, please don't hesitate to contact me, I'd love to hear from you.

If you wish to buy any of the items used, go to contacting me at the top of the page for details on how to order.

Will be back again soon with more cards, in the meantime take care and have a great day.
Annette ๐Ÿ˜˜

Wednesday, September 22, 2021

Ornate Thanks, card in a Trice!

 Thank you for joining me today!

A card in a trice!


Have you ever realised you need a card right now, well that's what happened to me today! And this is what I made in less than 5 minutes.

Materials required for this card are:

Card Stock: very vanilla 
Ink: mint macaron
Punches: banner pick a punch
Stamp Sets: ornate thanks  
Accessories: *black rhinestone jewel, *delightfully detailed note card & envelopes
(you still need to use up your old stash) don't you agree!
* = no longer available

Hope you liked today's card. If you would like more information on how to make it, please don't hesitate to contact me, I'd love to hear from you.

If you wish to buy any of the items used, go to contacting me at the top of the page for details on how to order.

Will be back again soon with more cards, in the meantime take care and have a great day.
Annette ๐Ÿ˜˜

Monday, June 8, 2020

Last A Lifetime meets Lasting Elegance

Hello and welcome to my haven in a hectic world, hope you're have a good day!

It's now week 12 for the lockdown and we actually went to the bank the other day, Yippee!!!
Still don't go out unless we have to so it made a change.

This is Sue's card for this week.

I created it using a u tube video from Lisa Curio's channel made some time ago. I changed the front and was very pleased with the outcome.
As this has come from an American demonstrator the measurements are in imperial inches.
(but I will soon be bring you a metric version, so keep your eye out for it!)

(cb) = card base, (cs) = card stock, (dsp) = designer series paper, (ef) embossing folder,  (r) = retired, (ss) = stamp set.
Colours used are: purple posy, soft sea foam, so saffron.

  • Start with a (cb) of thick whisper white (cs) 8½ x 5½  scored at 4¼. 
  • Emboss the front of the (cb) using the subtle (ef)
  • Cut 2 pieces of in color 19/21 (dsp) 4 x 4 and 3 x 4 making sure  the pattern goes in the same direction.
  • Using the 4 x 4 piece of (dsp) make a mark on the left side at 1½  then the bottom at 1¾ and finally the right side at 2¼. 
  • Cut off from the left side mark down to the bottom mark, now cut from the right mark down to make a point at the bottom.
  • Place the right side of the 4 x 4 piece level with the top of the 3 x 4 piece, line up so each side is level, then draw a line around the edge of the 4 x 4 piece onto the 3 x 4 piece, now cut along the line to get the corresponding shape for the bottom.
  • Place these pieces onto the (cb) and stamp the sentiments from the ornate thanks (ss) in the gap.
  • Using foam adhesive strips adhere the top and bottom pieces of (dsp) to the (cb).
  • Stamp the flowers from the last a life time (ss) onto whisper white (cs) using memento ink and colour using stampin' blends.
  • Die cut the flowers using the lasting elegance dies.
  • For the top sentiment I used the (r) new wonders (ss) and stamped in purple posy, then die cut using the ornate frames dies.
  • Adhere this sentiment using liquid glue to the (cb).
  • Attach the flowers using dimensional tabs.
  • Add some basic rhinestones in between the gap sentiments and jobs done!!!!
Thanks for dropping by and enjoy the rest of your day
Annette X

Monday, May 11, 2020

Ornate Thanks

Hi, welcome to my haven in a hectic world, hope you're having a good day!

I can't believe it's week 8 of the pandemic lockdown here in the UK.

At least I'm getting plenty of crafting done, also trying to tidy up my haven, but that's a slow process.

Another card for our lovely Sue, we have a beautifully cooked Sunday dinner delivered every week by her daughter Holly, and I like to send the payment in a nice card!
All measurements are in centimetres.
 (cs) = card stock, (ef) = embossing folder, (r) = retired, (sdsp) = speciality designer series paper, (ss) = stamp set, n = narrow, w = wide, when using layering dies (1) is the smallest

  • Start with a card base of very vanilla (cs) 21 x 14.5 scored at 10.5.
  • Then a layer of ornate garden (sdsp) 9.5 x 13.5 adhered at a slight angle using liquid glue.
  • The next layer is very vanilla (cs) 9.5 x 13.5 embossed using the ornate floral 3D (ef), this layer was lightly sponged using terracotta tile ink, and then adhered down again slightly off set using liquid glue.
  • The 3rd layer is ornate garden (sdsp) 8 x 10, this piece is die cut using the wide (4) ornate layers die, run through the die cutting machine twice if you want the pattern on all 4 edges. Adhere at an angle using liquid glue.
  • The sentiment is from the ornate thanks (ss) and stamped using terracotta tile ink onto very vanilla (cs) 6 x 9, then die cut using the w (2) ornate layers die, then attached using dimensional pads.
  • Make a bow using the ornate garden combo terracotta tile ribbon and adhere to the card using a glue dot.
  • Add (r) faceted gems for decoration.
Will be back again soon with more cards, thanks for dropping by.
Annette X

Daisies meets Nature's Symphony

  Welcome to my blog and    t hank you for joining me today! Happy birthday Serenia Intermediate level - die cutting, dry embossing, layerin...