Showing posts with label perennial postage dies. Show all posts

Sunday, April 5, 2026

Excellent Eggs meets Florals In Bloom

Welcome to my blog

and  thank you for joining me today!

Happy Easter Freddie

Intermediate level - colour using blends, crop down, die cutting, dry embossing, layering, stamping

Materials required for this card are:
 
Bundles: *excellent eggs
Card Stock: basic white, pecan pie
Designer Series Paper: florals in bloom
Dies: perennial postage (1), stylish shapes (4)
Embossing Folders: *subtles 3D
Ink: memento black
Stampin' Blends: daffodil delight, granny apple green, old olive, pecan pie
Accessories: *candy dots
 * = no longer available, when using layering dies (1) is the smallest

Start with a basic card base 14.5 x 21 scored at 10.5, white 12.5 x 9, 10 x 3, 7 x 9, 2.5 x 4, pecan pie 10 x 4, dsp 14 x 10
  1. adhere the dsp to the base card using liquid glue
  2. stamp the egg and bunny
  3. use the blends to colour the egg
  4. die cut the egg, bunny, postage frame and white banner
  5. stamp the sentiment in the banner near the left side, then crop down the banner  to balance the sentiment
  6. die cut the second banner
  7. dry emboss the postage frame using the 3D folder
  8. add  the postage frame to the card using dimensional pads
  9. adhere the egg and pecan pie banner to the card using liquid glue
  10. attach the top banner and bunny using dimensional pads
  11. add the candy dots
Hope you liked today's card. If you would like more information on how to make it, please don't hesitate to contact me. I'd love to hear form you.

If you wish to buy any of the items used, go to contacting me at the top of the page for details of how to order.
 
Will be back again soon with more cards, in the meantime take care and have a great day.

Annette 😊 

Tuesday, January 6, 2026

Charming Days meets Loveliest Trees

  Welcome to my blog

and  thank you for joining me today!

Happy Birthday Sue


Intermediate level - bow making, brush blending, die cutting, heat embossing,  layering, stamping

Materials required for this card are:
 
Card Stock: basic white. fresh freesia
Designer Series Paper: *irresistibly yours
Dies: charming day, perennial postage 
Embossing Powder: white
Ink: fresh freesia, versaMark
Stamps: loveliest trees
Accessories: bakers twine essentials, blending brush, heat gun, sequins & gems, adhesive sheets
 * = no longer available

There is a new dsp "irresistible designs" which is really lovely for the blending

Start with a basic card base 14.5 x 21 scored at 10.5, fresh freesia 13.5 x 9.5, 6.5 x 4,  dsp 13 x 9, white 11 x 7
  1. blend some colour onto the dsp in the middle section using the brush
  2. wind some bakers twine around this layer twice towards the bottom and secure at the back with tape
  3. make a bow and adhere with a glue dot towards the right side
  4. attach this layer to the fresh freesia layer using dimensional pads
  5. now adhere to the base card, using liquid glue
  6. stamp the sentiment and heat emboss it 
  7. add some adhesive sheet to the back of the 11 x 7 white card 
  8. die cut both the flowers and label
  9. remove the adhesive sheet backing from the flowers and adhere to the dsp
  10. attach the sentiment using dimensional pads
  11. add the sequins
Hope you liked today's card. If you would like more information on how to make it, please don't hesitate to contact me. I'd love to hear form you.

If you wish to buy any of the items used, go to contacting me at the top of the page for details of how to order.
 
Will be back again soon with more cards, in the meantime take care and have a great day.
Annette 😊

Tuesday, September 2, 2025

Catching Butterflies Card

 Welcome to my blog

and  thank you for joining me today!

Happy Birthday Evie


Intermediate level - colouring using wink of stella &  ink, colour using alcohol blends, die cutting, layering, stamping
Inspiration came from looking at cards on Pinterest

Materials required for this card are:
 
Card Stock: basic white, *boho blue
Designer Series Paper: timeless plaid
Dies: perennial postage (1)
Ink: basic grey, calypso coral
Stampin' Blends: *boho blue, cajun craze, darling duck, ivory, petal pink
Stamps: *catching butterflies
Accessories: bakers twine essentials, wink of Jetta, watercolor pencils basic gray
when using layering dies (1) is the smallest

Start with a base card 14.5 x 29 scored at 14.5 & 16.5, white layer 13 x 9, dsp 4 x 10
  1. adhere the dsp to the base card using liquid glue
  2. add the bakers twine and tie a bow, then adhere this section down using liquid glue, so the card opens at the second scoreline
  3. die cut the white layer
  4. position the stamps and ink up with basic gray, then stamp (using second generation)
  5. put a very small amount of calypso coral onto an ink block, squeeze a small blob of wink of stella onto the block and mix together then paint the dress and let it dry (make sure to clean the brush throughly) 
  6. colour the rest of the girl
  7. very lightly colour the net using the basic gray watercolor pencil
  8. now use the blends to colour the butterflies
  9. attach this layer to the base card using dimensional pads
Hope you liked today's card. If you would like more information on how to make it, please don't hesitate to contact me, I'd love to hear from you.

If you wish to buy any of the items used, go to contacting me at the top of the page for details of how to order.
 
Will be back again soon with more cards, in the meantime take care and have a great day.
Annette 😊

Sunday, August 24, 2025

Impressions abloom meets Loveliest Tree

 Welcome to my blog

and  thank you for joining me today!

Happy Birthday Donna


Clean & Simple - die cutting, dry embossing, layering, stamping

Materials required for this card are:

Card Stock: basic white, daffodil delight, granny apple green
Dies: impressions abloom, perennial postage (1) rectangle
Embossing Folders: exposed brick 3D
Ink: daffodil delight, secret sea
Stamps: loveliest tree
Accessories: bakers twine essentials, blending brush, brushed brass butterflies
when using layering dies (1) is the smallest

Start with a base card 14.5 x 21 scored at 10.5, white layer 10.1 14.1, off cuts for die cutting and stamping
  1. dry emboss the white layer 
  2. at 3cm in from the left side of the embossed layer score down 8 times, then adhere to the base card using liquid glue
  3. stamp the sentiment
  4. die cut all the pieces
  5. add some emphasis to the base of the flowers using blending brush
  6. adhere the leaves and stems using liquid glue, then attach the sentiment and flowers with dimensional pads
  7. attach the butterflies and bow
Hope you liked today's card. If you would like more information on how to make it, please don't hesitate to contact me, I'd love to hear from you.

If you wish to buy any of the items used, go to contacting me at the top of the page for details of how to order.
 
Will be back again soon with more cards, in the meantime take care and have a great day.
Annette 😊

Sunday, August 10, 2025

Blast from the the past - love & Sympathy

 Welcome to my blog

and  thank you for joining me today!

So sorry for your loss


Cased from Stampin' Pretty, a real blast from the past

Materials required for this card are:

Card Stock: very vanilla
Designer Series Paper: *simply marbleous
Dies: perennial postage (1)
Embossing Folders: exposed brick 3D
Ink: basic beige, crumb cake, coastal cabana
Stamps: elements of text, *love & sympathy
Accessories: *holiday rhinestones, linen thread 
 
* = no longer available, when using layering dies (1) is the smallest

Start with a base card 13.5 x 21 scored at 10.5, very vanilla 13 x 10, dsp 13.10 x 10.5
  1. dry emboss the dsp and adhere to the front of the card using liquid glue
  2. die cut the rectangle
  3. stamp the images and sentiment
  4. add the linen thread tying with a bow
  5. add the rhinestones
  6. attach to the base card using dimensional tabs
Hope you liked today's card. If you would like more information on how to make it, please don't hesitate to contact me, I'd love to hear from you.

If you wish to buy any of the items used, go to contacting me at the top of the page for details of how to order.
 
Will be back again soon with more cards, in the meantime take care and have a great day.
Annette 😊

Sunday, April 20, 2025

Blast from the past Backyard Basics & Delightful Dozen

 Welcome to my blog

and  thank you for joining me today!

Happy Easter Sheilah


Intermediate level - colour using alcohol markers, die cutting, dry embossing, layering, stamping

Materials required for this card are:

Card Stock: basic white
Designer Series Paper: bright & beautiful
Dies: cheerful daisies, perennial postage, *stitched rectangles (5)
Embossing Folders: *subtle 3D
Ink: basic grey, memento tuxedo black
Stampin' Blends: granny apple green, lemon lolly
Stamps: *backyard basics, *delightful dozen
Accessories: bakers twine 3 color pack, rainbow dots
 * = no longer available, when using layering dies (1) is the smallest

Start with a base card 14 x 21 scored at 10.5, basic white 7.5 x 10.5, 6.5 x 3, dsp 12 x 9
  1. die cut the dsp and adhere to the base card towards the top left side using liquid glue
  2. stamp the flower in memento black and sentiment in gray
  3. color the flower using the blends
  4. dry emboss both of these using the subtle folder
  5. attach the flower using dimensional pads
  6. wind some bakers twine and adhere to the sentiment using stampin seal +
  7. attach to the base card using dimensional pads
  8. add the rainbow dots
Hope you liked today's card. If you would like more information on how to make it, please don't hesitate to contact me, I'd love to hear from you.

If you wish to buy any of the items used, go to contacting me at the top of the page for details of how to order.
 
Will be back again soon with more cards, in the meantime take care and have a great day.
Annette 😊

Thursday, August 22, 2024

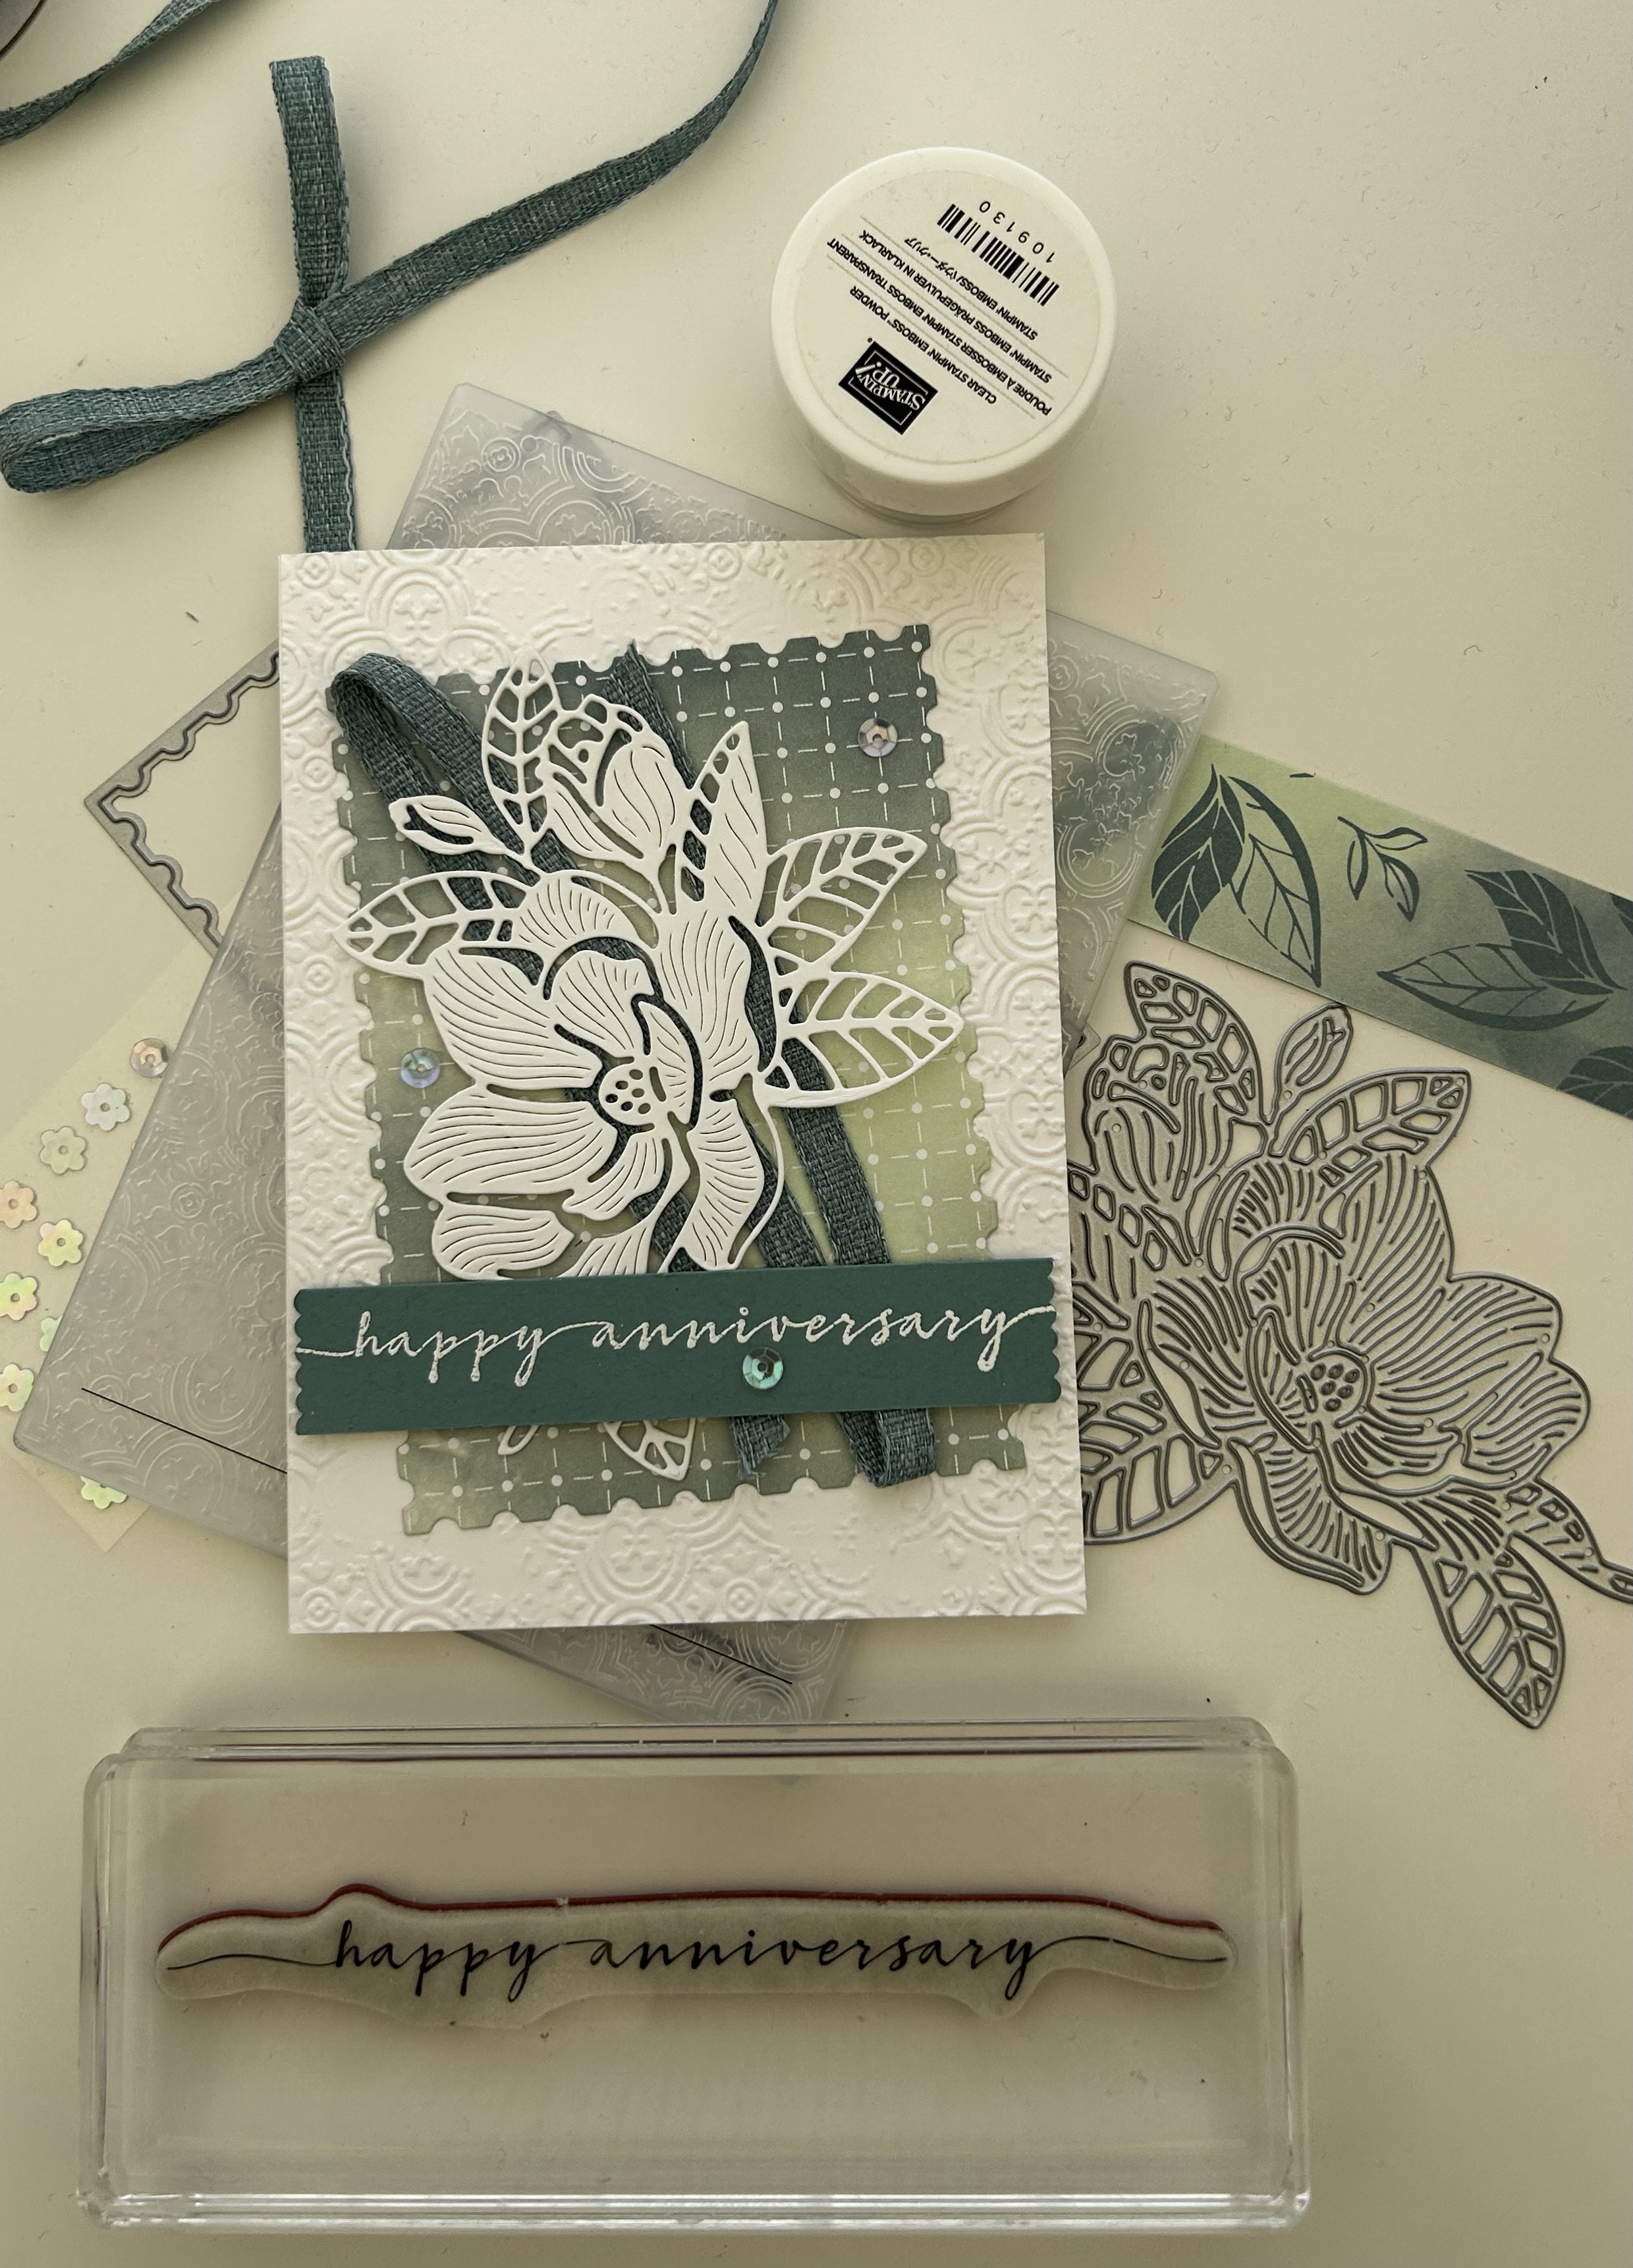
Magnolia Mood meets Perennial Postage

 Welcome to my blog

and  thank you for joining me today!

Happy Anniversary Margaret & Simon


Intermediate, die cutting, dry embossing, heat embossing, punching

Materials required for this card are:

Card Stock: basic white, lost lagoon
Designer Series Paper: hello irresistible 
Dies: magnolia mood, perennial postage (5)
Embossing Folders: distressed tile 3D
Ink: versamark 
Punches: happy labels
Stamps: sweetly scripted
Accessories: *bordered ribbon, *gingham gala sequins, white embossing powder
 
* = no longer available, when using layering dies (1) is the smallest

  1. Start with a base card 14.5 x 21 scored at 10.5, white layer 10.5 x 14.5 die cutting layer 9 x 12, dsp 9 x 12, lost lagoon 1.9 x 10.5
  2. dry emboss the white layer and adhere to the base card using liquid glue
  3. die cut the rectangle of dsp using the postage die and adhere to the base card at a slight angle using liquid glue.
  4. run a small strip of stampin' seal in the middle of the dsp and attach the ribbon
  5. die cut the flower and attach to the card using dimensional pads
  6. stamp the sentiment in versamark, add the embossing powder and heat
  7. trim the edges of the sentiment with the punch and attach to the card using dimensional pads 
  8. add the sequins
Hope you liked today's card. If you would like more information on how to make it, please don't hesitate to contact me, I'd love to hear from you.

If you wish to buy any of the items used, go to contacting me at the top of the page for details of how to order.

Will be back again soon with more cards, in the meantime take care and have a great day.
Annette 😊 
Tuesday, July 23, 2024

Softly Sophisticated and more

 Welcome to my blog

and  thank you for joining me today!

Happy Birthday Anne


Bright and cheerful, using the new in colors and Cased from Sharon Berkert ("astheinkdries") - die cutting, dry embossing, layering, two step stamping

Materials required for this card are:

Card Stock: basic white, petunia pop
Dies: perennial postage (5)
Embossing Folders: softly sophisticated 
Ink: memento tuxedo black, mossy meadow, petunia pop, pretty in pink
Stamps: loveliest tree, *softly sophisticated
Accessories: *bakers twine, brushed brass butterflies
 
* = no longer available, when using layering dies (1) is the smallest
  1. Start with a base card 14.5 x 21 scored at 10.5, pp 10 x 14, bw 12.5 x 9.5
  2. dry emboss the background layer and adhere to the base card using liquid glue
  3. stamp the flowers across the white layer starting with the stems, then the lighter colour flowers followed by the darker colour (you should get 5)
  4. stamp the sentiment
  5. die cut this layer, and then add bakers twine using a double bow
  6. attach to the base card using dimensional pads
  7. finish off by adding the butterflies.
Hope you liked today's card. If you would like more information on how to make it, please don't hesitate to contact me, I'd love to hear from you.

If you wish to buy any of the items used, go to contacting me at the top of the page for details of how to order.

Will be back again soon with more cards, in the meantime take care and have a great day.
Annette 😊 

Delicate Whispers and more

Welcome to my blog and    t hank you for joining me today! Happy Anniversary to Sylvia & Bill Intermediate level - blending with a brush...