Showing posts with label white embossing powder. Show all posts

Thursday, April 24, 2025

Magnolia Mood meets Dainty Flowers DSP

 Welcome to my blog

and  thank you for joining me today!

Happy Birthday Pauline


Intermediate level - fussy cutting, heat embossing,  layering, 

Materials required for this card are:

Card Stock: blackberry bliss
Designer Series Paper: *dainty flowers
Ink: versaMark
Stamps: magnolia mood
Accessories: bakers twine essentials pack, embossing powder (white),  iridescent discs
 * = no longer available

Start with a base card 14.5 x 21 scored at 10.5, layer one 10.2 x 14.2, dsp layer 10 x 14, sentiment 7 x 3
  1. stamp and heat emboss the sentiment, then fussy cut round it
  2. adhere the dsp to the first layer using liquid glue
  3. adhere these to the base card using liquid glue
  4. make a double bow and attach to the base card using a glue dot
  5. attach the sentiment using dimensional pads
  6. add the discs
Hope you liked today's card. If you would like more information on how to make it, please don't hesitate to contact me, I'd love to hear from you.

If you wish to buy any of the items used, go to contacting me at the top of the page for details of how to order.
 
Will be back again soon with more cards, in the meantime take care and have a great day.
Annette 😊

Thursday, August 22, 2024

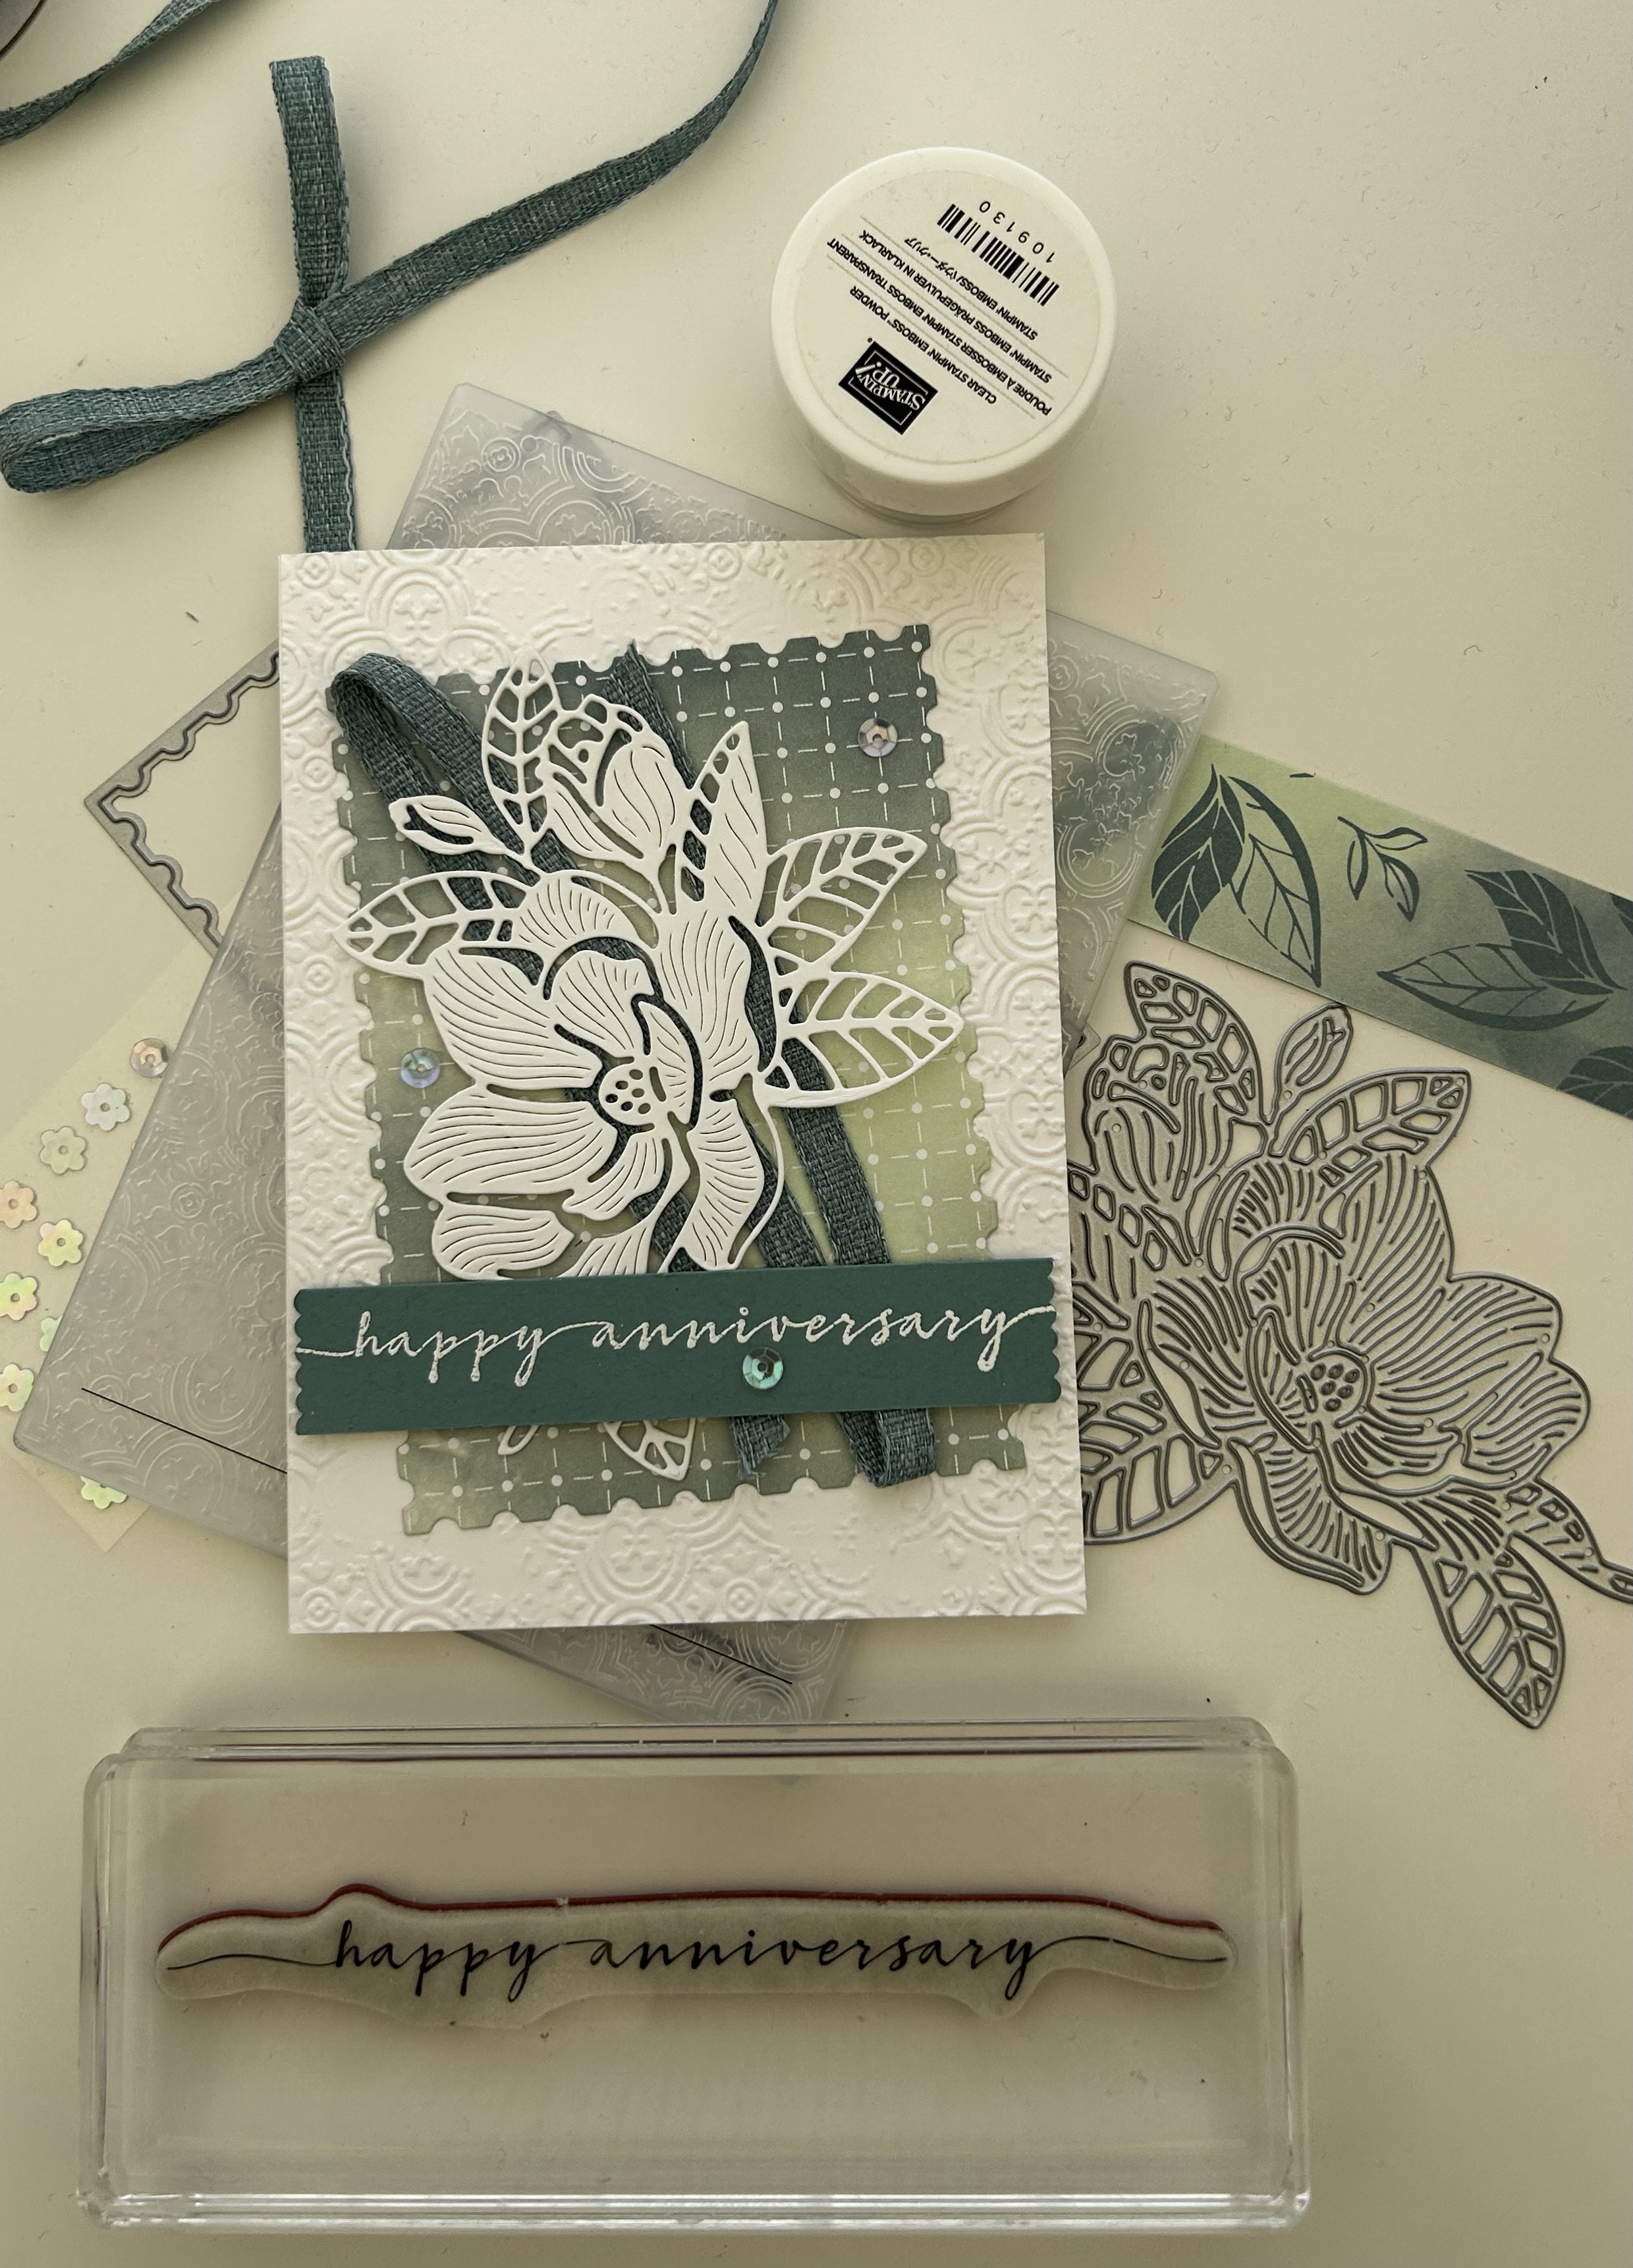
Magnolia Mood meets Perennial Postage

 Welcome to my blog

and  thank you for joining me today!

Happy Anniversary Margaret & Simon


Intermediate, die cutting, dry embossing, heat embossing, punching

Materials required for this card are:

Card Stock: basic white, lost lagoon
Designer Series Paper: hello irresistible 
Dies: magnolia mood, perennial postage (5)
Embossing Folders: distressed tile 3D
Ink: versamark 
Punches: happy labels
Stamps: sweetly scripted
Accessories: *bordered ribbon, *gingham gala sequins, white embossing powder
 
* = no longer available, when using layering dies (1) is the smallest

  1. Start with a base card 14.5 x 21 scored at 10.5, white layer 10.5 x 14.5 die cutting layer 9 x 12, dsp 9 x 12, lost lagoon 1.9 x 10.5
  2. dry emboss the white layer and adhere to the base card using liquid glue
  3. die cut the rectangle of dsp using the postage die and adhere to the base card at a slight angle using liquid glue.
  4. run a small strip of stampin' seal in the middle of the dsp and attach the ribbon
  5. die cut the flower and attach to the card using dimensional pads
  6. stamp the sentiment in versamark, add the embossing powder and heat
  7. trim the edges of the sentiment with the punch and attach to the card using dimensional pads 
  8. add the sequins
Hope you liked today's card. If you would like more information on how to make it, please don't hesitate to contact me, I'd love to hear from you.

If you wish to buy any of the items used, go to contacting me at the top of the page for details of how to order.

Will be back again soon with more cards, in the meantime take care and have a great day.
Annette 😊 
Wednesday, August 14, 2024

Alphabet A La Mode masculine birthday

 Welcome to my blog

and  thank you for joining me today!

Happy Birthday Jack


Easy Intermediate - die cutting, fussy cutting, heat embossing, layering, stamping

Materials required for this card are:

Card Stock: *evening evergreen, *soft succulent
Designer Series Paper: *texture chic
Dies: alphabet a la mode
Embossing Powder: white
Ink: versamark 
Stamps: *biggest wish
Accessories: linen thread, *slimline envelopes
 
* = no longer available
  1. Start with a base card 22 x 19 scored at 9.5, first layer 21 x 8.5, dsp layer 20.5 x 8, letters 5 x 14, off cut for sentiment
  2. adhere the dsp to the first layer using liquid glue
  3. wrap some linen thread around and tie with a bow towards the bottom 
  4. adhere some adhesive sheeting to the back of the letters layer arrange the letters and then die cut
  5. stamp the sentiment, heat emboss in white then fussy cut round it
  6. place the letters where you want them and adhere down
  7. attach this layer to the base card using dimensional pads
  8. attach the sentiment using dimensional pads
Hope you liked today's card. If you would like more information on how to make it, please don't hesitate to contact me, I'd love to hear from you.

If you wish to buy any of the items used, go to contacting me at the top of the page for details of how to order.

Will be back again soon with more cards, in the meantime take care and have a great day.
Annette 😊 

Monday, July 17, 2023

Blast from the past, Work of Art

   Welcome to my blog

and  thank you for joining me today!

Happy Birthday Kayden


A blast from the past, using both past and present products.

Materials required for this card are:

Card Stock: basic white, pecan pie, pumpkin pie, starry sky
Dies: alphabet al a mode, *christmas cheer, something fancy
Embossing Folders: painted texture
Ink: pecan pie (stamped off once) , pumkin pie, starry sky, versamark
stampin' Blends: pecan pie
Stamp Sets: artistically inked, *work of art
Accessories: *candy dots, matte decorative dots, white embossing powder
 * = no longer available
  1. Start with a base card 14.5 x 21 scored at 10.5, blue border 10 x 14, white panel 9.8 x 13.8
  2. stamp the shapes onto the white panel and emboss using the folder
  3. adhere the white panel to the blue border using liquid glue, then attach the blue border to the base card using dimensional pads
  4. stamp the 'birthday' onto a piece of pecan pie using versamark then cover with white embossing power, and heat emboss
  5. die cut the numbers, happy and birthday
  6. adhere the 'happy' and numbers using liquid glue
  7. attach the 'birthday' using dimensional pads
  8. colour a sahara sand candy dot using the pecan pie stampin' blend, then attach a pumpkin pie and the coloured dot along with a blue matte dot to finish.
Hope you liked today's card. If you would like more information on how to make it, please don't hesitate to contact me, I'd love to hear from you.

If you wish to buy any of the items used, go to contacting me at the top of the page for details on how to order.

Will be back again soon with more cards, in the meantime take care and have a great day.
Annette 😘

Monday, October 31, 2022

Celebrating You meets Rays of Light

  Welcome to my blog

and  thank you for joining me today!

Happy Birthday Rachael


I wasn't going to get the 'ray's of light' stamp, but I'm so glad I did. This was a fairly quick and easy card to make, and that's just how i like them. stamping, die cutting and heat embossing.

Materials required for this card are:

Card Stock: basic white, highland heather
Dies: meadow
Ink: highland heather, versaMark
Punches: banner pick a punch
Stampin' Up Blends: highland heather
Stamp Sets: celebrating you, rays of light
Accessories: bakers twine, white embossing powder
  1. base card 14.8 x 21 scored at 10.5 
  2. stamp the ray of lights onto a piece of white card stock and trim to 9.5 x 13.8
  3. die cut the flowers in white 
  4. using a strip of highland heather 2 x 9 stamp the sentiment in versaMark and heat emboss
  5. use the punch to create the tails
  6. colour the bakers twine using the stampin' blends and create a bow.
  7. adhere the first layer using wet glue, arrange the flowers and sentiment then attach with dimensionals
  8. attach the bow using a glue dot.
Hope you liked today's card. If you would like more information on how to make it, please don't hesitate to contact me, I'd love to hear from you.

If you wish to buy any of the items used, go to contacting me at the top of the page for details on how to order.

Will be back again soon with more cards, in the meantime take care and have a great day.
Annette 😘

Delicate Whispers and more

Welcome to my blog and    t hank you for joining me today! Happy Anniversary to Sylvia & Bill Intermediate level - blending with a brush...