Showing posts with label daisy lane. Show all posts

Wednesday, October 13, 2021

Daisy Lane and lots more

 Thank you for joining me today!

This is another card for Paul put together late last night. I just don't know where this week has gone.

I came across a video a couple of weeks ago created by the lovely Jill Chapman from 'paper daisy crafting' gathered up what was needed plus a couple of extra things and changed the orientation, hope yo like it.


Materials required for this card are:

Card Stock: basic black, very vanilla
Designer Series Paper: hand penned
Dies: penned flowers, pierced blooms, stitched greenery
Ink: crushed curry, memento black
Punches: medium daisy
Ribbon: braided linen
Stamp Sets: daisy lane  
Accessories: *faceted gems, note cards
* = no longer available, when using layering dies (1) is the smallest

Hope you liked today's card. If you would like more information on how to make it, please don't hesitate to contact me, I'd love to hear from you.

If you wish to buy any of the items used, go to contacting me at the top of the page for details on how to order.

Will be back again soon with more cards, in the meantime take care and have a great day.
Annette 😘

Monday, April 26, 2021

Daisy Lane meets Jar of Flowers

 Thanks for joining me today!


Happy Birthday Ita

A quick and simple card, CASEd from Mitosu Crafts


Materials required for this card are:

Card Stock: basic white, pool party
Designer Series Paper: flowers for every season 
Ink: pool party, night of navy
Punches: small bloom
Ribbon: flowers for every season combo
Stamp Sets: daisy lane, jar of flowers  
Accessories: basic rhinestones

Hope you liked today's card. If you would like more information on how to make it, please don't hesitate to contact me, I'd love to hear from you.

If you wish to buy any of the items used, go to contacting me at the top of the page for details on how to order.

Will be back again soon with more cards, in the meantime take care and have a great day.
Annette 😘
Sunday, March 28, 2021

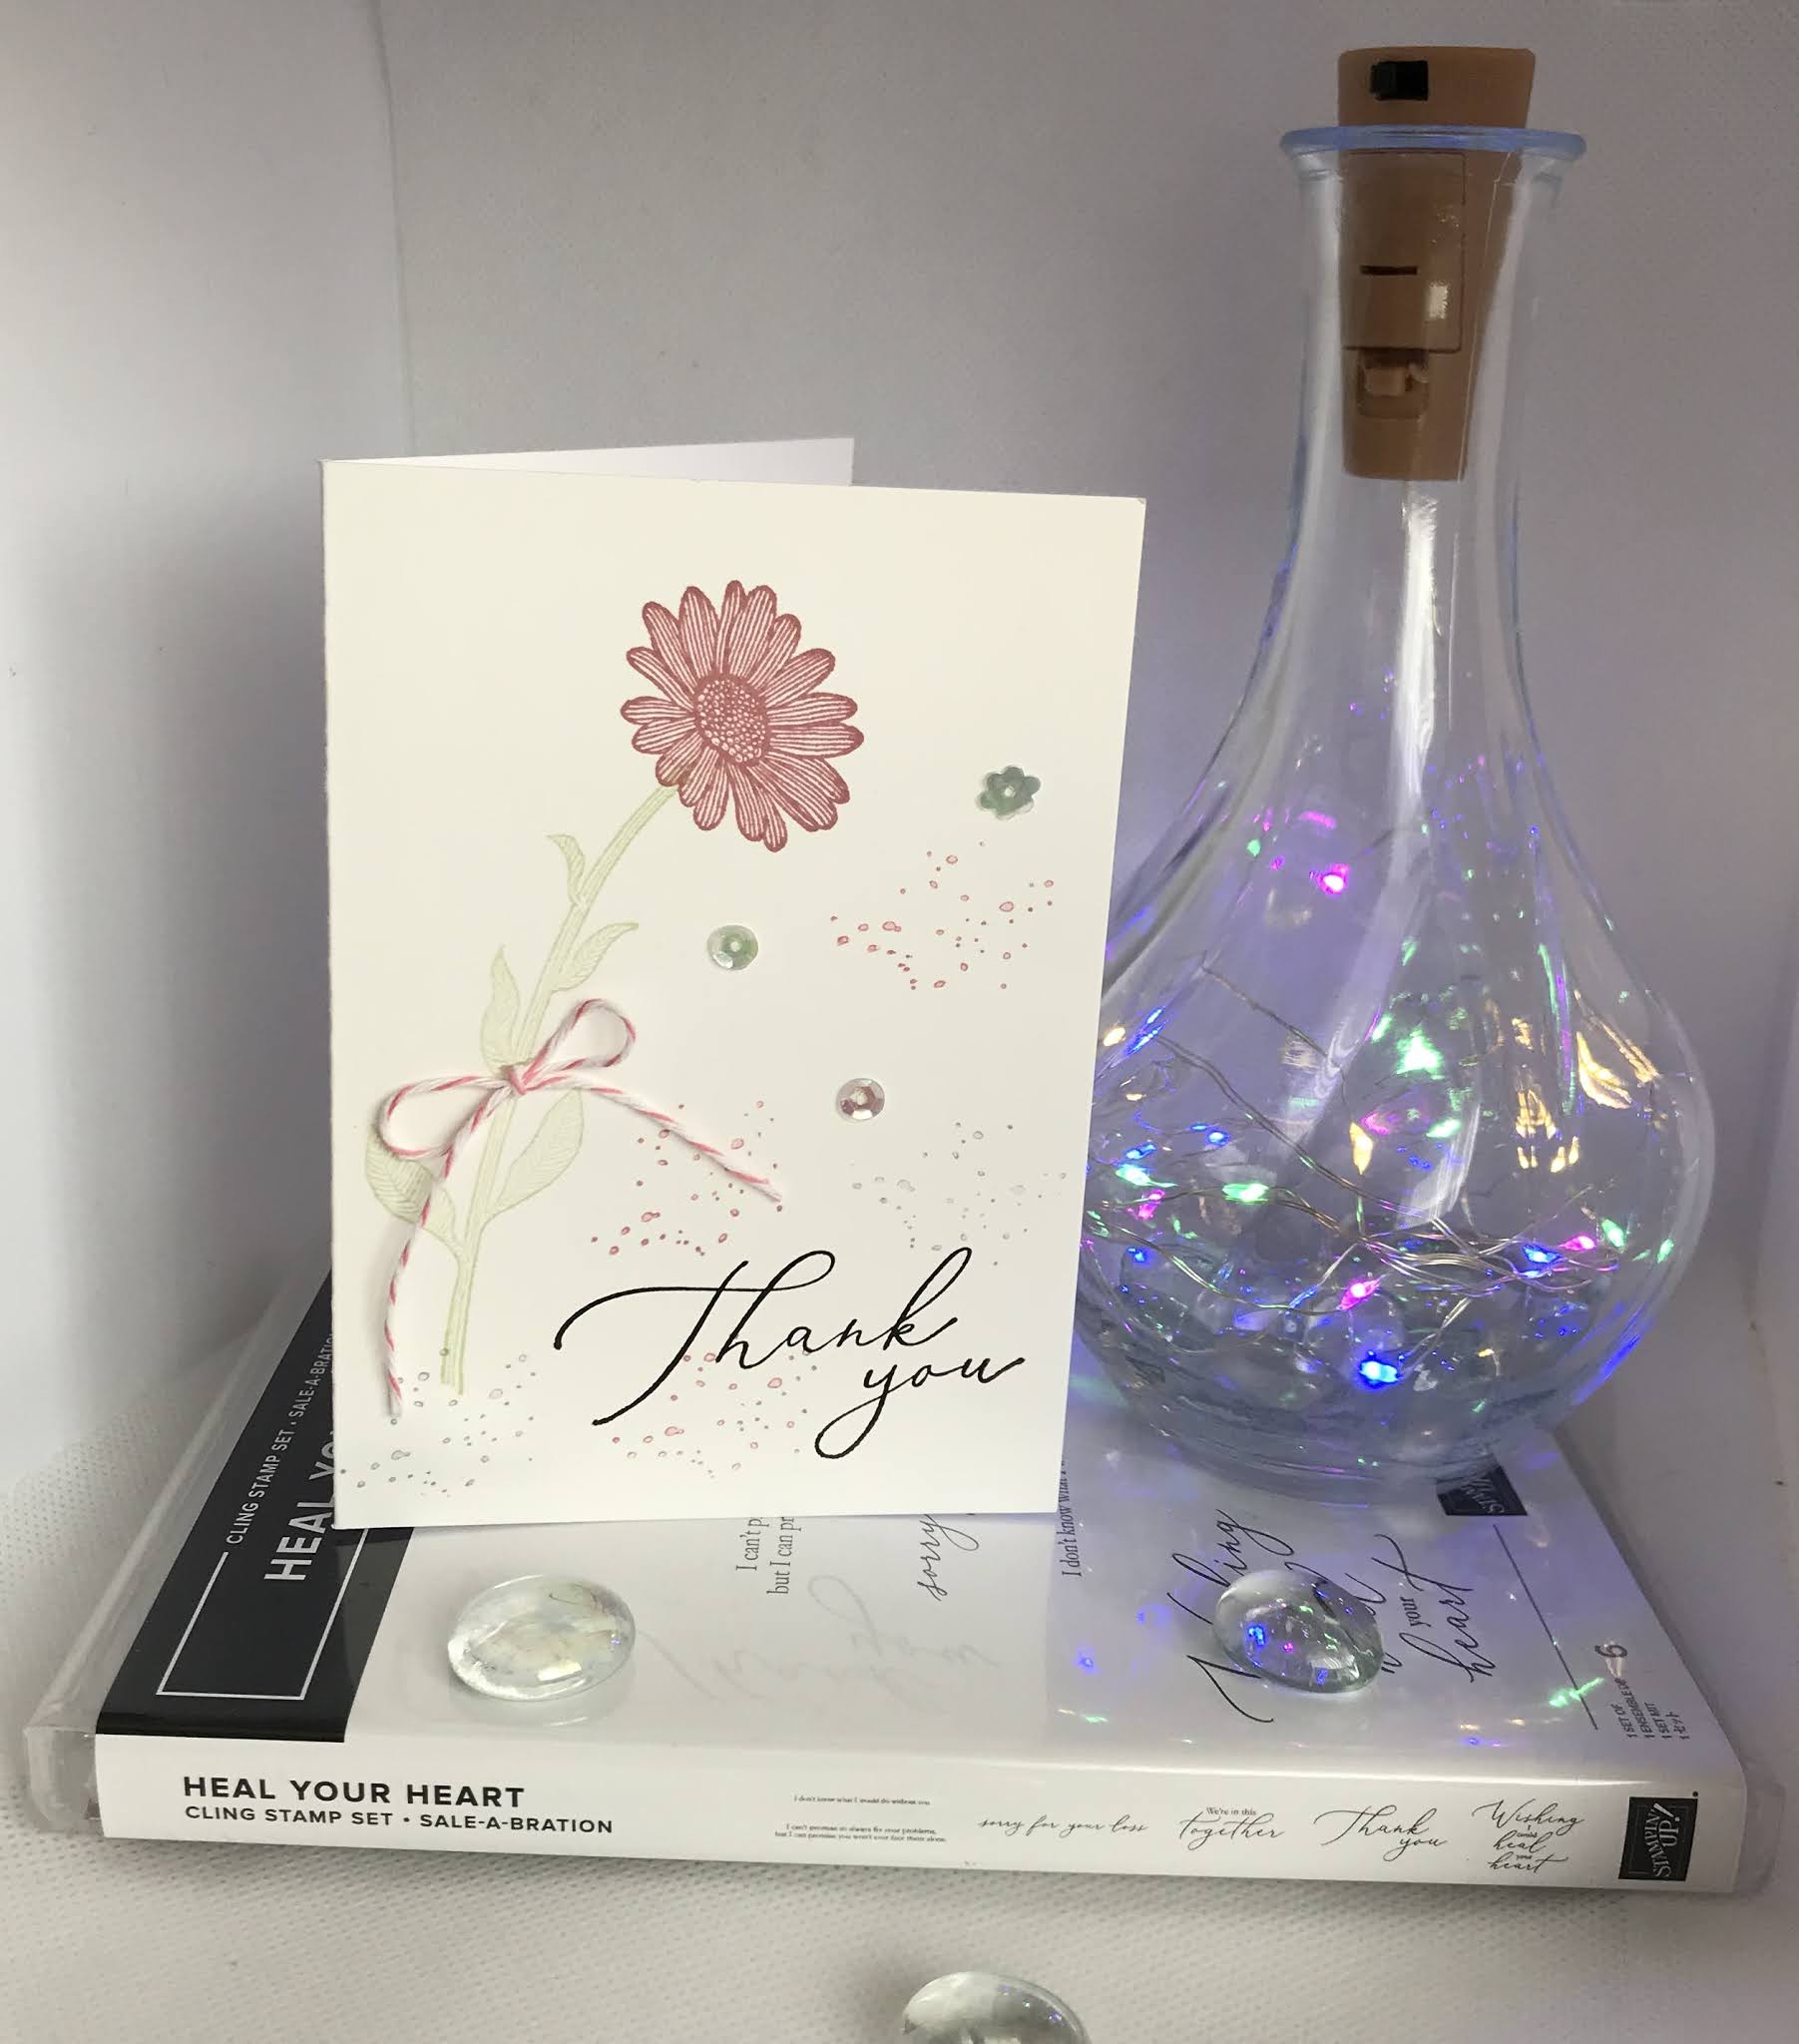
Daisy Lane meets Forever Fern and more

 Thank you for joining me today!


It's now been over a year since I started making Sue a card each week,
 to say thank you.


This one is what I call clean and simple

Materials required for this card are:

Card Stock: note card
Ink: rococo rose, smoky slate, soft sea foam, stazon
Ribbon: *bakers twine
  Stamp Sets: Daisy lane, forever fern, heal your heart
Accessories: *gingham gala sequins
* = retired, when using layering dies (1) is the smallest

Hope you liked today's card. If you would like more information on how to make it, please don't hesitate to contact me, I'd love to hear from you.

If you wish to buy any of the items used, go to contacting me at the top of the page for details on how to order.

Will be back again soon with more cards, in the meantime take care and have a great day.
Annette 😘

Thursday, November 19, 2020

Butterfly Wishes meets Daisy Lane

 Hello and welcome to my haven in a hectic world!

Thanks for joining me today!

Happy Birthday Millie


This is a CASe from Terri Pocock and adding a couple of things!

Materials required for this card are:

Card stock: misty moonlight, whisper white
DSP: flowers for every season
Dies:ornate borders, stitched rectangles (2) narrow
Embossing folders: script 3D
Ink: misty moonlight, smoky slate
Punches: medium daisy 
Stamp sets: butterfly wishes, daisy lane
Accessories: *designer elements, *gold cord, in color enamel dots
* = retired, when using layering dies (1) is the smallest

Hope you liked today's card. If you would like more information on how to make it, please don't hesitate to contact me, I'd love to hear from you.

If you wish to buy any of the items used, go to contact me at the top of the page for details on how to order.

Will be back again soon with more cards, in the meantime take care and have a great day.
Annette 😘

Sunday, October 4, 2020

Daisy Lane meets Itty Bitty Greetings

 Hello and welcome to my haven in a hectic world!

Thanks for joining me today!

Hi Sue, yet another week over


CASeD from Amanda Bates blog, really liked it so just added a little bling!


Materials required for this card are:

Card Stock: gold foil, gray granite, whisper white
Dies: stitched rectangles (3&4)
Embossing Powder: gold
Ink: gray granite, versamark
Punches: medium daisy
Stamp Sets: daisy lane, itty bitty greetings
Accessories: *designer elements, *gold sequins
* = retired, when using layering dies (1) is the smallest

Hope you liked today's card. If you would like more information on how to make it, please don't hesitate to contact me, I'd love to hear from you.

If you wish to buy any of the items used, go to contacting me at the top of the page for details on how to order.

Will be back again soon with more cards, in the meantime take care and have a great day.
Annette 😘

Wednesday, April 15, 2020

A Little Lace meets Daisy Lane

Hello and welcome to my haven in a hectic world,

We're now on week 4 of the lock down and here's my card for our lovely Sue!
All measurements are in centimetres.

Card Stock: Pear Pizzazz 21 x 14.5 scored at 10.5 (card base), 18 x 5 (leaves x2), Sahara Sand 10 x 14 (1st layer), Whisper White 9.5 x 4.5 (4 daisies), 1 x 10 (sentiment).

(cs) = card stock, (ef) = embossing folder,  (r) = retired,  (ss) = stamp set.
  • Emboss the sahara sand 1st layer (cs) using the scripty (ef).
  • Cut a 13cm piece of textured weave ribbon and wrap it around the bottom of the 1st layer attaching at the back with glue dots or tape.
  • Adhere the 1st layer to the pear pizzazz card base using dimensional pads.
  • Stamp 2 daisies from the daisy lane (ss) on the Whisper white daisies (cs) in smoky slate ink.
  • Punch out the 2 stamped daisies plus 2 plain ones (4 in all) using the medium daisy punch.
  • Coat the stamped daisies with wink of stella.
  • Die cut 2 of the leaves from the poppy moments dies using the pear pizzazz leaves (cs).
  • Adhere the leaves in only 2 or 3 places to the 1st layer, tucking it slightly behind the ribbon using liquid glue.
  •  Adhere each of the stamped daisies to the plain daisies using liquid glue.
  • Gently curl the petals and add a dimensional pad to the back of each daisy, and attach to the top of each of the leaves.
  • Add a (r) iced rhinestone to the centre of each of the flowers.
  • Using a fine tip glue pen adhere a few sequins (mine are (r) silver ones).
  • With the whisper white sentiment (cs) stamp the sentiment from the a little lace (ss).
  • Die cut the sentiment using the strap die from the all dressed up dies. Once die cut, trim down the right side, cutting at an angle leaving enough room to adhere a basic rhinestone.
  • Attach the sentiment to the ribbon using dimensional pads.
Hope you liked today's card!!

Will be back again soon with more cards, until then keep safe and well!
Annette X

Tuesday, March 31, 2020

Daisy Lane meets Forever Blossoms and more

Hello and welcome to my haven in a hectic world, thanks for dropping by.

A thank you card for Sue!

Sue is the proprietor of our local Cafe/restaurant, where we go quite often for breakfast or Sunday lunch, she has turned her business into a take away delivery service for the time being in this very uncertain world we're living in. So each Sunday hubby and I sit down to a lovely Sunday Roast without any of the work and stress!
This is my way of sending back the payment and the following week's order. Our thanks also goes out to her lovely daughter Holly, who drops off the food in our porch and picks up the envelope.

All measurements are in inches.
Card Stock: Grapefruit Grove Foil 5 x ½ 2 pieces, Vellum 5 x 2¾ , off cut for flower.
DSP: 5 x 2¾.
Note Card: 5 x 7 scored at 3½.

(cs) = card stock, (sdsp) = specialty designer series paper, (r) = retired, (ss) = stamp set.
  • Adhere the (r) grapefruit grove foil strips down each side of the note card using liquid glue.
  • Stamp the sentiment from the (r) part of my story (ss) in memento black ink towards the bottom of the larger piece of vellum (cs).
  • Now towards the top of the same piece of vellum stamp the Smile sentiment from the Daisy Lane (ss) in memento black ink.
  • Using a sponge lightly dab some liquid glue on the back of the vellum and adhere to the flowering foils (sdsp).
  • With the off cut of vellum (cs) colour an area large enough for the single flower in the forever blossoms (ss) using a petal pink stampin' blend, now stamp the flower over the top in memento black ink and leave to one side to dry for a few minutes. It's best to lay the colour down first before stamping on vellum, as there can be a little bleeding.
  • Wrap a piece of organdy striped ribbon around the vellum just above the bottom sentiment and adhere with tape of glue dots. Cut another piece of the ribbon and tie a faux bow around the first piece towards the right side.
  • Die cut the flower using the cherry blossoms dies and adhere to the ribbon on the left side using a glue dot.
  • To finish off colour a medium basic rhinestone with the petal pink stampin' blend and attach to the middle of the flower.
Will be back again soon with more cards, and have a great day!
Annette X

Saturday, October 26, 2019

Beautiful You meets Daisy Lane

Hello, it's lovely you've popped by today!

Happy Birthday Jenny

My lovey daughter is having a birthday today, and here's the card I created for her. (it's based on one I saw on Lisa's Stamp Studio blog).
To recreate the card, you will need:

Ⓡ = retired, (ss) = stamp set, all measurements are Centimetres

Card Stock: Pear Pizzazz 16 x 11.2 (first layer)
Vellum: 4.5 x 9
Very Vanilla 3 pieces 24.5 x 17 scored at 12.25 (card base), 10 x 13.5 (top background), 4.5 x 17.5 (daisies and pretty label)
Dies: Stitched Rectangle
Elements: Faceted Gems, Gingham Gala Sequins Ⓡ
Punches: Leaf, Medium Daisy, Pretty Label
Stamp Sets: Beautiful You, Daisy Lane

The card base, first layer and Daughter sentiment were cut using non stampin' up products.
Randomly stamp the 2nd layer with the daisy and leaf stamp from the daisy lane (ss) and then use a dauber to colour the daisy centres. Add the 'Life looks beautiful on you' sentiment from the beautiful you (ss) towards the top right corner and then die cut using the largest rectangle from the stitched rectangle dies.
Stamp and punch out the rest of the elements using the daisy lane (ss), leaf, medium daisy and pretty label punches (if you adhere the vellum using removable tape to a piece of normal copy paper it will cut much better, but remember to remove it before adhering to the card).
Arrange all the elements  on  the card and adhere down.
Add the faceted gem to the daisy and the gingham gala sequins to the 'smile' sentiment.

Will be back again soon with more cards
Annette X

Wednesday, September 4, 2019

New Wonders meets A Little Lace

Hi folks, hope you're having a good day

Hoorah!! it's the 4th September which means the new Autumn Winter Catalogue is going live today, check it out by clicking on the image on the right. It will take you straight to the catalogue in full. If you wish to order anything and you are happy to have me as your demonstrator just email me (details on my contact page) and I will be happy to help you.

I really enjoyed making this card, loved the stamps and the colours.  They are my granddaughters favourite colours so I know she'll just love it.
These are sets I think will always stay in my craftroom, I think they're just gorgeous.

To recreate this card follow the guide below:
(cs) = Card Stock, dsp = Designer Series Paper, ® = Retired, (ss) = Stamp Set

All measurements are in Centimetres

Card Stock: Highland Heather 2 pieces 14.8 x 21, 4 x 4
Seaside spray 10 x 14.2
Vellum 10 x 4.5
Whisper White 2 pieces 13.8 x 9.5, 3.5 x 3.5
Embossing Folders: Subtle
Embossing Powder: White
Punches: Medium Daisy, 1⅛ Scallop circle, 1⅜ Scallop circle
Ribbon: ® Organdy Combo
Stamp Sets: A Little Lace, Daisy Lane, New Wonders
Stampin' Blends: Highland Heather, Petal Pink, Pretty Peacock, Seaside Spray, Soft Suede, So Saffron
Stampin' Pads: Highland Heather, Seaside Spray
Accessories: Faceted Gems, ® Gingham Gala Sequins, Memento Tuxedo Black ink, VersaMark, Wink of Stella

Start with the larger piece of Highland Heather (cs) measuring 14.8 x 21, score and fold at 10.5, this is now your card base.

Next using the larger piece of  whisper white (cs), (on reflection I think Shimmery White (cs) would have been better) stamp the fairy from the new wonders (ss) towards the top right hand side in memento ink, now stamp the first greeting in highland heather so it's sitting just below the nib of the penStamp the swirly daisy from the a little lace (ss) at the bottom in seaside spray.

Using the stampin' blends colour in the fairy using both the light and dark blends to emphasis the shadow. For the wings use the wink of stella so they will shimmer nicely.

Now layer this piece with the piece of  seaside spray (cs) using liquid glue, and emboss using the subtle folder.

Next using the piece of vellum and the daisy lane (ss) stamp the smaller daisy twice in VersaMark and then heat emboss using white embossing powder.

Punch out both these daisies using the Medium Daisy punch. Then curl the petals of the first one up and the petals on the second one down before adhering them together using liquid glue.

Stamp the second sentiment using the smaller piece of whisper white (cs) in highland heather and punch out using the 1⅛ Scallop circle punch.

Now punch out the second circle using the 1⅜" scallop circle punch and the smaller piece of highland heather (cs). Layer these 2 circles using dimensional pads.

Wrap some ® organdy ribbon around the bottom of the 2nd and 3rd layers, securing at the back with glue dots.  Add dimensional pads to the back and adhere to the card base.

Use liquid glue to secure the daisy in place, and dimensional pads for the scalloped circles. Add one of  the gingham gala sequins to the bottom sentiment and a faceted gem in the middle of the daisy and that's it folks job done!!

Will be back again soon with more cards.
Annette X

Delicate Whispers and more

Welcome to my blog and    t hank you for joining me today! Happy Anniversary to Sylvia & Bill Intermediate level - blending with a brush...