Tuesday, April 30, 2024

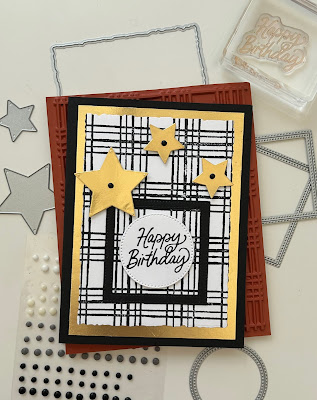
Sketched Plaid meets Beautiful Balloons

 Welcome to my blog

and  thank you for joining me today!

Happy Birthday Nigel


Quick card, Inspired by 'stampinpretty' - die cutting, layering, stamping

Materials required for this card are:

Bundles: beautiful balloons
Card Stock: basic black, *gold foil
Dies: deckled rectangles (7), stylish shapes squares (3,4) circle (3)
Ink: memento tuxedo black
Stamps: sketched plaid
Accessories: classic matte dots
 
* = no longer available, when using layering dies (1) is the smallest

  1. Start with a base card 14 x 21 scored at 10.5, white and gold layers 9.5 x 13, black layer 7 x 7, off cuts for the stars
  2. stamp the white layer using the plaid stamp and then die cut it using the deckled rectangle
  3. die cut the 3 stars from the middle of the gold rectangle
  4. adhere the plaid layer to the gold layer using liquid glue
  5. adhere this layer to the base card again using liquid glue
  6. stamp the sentiment and die cut using the circle die
  7. die cut the black frame using both square dies at the same time
  8. adhere the black frame using liquid glue
  9. attach the sentiment and stars using dimensional pads
  10. add the dots
Hope you liked today's card. If you would like more information on how to make it, please don't hesitate to contact me, I'd love to hear from you.

If you wish to buy any of the items used, go to contacting me at the top of the page for details of how to order.

Will be back again soon with more cards, in the meantime take care and have a great day.
Annette 😊 
Heartfelt Hexagon meets Stylish Shapes

 Welcome to my blog

and  thank you for joining me today!

Happy birthday Georgia


Quick & Easy - dry embossing, layering, punching, stamping

Materials required for this card are:

Bundles: heartfelt hexagon
Card Stock: basic white, blueberry bushel
Designer Series Paper: bright & beautiful
Dies: stylish shapes (2)
Embossing Folders: timeworn type 3D
Ink: berry burst, blueberry bushel
Stampin' Blends: berry burst 
Accessories: cotton combo ribbon, basic rhinestones
 
When using layering dies (1) is the smallest

My base card was from my old stash
  1. Start with a base card 12 x 24 scored at 12, first layer 11 x 11, backing for 2nd layer 10 x 10, dsp 5 x 10, basic white 5 x 10, pieces of white & blue for die cutting and punching
  2. The first sentiment is computer generated changing the colour to #B74984
  3. die cut the sentiment and put to one side
  4. colour 3 rhinestones using the alcohol blend marker and again put to one side
  5. adhere the second layer to the base card using liquid glue
  6. emboss the white rectangle using the folder, and adhere to the backing piece at the bottom using liquid glue
  7. adhere the dsp rectangle above the embossed one
  8. attach the ribbon across the middle of this layer securing it at the back with tape
  9. slide another piece of the ribbon under the first and tie a knot to create a faux knot bow 
  10. adhere this layer to the card
  11. stamp the second sentiment then punch it out using the hexagon, along with a blue hexagon
  12. adhere the 2 hexagons together using liquid glue and attach to the card using dimension pads
  13. add the die cut sentiment again using dimensional pads
  14. add the rhinestones
Hope you liked today's card. If you would like more information on how to make it, please don't hesitate to contact me, I'd love to hear from you.

If you wish to buy any of the items used, go to contacting me at the top of the page for details of how to order.

Will be back again soon with more cards, in the meantime take care and have a great day.
Annette 😊 

Sunday, April 28, 2024

Blast from the past Perennial Birthday

 Welcome to my blog

and  thank you for joining me today!

Happy Birthday Stephen

For this card I was inspired by one i'd seen on Pinterest, don't know who it was but thank you.


Intermediate level - brush blending, dry embossing, heat embossing, layering, punching, sponge daubing, stamping

Materials required for this card are:
 
Card Stock: early espresso, very vanilla
Designer Series Paper: nature's sweetness
Embossing Folders: metal plate 3D
Ink: pecan pie, versaMark
Punches: banner pick a punch, heartfelt hexagon
Stamps: *perennial birthday
Accessories: *designer elements, *faux suede trim, sponge dauber
 
* = no longer available

  1. Start with a base card 14.5 x 21 scored at 10.5, dsp 10 x 14, 10 x 6, sentiment 6.5 x 6, vellum banner 10 x 8, cs banner 11 x 2.5
  2. distress the edges of the 10 x 14 dsp and all of the 10 x 6 dsp, using a blending brush
  3. stamp the sentiment using versaMark, add gold embossing powder then heat emboss
  4. punch out the sentiment and distress the edges using a sponge dauber
  5. to make the V in the vellum banner put a mark 1cm up and 5cm in from the edge, then from the bottom corners cut up to the mark on each side
  6. emboss this banner using the folder
  7. for the dark banner, flag each end with the banner punch
  8. attach the trim towards the bottom of the larger layer using tear n tape
  9. adhere the smaller piece of dsp and the darker banner using liquid glue
  10. add the sentiment to the vellum banner using dimensional pads 
  11. add liquid glue to the back of the vellum behind the sentiment and adhere to the card
  12. attach the elements
Hope you liked today's card. If you would like more information on how to make it, please don't hesitate to contact me, I'd love to hear from you.

If you wish to buy any of the items used, go to contacting me at the top of the page for details of how to order.

Will be back again soon with more cards, in the meantime take care and have a great day.
Annette 😊 

Wednesday, April 24, 2024

Painted Lavender meets Best Family Ever

 Welcome to my blog

and  thank you for joining me today!

Happy Birthday Pauline


Intermediate - die cutting, double dry embossing, layering, stamping

Materials required for this card are:

Bundle: painted lavender
Card Stock: basic white, gorgeous grape
Embossing Folders: strippes & splatters 3D, *subtle 3D
Ink: gorgeous grape, highland heather, old olive
Stamps: best family ever
Accessories: basic rhinestones, linen thread
 
* = no longer available, when using layering dies (1) is the smallest

  1. Start with a base card 14.5 x 21 scored at 10.5, white layer 10 x 14, off cuts of  white for stamping 
  2. stamp the leaves on the left side of the white panel, once full strength and 2 stamp offs either side
  3. emboss the white panel using both embossing folders, by only doing to half way for each folder, then adhere to the base card using liquid glue
  4. stamp the elements, 3 flower heads (2 gorgeous grape, one stamped off, 1 highland heather, 1 butterflies stamped off twice, 3 stems, 1 sentiment)
  5. die cut the flower pieces and butterflies
  6. layer the 3 stems onto the card using liquid glue
  7. attach the flower heads and butterfies using dimensional pads
  8. add the rhinestone and bow (use a glue dot to attach the bow)
Hope you liked today's card. If you would like more information on how to make it, please don't hesitate to contact me, I'd love to hear from you.

If you wish to buy any of the items used, go to contacting me at the top of the page for details of how to order.

Will be back again soon with more cards, in the meantime take care and have a great day.
Annette 😊 

Tuesday, April 23, 2024

Cheerful Daisies meets Detailed Dogwood

Welcome to my blog

and  thank you for joining me today!

Happy birthday Heather


Avid - colouring, die cutting, dry & heat embossing, layering

Materials required for this card are:

Bundles: cheerful daisies
Card Stock: basic white, bubble bath, vellum
Dies: deckled rectangles (7)
Embossing Folders: *softly sophisticated
Embossing Powder: silver, white
Ink: versamark
Stamps: *detailed dogwood
Stampin Blends: bubble bath, flirty flamingo, lemon lime twist
Accessories: *gingham gala sequins, simply elegant trim
 
* = no longer available, when using layering dies (1) is the smallest
  1. Start with a base card 14.5 x 21 scored at 10.5, white 10 x 14, vellum 9 x 11.5, bubble bath off cut for sentiment
  2. dry emboss the white panel and adhere to the base card using liquid glue
  3. die cut the vellum rectangle and stamp the image using versaMark, then add the silver embossing powder and heat
  4. colour the image on the reverse side using the blends
  5. add the 3 sequins, then attach glue dots behind the sequins along with one where your sentiment is going to go on the reverse side and attach to the base card
  6. stamp the sentiment in versaMark, add white embossing powder and heat
  7. die cut the sentiment and attach the trim on the back before attaching it to the base card using dimensional pads
Hope you liked today's card. If you would like more information on how to make it, please don't hesitate to contact me, I'd love to hear from you.

If you wish to buy any of the items used, go to contacting me at the top of the page for details of how to order.

Will be back again soon with more cards, in the meantime take care and have a great day.

Annette 😊  

Friday, April 12, 2024

Inspirational Sketches meets Go To Greetings

 Welcome to my blog

and  thank you for joining me today!

Happy Birthday Duncan


Intermediate card for men -  brush blending, die cutting, dry embossing, layering, punching, stamping. CASEd from 'Mandy VanHavermaet'

Materials required for this card are:

Card Stock: early espresso, pecan pie
Designer Series Paper: nature's sweetness
Dies: deckled rectangles (4)
Embossing Folders: basics 3D
Ink: early espresso, pecan pie
Punches: happy labels
Stamps: inspirational sketches, go to greetings
Accessories: blending brushes, *faux suede trim, rustic metallic dots
 
* = no longer available, when using layering dies (1) is the smallest
  1. Start with a base card 14.5 x 21 scored at 10.5, pecan pie layer 10 x 14, dsp layer 10 x 6, deckled rectangle 6.5 x 9.5, basic white 10 x 2.5, basic white 5.3 x 8.5
  2. With the hay type stamp, stamp around the pecan pie layer on the left, top and right sides, using the stamping off method, then emboss this layer
  3. using pecan pie and a blending brush, lightly colour the dsp, white rectangle and sentiment strip, then finish off each end of the sentiment using the punch
  4. adhere the dsp to the bottom of the pecan pie layer using liquid glue
  5. wrap the suede trim around the top of the dsp and attach to the back using tape
  6. attach these layers to the base card using dimensional pads
  7. stamp the bird and sentiment
  8. adhere the bird to the deckled rectangle using liquid glue
  9. attach the sentiment and bird to the base card using dimensional pads
  10. add the metallic dots
Hope you liked today's card. If you would like more information on how to make it, please don't hesitate to contact me, I'd love to hear from you.

If you wish to buy any of the items used, go to contacting me at the top of the page for details of how to order.

Will be back again soon with more cards, in the meantime take care and have a great day.
Annette 😊 

Thursday, April 11, 2024

Brewed for you meets Inked Botanicals

 Welcome to my blog

and  thank you for joining me today!

Happy Birthday Thomas


Intermediate man card - die cutting, dry & heat embossing, layerings, two step stamping 

Materials required for this card are:

Card Stock: basic black & white, crushed curry
Designer Series Paper: *beautifully penned, inked botanicals
Dies: brewed
Embossing Folders: basics 3D
Embossing Powder: black
Ink: memento black, crushed curry, versaMark
Stamps: brewed for you
Accessories: bakers twine
 * = no longer available
  1. Start with a base card 14.5 x 21 scored at 10.5, 1st matt layer 10 x 14, dsp layer 9.5 x 13.5, strip 2 x 10, white off cuts for stamping
  2. dry emboss the dsp layer and adhere it to the 1st layer using liquid glue
  3. adhere the strip towards the bottom using liquid glue, then add the bakers twine tying with a knot
  4. adhere this section to the base card using liquid glue
  5. stamp the sentiment using versaMark and heat emboss in black, fussy cut round the sentiment and attach to the card using dimensional pads
  6. stamp the glass outline's and the beer heads in memento black then in fill the glasses with crushed curry.
  7. die cut the these pieces, adhere the beer heads to the top of the glasses using liquid glue, then attach the glasses to the base card
Hope you liked today's card. If you would like more information on how to make it, please don't hesitate to contact me, I'd love to hear from you.

If you wish to buy any of the items used, go to contacting me at the top of the page for details of how to order.

Will be back again soon with more cards, in the meantime take care and have a great day.
Annette 😊 

Aspen Trees meets Perched On A Tree (with a twist)

 Welcome to my blog

and  thank you for joining me today!

Happy Birthday Andy


CASeD from Narelle Farrugia - alcohol blending, die cutting, dry embossing (with a twist), layering, stamping, tearing paper

Materials required for this card are:

Card Stock: basic white, early espresso
Designer Series Paper: *galvanised metallic, *in good taste
Dies: aspen trees
Ink: early espresso, pretty peacock
Punches: banner pick a
Stamps: artistically inked
Stampin' Blends: crumb cake, ivory, 700 medium light 1, 800 medium light 2
 * = no longer available
  1. Start with a base card 14.5 x 21 scored at 10.5, basic white layer 9.5 x 13.5, galvanised metallic 10 x 14, dsp 2 x 10.5, early espresso 10.5 torn across at about 3cm, basic white for stamping
  2. die cut the leaves from the middle of the galvanised metallic layer, then adhere the galvanised layer only to the base card using liquid glue
  3. using the splatter stamps on the white layer, stamp the full stamp a few times using the stamping off method, then the dotted stamp full strength on top
  4. Now for the 'twist' - layer your aspen window die as if to die cut, but place your silicone matt underneath the paper first when layering your sandwich (this embosses the image instead of cutting it) adhere to the base card using liquid glue
  5. stamp the trees and bird, colour the bird using the blends (crumb cake for the wing, 700 & 800 for the head, ivory for the body)
  6. stamp the sentiment using a strip of basic white then flag the one end
  7. adhere the dsp and paper strip together using liquid glue, then adhere to the base card, using liquid glue
  8. adhere the leaves using liquid glue
  9. attach the bird, trees and sentiment using dimensional pads
Hope you liked today's card. If you would like more information on how to make it, please don't hesitate to contact me, I'd love to hear from you.

If you wish to buy any of the items used, go to contacting me at the top of the page for details of how to order.

Will be back again soon with more cards, in the meantime take care and have a great day.
Annette 😊
Wednesday, April 3, 2024

Blast from the past 'Sky's The Limit'

 Welcome to my blog

and  thank you for joining me today!

Happy Birthday Mike


For the man who loves flying
Blast from the past, not many current products.
Intermediate level - die cutting, dry embossing, layering, punching, stamping

Materials required for this card are:

Card Stock: basic black & white, pecan pie
Designer Series Paper: *going places
Dies: *layering ovals (8), *stitched shapes (4)
Embossing Folders: *old world paper 3D, subtle 3D
Ink: memento tuxedo black
Punches: banner pick a 
Stamps: seasonal branches, *sky's the limit
Accessories: *glittered organdy ribbon  
* = no longer available, when using layering dies (1) is the smallest
  1. Start with a base card 14.8 x 21 scored at 10.5, dsp 10.1 x 6.1, pecan pie layer 10.1 x 8.1, white layer 10.1 x 14.1 scraps for die cutting and stamping
  2. emboss the pecan pie using the old world paper folder
  3. adhere the dsp at the top of the white layer using liquid glue
  4. adhere the pecan pie layer to the bottom of the white layer
  5. attach the ribbon to join the two areas using tape and adhere to the base card using liquid glue
  6. stamp the plane and sentiment onto a piece of white card 
  7. die cut the plane using the stitched shapes , along with a black oval from the layering ovals
  8. emboss the plane using the subtle's folder and attach to the black oval using dimensional pads, then adhere to the base card using liquid glue
  9. create a banner using the punch, fussy cut the sentiment and adhere to the banner using liquid glue, then adhere this to the base card using liquid glue.
Hope you liked today's card. If you would like more information on how to make it, please don't hesitate to contact me, I'd love to hear from you.

If you wish to buy any of the current items used, go to contacting me at the top of the page for details of how to order.

Will be back again soon with more cards, in the meantime take care and have a great day.
Annette 😊 

Biggest Wish meets Forever Plaid 3D

  Welcome to my blog and    t hank you for joining me today! Happy Birthday Mick Intermediate - die cutting, dry embossing, embellishing, la...