Thursday, December 28, 2023

Medley Mix meets Inked & Tiled punches

   Welcome to my blog

and  thank you for joining me today!

Happy Anniversary to Heather & Mike


Quick intermediate - dry embossing, layering, punching, stamping, sentiment computer generated 
Cased from Jackie Bolhuis (klompenstampers)

Materials required for this card are:

Card Stock: basic white
Embossing Folders: basics 3D
Ink: azure afternoon, berry burst
Punches: inked & tiled
Stamp Sets: medley mix
Accessories: bakers twine essentials, note cards & envelopes
  1. Start with a note card & envelope, basic white 8.4 x 12
  2. dry emboss the white layer using the folder
  3. computer generate the sentiment and stamp the dots shape around it
  4. stamp the 4 geometric shapes
  5. punch out all the shapes
  6. position the geometric shapes down the right side of the white layer (they over hang slightly, top & bottom) and adhere using liquid glue
  7. attach the sentiment using dimensional pads
  8. wrap the bakers twine around the white layer and tie a blow
  9. attach the white layer to the base card using dimensional tabs
Hope you liked today's card. If you would like more information on how to make it, please don't hesitate to contact me, I'd love to hear from you.

If you wish to buy any of the items used, go to contacting me at the top of the page for details on how to order.

Will be back again soon with more cards, in the meantime take care and have a great day.
Annette 😘

Wednesday, December 13, 2023

Cheerful daisies meets Circle sayings

   Welcome to my blog

and  thank you for joining me today!

Happy Birthday Sue


More an intermediate card this time - stamping, die cutting, dry embossing and layering

Materials required for this card are:

Card Stock: basic white, shimmery vellum 14.85 x 4.5, *silver foil
Bundles: cheerful daisies
Designer Series Paper: bright & beautiful
Dies: alphabet A la mode, deckled rectangles (6), timeless arrangements
Embossing Folders: exposed brick 3D, * subtle 3D 
Ink: fresh freesia, garden green
Punches: 2 ⅜ circle
Stamp Sets: circle sayings
Accessories: adhesive sheets, *adhesive backed sequins & gems, blending brush
 * = no longer available, when using layering dies (1) is the smallest
  1. Start with a base card 29 x 10.5 scored at 14.85
  2. stamp and punch out the sending you a happy
  3. stamp the birthday on a small piece of white and die cut 
  4. die cut the numbers using adhesive sheets on the back
  5. emboss the front of the base card, the circle, and the label using the subtle folder
  6. emboss the vellum using the exposed brick folder
  7. die cut the two rectangles (1 white & 1 dsp)
  8. adhere these two pieces together at an off set angle using liquid glue
  9. stamp 5 leaves in green, and 3 centre's in fresh freesia, 1 large & 2 small
  10. die cut the leaves and the large centre then fussy cut the 2 smaller centres
  11. for the flower centres I embossed them using the exposed brick folder to give them more dimension
  12. die cut all the pieces for the flowers (7 pieces in all)  and layer them together using liquid glue. (the larger layer containing all the flowers is the middle layer with the leaves cut off)
  13. lightly colour the petals using a blending brush
  14. adhere the vellum to the base card using liquid glue
  15. arrange the rectangles and adhere using liquid glue
  16. adhere the circle using liquid glue and add the numbers
  17. adhere the 3 flowers using a mixture of liquid glue for the 2 full flowers and a demensional pad for the unopened flower.
  18. insert the leaves using liquid glue
  19. add the birthday sentiment using dimensional pads
  20. add the sequins and bow

Hope you liked today's card. If you would like more information on how to make it, please don't hesitate to contact me, I'd love to hear from you.

If you wish to buy any of the items used, go to contacting me at the top of the page for details on how to order.

Will be back again soon with more cards, in the meantime take care and have a great day.
Annette 😘

Inked & Tiled meets Wanted To Say

   Welcome to my blog

and  thank you for joining me today!

Happy Birthday Sima


No stamping card - die cutting, dry embossing, layering 

Materials required for this card are:

Card Stock: *gold foil, very vanilla
Designer Series Paper: *ever eden
Dies: wanted to say
Embossing Folders: basic 3D
Punches: inked & tiled
Accessories: adhesive sheets, *in color jewels 21/3, *thick bakers twine
 * = no longer available
  1. Start with a base card 29 x 10.5 scored at 14.5, very vanilla 14 x 10, gold foil 6 x 14, dsp 5.3 x 14
  2. dry emboss the the first layer using the 3D folder
  3. die cut the happy birthday in the middle of the gold foil (use an adhesive sheet on the back)
  4. adhere the second and third layers together using liquid glue
  5. now adhere layer 1 & 2 to the first layer using liquid glue
  6. adhere the happy birthday to the first layer 
  7. attach these layers to the base card using dimensional pads
  8. make a double bow and attach it to card using a glue dot
  9. add the jewels
Hope you liked today's card. If you would like more information on how to make it, please don't hesitate to contact me, I'd love to hear from you.

If you wish to buy any of the items used, go to contacting me at the top of the page for details on how to order.

Will be back again soon with more cards, in the meantime take care and have a great day.
Annette 😘
Saturday, December 9, 2023

Countryside Corners meets *Happiest Of Birthdays

   Welcome to my blog

and  thank you for joining me today!

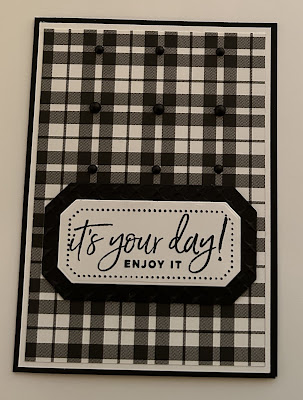
Happy Birthday Simon


Cased from Susan at mypassionforcards. die cutting, layering, stamping
With a mixture of old and new products. Not quite as easy as it looks

Materials required for this card are:

Card Stock: basic black & white
Bundles: countryside corners (3, 4)
Designer Series Paper: *plaid tidings
Embossing Folders: metal plate 3D
Ink: memento tuxedo black
Stampin' Markers: black (to ink up the rectangle dots)
Stamp Sets: *Happiest of birthdays
Accessories: *matte black dots
 * = no longer available, when using layering dies (1) is the smallest
  1. Start with a base card 14.5 x 21 scored at 10.5, white layer 10 x 14, dsp layer 9.5 x 13.5, scrap black & white pieces for labels
  2. adhere the white layer to the base card using liquid glue, then do the same with the dsp layer.
  3. stamp the dotted rectangle and then stamp the greeting in the middle (I used a  stamp-a-ma-jig) to line up the sentiment
  4. die cut the 2 rectangles
  5. emboss the black rectangle 
  6. adhere the two rectangles together using seal+ tape
  7. attach the rectangles to the base card using dimensional tabs
  8. add the black dots
Hope you liked today's card. If you would like more information on how to make it, please don't hesitate to contact me, I'd love to hear from you.

If you wish to buy any of the items used, go to contacting me at the top of the page for details on how to order.

Will be back again soon with more cards, in the meantime take care and have a great day.
Annette 😘

Biggest Wish meets Forever Plaid 3D

  Welcome to my blog and    t hank you for joining me today! Happy Birthday Mick Intermediate - die cutting, dry embossing, embellishing, la...