Wednesday, September 27, 2023

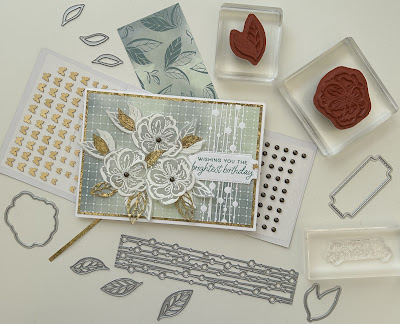
Irresistible Blooms meets Cheerful Daisies

  Welcome to my blog

and  thank you for joining me today!

Happy Birthday Judi


Die cutting, heat embossing, layering and stamping

Materials required for this card are:

Card Stock: basic white, distressed gold, vellum, 
Designer Series Paper: hello irresistible
Dies: cheerful daisies, irresistible blooms 
Ink: lost lagoon, versaMark
Stamp Sets: cheerful daisies, irresistible blooms
Accessories: brushed brass butterflies, rustic metallic dots, white embossing powder
  1. Start with a base card 14.8 x 21 scored at 10.5, distressed gold 14.4 x 10.1, dsp 14 x 9.7
  2. stamp the white flowers & leaves in versamark and heat emboss
  3. stamp the sentiment in flirty flamingo
  4. die cut all these pieces plus the trim and gold leaves (back the white trim with adhesive sheeting before cutting)
  5. place the trim across the dsp and press it down
  6. adhere the dsp to the gold layer using liquid glue, then adhere this piece to the base card again using liquid glue
  7. attach the 3 flowers using dimensional pads
  8. adhere the leaves and sentiment using liquid glue
  9. add the dots and butterfly
Hope you liked today's card. If you would like more information on how to make it, please don't hesitate to contact me, I'd love to hear from you.

If you wish to buy any of the items used, go to contacting me at the top of the page for details on how to order.

Will be back again soon with more cards, in the meantime take care and have a great day.
Annette 😘
Monday, September 18, 2023

Alphabet A La Mode meets Wanted To Say

   Welcome to my blog

and  thank you for joining me today!

Happy Birthday Louise


No stamping card - layering and die cutting
Used some old stash for the base card.

Materials required for this card are:

Card Stock: flirty flamingo, *gold foil, very vanilla
Designer Series Paper: hello irresistible
Dies: alphabet a la mode, wanted to say
Embossing Folders: basics 3D
Accessories: *gold glitter enamel dots 
  1. Start with a base card 14.5 x 21 scored at 10.5 - flirty flamingo layer 10.1 x 14.1 - dsp 9.5 x 9.5
  2. die cut the circle from the top layer
  3. emboss the top layer using the folder
  4. adhere the dsp to the back o this layer using liquid glue
  5. adhere the finished layer to the base card using liquid glue
  6. add adhesive sheeting to the back of the gold foil, then die cut the numbers and sentiment, followed by the 'th' from the word birthday
  7. adhere the gold foil pieces and add the enamel dots. 
Hope you liked today's card. If you would like more information on how to make it, please don't hesitate to contact me, I'd love to hear from you.

If you wish to buy any of the items used, go to contacting me at the top of the page for details on how to order.

Will be back again soon with more cards, in the meantime take care and have a great day.
Annette 😘

Sunday, September 17, 2023

Blast from the past - Memorable Moments and more

  Welcome to my blog

and  thank you for joining me today!

Happy 18th Leah


Cased from Helen Wadelton - dry embossing, die cutting, stamping and layering - this is a blast from the past card

Materials required for this card are:

Card Stock: basic white
Designer Series Paper: *moonlight
Dies: alphabet A La mode, deckled rectangles (3)
Embossing Folders: *seaside
Ink: *hello honey
Stamp Sets: *memorable moments 
Accessories: *21/23 in color jewels
 * = no longer available, when using layering dies (1) is the smallest
  1. Start with a base card 14.8 x 21 scored at 10.5, dsp 10.1 x 14.8, dsp 10.1 x 6, 3 pieces of basic white 9 x 4.5 with adhesive sheeting on the back for letters and numbers
  2. die cut the rectangle and stamp the happy and "th",  then dry emboss it along with the larger piece of dsp using the folder
  3. die cut the numbers once using dsp with adhesive backing sheet on the back
  4. removing the adhesive backing, layer up all the letters and numbers
  5. adhere the larger peice of dsp to the base card using liquid glue
  6. adhere the second piece of dsp across the top area of the base card using liquid glue
  7. adhere the white panel, stick down the numbers and add the jewels
  8. lastly stick down the rest of the letters.
Hope you liked today's card. If you would like more information on how to make it, please don't hesitate to contact me, I'd love to hear from you.

If you wish to buy any of the items used, go to contacting me at the top of the page for details on how to order.

Will be back again soon with more cards, in the meantime take care and have a great day.

Annette 😘 

Sunday, September 3, 2023

Cheerful Daisies meets Irresistible Blooms

   Welcome to my blog

and  thank you for joining me today!

Happy Birthday Lesley


Die cutting, heat embossing, layering and stamping

Materials required for this card are:

Card Stock: basic white, distressed gold, vellum, 
Designer Series Paper: hello irresistible
Dies: cheerful daisies, irresistible blooms 
Ink: flirty flamingo, versaMark
Stamp Sets: cheerful daisies, irresistible blooms
Accessories: brushed brass butterflies, rustic metallic dots, white embossing powder
  1. Start with a base card 14.8 x 21 scored at 10.5, distressed gold 14.4 x 10.1, dsp 14 x 9.7
  2. stamp the white flowers & leaves in versamark and heat emboss
  3. stamp the sentiment in flirty flamingo
  4. die cut all these pieces plus the trim and gold leaves (back the white trim with adhesive sheeting before cutting)
  5. place the trim across the dsp and press it down
  6. adhere the dsp to the gold layer using liquid glue, then adhere this piece to the base card again using liquid glue
  7. attach the 3 flowers using dimensional pads
  8. adhere the leaves and sentiment using liquid glue
  9. add the dots and butterfly
Hope you liked today's card. If you would like more information on how to make it, please don't hesitate to contact me, I'd love to hear from you.

If you wish to buy any of the items used, go to contacting me at the top of the page for details on how to order.

Will be back again soon with more cards, in the meantime take care and have a great day.
Annette 😘

Biggest Wish meets Alphabet A La Mode

   Welcome to my blog

and  thank you for joining me today!

Happy Birthday Stuart


Embossing, die cutting, stamping

Materials required for this card are:

Card Stock: blueberry bushel, crumb cake
Designer Series Paper: *in good taste
Dies: alphabet al a mode, nested essentials (2)
Embossing Folders: exposed brick 3D
Ink: memento black, pecan pie
Stamp Sets: biggest wish
Accessories: *holiday rhinestones
 * = no longer available, when using layering dies (1) is the smallest
  1. Start with a base card 10.5 x 29.7 scored at 14.85, first layer 14.4 x 10.1
  2. emboss the first layer
  3. cut a stripe of dsp 14.4 x 2.7 and adhere to the first layer 1cm from top
  4. adhere this layer to the base card using liquid glue
  5. stamp the happy and birthday one on top of the other
  6. add adhesive sheet to the back of the dsp for the letters 
  7. die cut the letters and sentiment
  8. attach the sentiment to card using dimensional pads
  9. remove the adhesive backing from the letters, place them on the card and press down to adhere them.
  10. add a linen bow and rhinestones
Hope you liked today's card. If you would like more information on how to make it, please don't hesitate to contact me, I'd love to hear from you.

If you wish to buy any of the items used, go to contacting me at the top of the page for details on how to order.

Will be back again soon with more cards, in the meantime take care and have a great day.
Annette 😘

Saturday, September 2, 2023

Best Family Ever meets Wanted to say

   Welcome to my blog

and  thank you for joining me today!

Happy Birthday Evie


die cut layering, dry embossing, stamping and punching

Materials required for this card are:

Card Stock: basic white, crushed curry
Designer Series Paper: *it's my party
Dies: wanted to say
Embossing Folders: basic 3D
Punches: happy labels
Ink: crushed curry
Stamp Sets: best family ever
Accessories: bakers twine essentials, *genial gems, adhesive sheets
 * = no longer available
  1. Start with a base card 14.8 x 21 scored at 10.5, basic white 10.1 x 14.4, dsp 9.7 x 14, 2 white rectangles 8 x 4.5 and backed with adhesive sheets
  2. emboss the white panel and adhere to the base card using liquid glue
  3. add a panel of adhesive sheeting to the back of the dsp and die cut all 3 happy birthday's
  4. layer these to give the HB depth
  5. die cut the outline for the HB and adhere the sentiment
  6. adhere the finished HB to the dsp layer using liquid glue, add the bakers twine at the top and tie with a bow.
  7. attach this layer to the base card using dimensional pads
  8. stamp the bottom sentiment on a strip of white finishing off each end using the punch
  9. Attach the bottom sentiment using dimensional pads, then add the gems
Hope you liked today's card. If you would like more information on how to make it, please don't hesitate to contact me, I'd love to hear from you.

If you wish to buy any of the items used, go to contacting me at the top of the page for details on how to order.

Will be back again soon with more cards, in the meantime take care and have a great day.
Annette 😘

Go To Greetings meets Nested Essentials

   Welcome to my blog

and  thank you for joining me today!

Sympathy card for Peggy

After losing my Father 4 weeks ago at the grand old age of 91, one of his close friends and neighbour has also lost her son of only 49. My heart goes out to her.


Dry and heat embossing, die cutting and stamping

Materials required for this card are:

Card Stock: basic white, pool party
Designer Series Paper: *simply marbleous
Dies: meadow, nested essentials (3)
Embossing Folders: exposed brick 3D, *subtle 3D (this is my go to, for a linen effect)
Ink: pool party, versamark
Punches: banner picka a punch
Stamp Sets: go to greetings
Accessories: bakers twine essentials, basic rhinestones
 * = no longer available, when using layering dies (1) is the smallest
  1. Start with a base card 14.5 x 21 scored at 10.5, white panel 10 x 14 and a strip of white card 7.5 x 1.2 (for sentiment)
  2. dry emboss the white panel using the exposed brick folder
  3. Ink up the sentiment in versamark and pool party in that order before stamping, then cover in embossing powder before using a heat gun
  4. Use the punch to flag each end of the sentiment
  5. die cut all the elements needed (4 in all)
  6. adhere the dsp rectangle to the white panel using liquid glue
  7. emboss the flowers, sentiment and butterfly using the subtle 3D folder
  8. adhere the flowers using liquid glue
  9. wrap the bakers twine 3 times around the white panel toward the bottom
  10. attach the sentiment using dimensional pads
  11. adhere the butterfly using liquid glue
  12. add the rhinestones.
Hope you liked today's card. If you would like more information on how to make it, please don't hesitate to contact me, I'd love to hear from you.

If you wish to buy any of the items used, go to contacting me at the top of the page for details on how to order.

Will be back again soon with more cards, in the meantime take care and have a great day.
Annette 😘
Friday, September 1, 2023

Dainty Delight meets Celebrating You

   Welcome to my blog

and  thank you for joining me today!

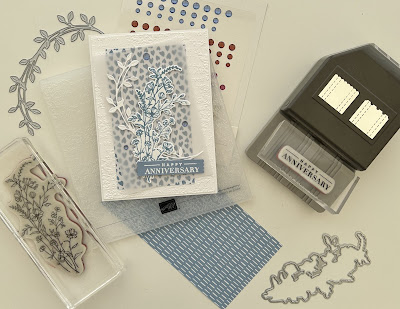
Happy Anniversary to Alison & Rob


Die cutting, stamping, layering, dry & heat embossing

Materials required for this card are:

Card Stock: basic white, boho blue, vellum
Designer Series Paper: in color 23/5
Dies: dainty delight
Embossing Folders: timeworn type 3D
Ink: boho blue, versaMark
Stamp Sets: *celebration you, dainty delight
Accessories: in color dots, white embossing powder
  1. Start with a base card 14.8 x 21 scored at 10.5, basic white 10.1 x 14.4, dsp 8 x 12.5, vellum 8 x 12.5
  2. dry emboss the white layer
  3. stamp the flowers, stamp the sentiment using versaMark, embossing powder and heat gun
  4. die cut the flowers & leaves
  5. attach the flowers & leaves to the vellum using dimensional pads
  6. adhere the vellum & dsp together using liquid glue (where it won't show)
  7. adhere these to the base card using liquid glue
  8. attach the sentiment using dimensional pads
  9. add the coloured dots
Hope you liked today's card. If you would like more information on how to make it, please don't hesitate to contact me, I'd love to hear from you.

If you wish to buy any of the items used, go to contacting me at the top of the page for details on how to order.

Will be back again soon with more cards, in the meantime take care and have a great day.
Annette 😘

Unbounded Love meets Thoughtful Wishes

  Welcome to my blog and    t hank you for joining me today! Happy Birthday Gladys Intermediate level - die cutting, dry embossing, stamping...