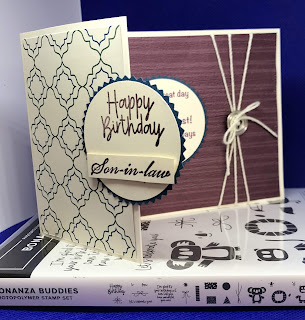
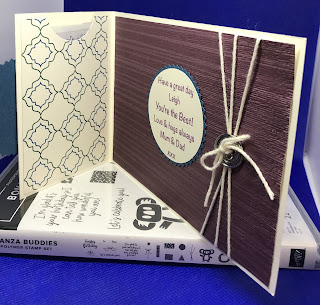
This is a card and money holder all in one.
As the title say's it's a blast from the past as there's only the Happy Birthday sentiment that is still current. But it could easily be made using current colours and papers.
Card Stock: Dapper Denim 12 x 6 (starbursts), Very Vanilla 10.5 x 29.2 scored at 14.8 and 22.2 (card base), 12 x 6 (circles).
DSP: 10 x 14.2 (back panel), 10 x 6.5 (middle panel), 10 x 6.8 (front panel).
(cs) = card stock, (dsp) = designer series paper, (ef) = embossing folder, (nsu) = non stampin' up, (r) = retired.
- Fold and burnish all the score lines on very vanilla card base (cs). Fold the first panel of the card base in towards the centre of the card and adhere the (r) Eastern Palace (dsp) middle panel using liquid glue, then with the 1½" circle punch, punch out a lip. Adhere the bottom and side of this panel down using narrow tear & tape. You now have a pocket to place a gift card or money.
- Emboss the (r) Eastern Palace (dsp) back panel using the subtle (ef).
- Adhere the (r) Eastern Palace (dsp) front panel using liquid glue.
- With the dapper denim starburst (cs) punch out 2 starbursts using the starburst punch.
- Adhere one of the startbursts to the front panel using liquid glue.
- Position the (r) Eastern Palace (dsp) back panel and decide where to attach the (r) very vanilla bakers twine using glue dots or sellotape.
- Once bakers twine is attached, adhere to the back panel of the card base.
- Adhere the second starburst to the back panel directly behind the first one using liquid glue.
- Using the very vanilla circles (cs) stamp the happy birthday from the bonanza buddies (ss) in Fresh Fig ink and punch out using the 2" circle punch. With the rest of this piece of (cs) stamp a greeting of your choice and again punch out with the 2" circle punch (my insert was computer generated), and the son-in-law is (nsu).
- Adhere these two circles to the starbursts using liquid glue.
- I added a (r) designer silver basics button to the bakers twine tying with a bow and securing with a glue dot.
Annette X


No comments:
Post a Comment