Wednesday, April 30, 2025

No Stamping Card

 Welcome to my blog

and  thank you for joining me today!

Happy Birthday Georgia


Easy level - die cutting, dry embossing, layering, using pop outs
Cased from the lovely "Lisa's stamp studio"

Materials required for this card are:
 
Card Stock: basic white, blueberry bushel, brushed gold foil
Designer Series Paper: wildflower birthday
Dies: spotlight on nature (3), wanted to say
Embossing Folders: adorning hearts 
Accessories: adhesive sheets, party dots
when using layering dies (1) is the smallest (for this pattern)

Start with a base card 14.5 x 21 scored at 10.5, gold layer 10.1 x 14.1, dsp layer 9.7 x 13.7, hp background 5 x 9
  1. on the back of the brushed gold add adhesive sheeting in the middle and die cut the happy birthday
  2. adhere the gold sheet to the base card using liquid glue
  3. adhere the dsp to the base card using liquid glue
  4. die cut the circle and emboss using the folder 
  5. adhere the circle to the base using liquid glue
  6. pop out the piece of cake and attach to the circle using dimensional pads
  7. on one side of the blue piece add some adhesive sheeting and die cut the pb background
  8. stick the gold hb to the blue one and then the blue one to the base card
  9. add the party dots
Hope you liked today's card. If you would like more information on how to make it, please don't hesitate to contact me, I'd love to hear from you.

If you wish to buy any of the items used, go to contacting me at the top of the page for details of how to order.
 
Will be back again soon with more cards, in the meantime take care and have a great day.
Annette 😊

Simply Said meets Heartfelt Hexagon Punch

Welcome to my blog

and  thank you for joining me today!

Happy Birthday Nigel


Easy level - dry & heat embossing, layering, using a punch

Materials required for this card are:

Card Stock: basic grey & white
Designer Series Paper: take to the sky
Embossing Folders: plaster paintings 3D
Embossing Powder: black
Ink: versaMark
Punches: heartfelt hexagon
Stamps: simply said
Accessories: bakers twine essentials pack, *black rhinestones 
 * = no longer available

Start with a base card 14.5 x 21 scored at 10.5, layer one 14.1 10.1, black rectangle 2.5 x 14.1 small rectangles 3.5 x 8.5 (3), dsp rectange2 x 14.5 smaller rectangles 3 x 8 (3), white 6.5 x 5.5
  1. dry emboss the first layer using the plaster paintings folder and adhere to the base card using liquid glue
  2. adhere the dsp strips to the black rectangles using liquid glue
  3. adhere all the rectangles to the base card using liquid glue
  4. stamp the sentiment using versaMark, add the black embossing powder and heat
  5. punch out the sentiment 
  6. wind some black bakers twine and attach to the middle rectangle using stampin' seal
  7. attach the sentiment using dimensional pads
  8. add the rhinestones.
Hope you liked today's card. If you would like more information on how to make it, please don't hesitate to contact me, I'd love to hear from you.

If you wish to buy any of the items used, go to contacting me at the top of the page for details of how to order.
 
Will be back again soon with more cards, in the meantime take care and have a great day.

Annette 😊 

Monday, April 28, 2025

Birthday Celebrations meets Well Written

 Welcome to my blog

and  thank you for joining me today!

Happy Birthday Stephen


Intermediate level - die cutting, fussy cutting, layering, stamping

Materials required for this card are:

Bundles: birthday celebration
Card Stock: basic black & white, garden green, real red
Dies: layering circles (7), *well written 
Ink: real red
accessories: adhesive sheets, computer generated dart board and dart
 * = no longer available, when using layering dies (1) is the smallest

Start with a base card 14.5 x 21 scored at 10.5, background 14.1 x 10.5, white cs birthday, 8 x 10, happy 8.5 x 7 (you will need 3 of each word), real red cs numbers 5 x 4.5, off cut for white flag
  1. adhere background to the base card using liquid glue
  2. add adhesive sheeting to the back of the white and red cs for the happy birthday and numbers
  3. die cut the 3 birthday, 3 happy and 1 numbers
  4. layer up the birthday's and happy's
  5. the dart board and dart were computer generated
  6. fussy cut the dart, and die cut the dartboard
  7. stamp the TH on the flag
  8. position the elements on the card base then use dimension pads for the dartboard and flag
  9. adhere the dart using liquid glue
  10. attach the birthday, happy and numbers
Hope you liked today's card. If you would like more information on how to make it, please don't hesitate to contact me, I'd love to hear from you.

If you wish to buy any of the items used, go to contacting me at the top of the page for details of how to order.
 
Will be back again soon with more cards, in the meantime take care and have a great day.
Annette 😊

Thursday, April 24, 2025

Magnolia Mood meets Dainty Flowers DSP

 Welcome to my blog

and  thank you for joining me today!

Happy Birthday Pauline


Intermediate level - fussy cutting, heat embossing,  layering, 

Materials required for this card are:

Card Stock: blackberry bliss
Designer Series Paper: *dainty flowers
Ink: versaMark
Stamps: magnolia mood
Accessories: bakers twine essentials pack, embossing powder (white),  iridescent discs
 * = no longer available

Start with a base card 14.5 x 21 scored at 10.5, layer one 10.2 x 14.2, dsp layer 10 x 14, sentiment 7 x 3
  1. stamp and heat emboss the sentiment, then fussy cut round it
  2. adhere the dsp to the first layer using liquid glue
  3. adhere these to the base card using liquid glue
  4. make a double bow and attach to the base card using a glue dot
  5. attach the sentiment using dimensional pads
  6. add the discs
Hope you liked today's card. If you would like more information on how to make it, please don't hesitate to contact me, I'd love to hear from you.

If you wish to buy any of the items used, go to contacting me at the top of the page for details of how to order.
 
Will be back again soon with more cards, in the meantime take care and have a great day.
Annette 😊
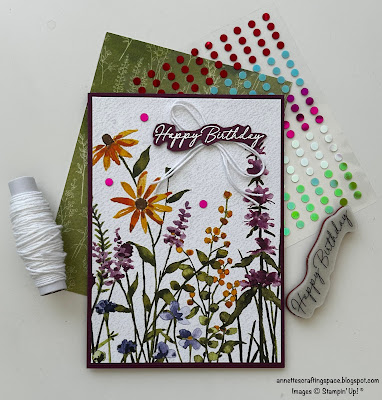
Wednesday, April 23, 2025

Changing Leaves meets Charming sentiments

 Welcome to my blog

and  thank you for joining me today!

Happy Birthday Heather


Cased from 'stampinkerry' thanks for  the inspiration.
Intermediate level - die cutting, dry embossing, layering, punching, stamping

Materials required for this card are:

Bundles: changing leaves
Card Stock: basic white
Dies: *sentiment silhouettes
Ink: basic beige, pretty in pink, summer splash
Punches: petal park
Stamps: *charming sentiments, petal park
Accessories: 24/6 resin dots, linen thread
 * = no longer available
  1. Start with a base card 14.5 x 21 scored at 10.5, white 14.2 x 10.2 (embossed layer), 5 x 6 (punched flowers), 7 x 9 (small leaves),12 x 9 (large leaves, 8 x 2 (sentiment)
  2. dry emboss the largest layer using the folder
  3. stamp all the pieces 
  4. die cut the leaves and sentiment and punch out the flowers
  5. adhere the embossed layer using liquid glue
  6. adhere the the leaves using liquid glue only down the the centre, so they have slight dimension 
  7. using a round embossing tool give the flowers some dimension and adhere to the card using glue dots.
  8. create a double bow and adhere to the leaves using a glue dot
  9. attach the sentiment using dimensional pads
  10. add the resin dots to each of the flowers
Hope you liked today's card. If you would like more information on how to make it, please don't hesitate to contact me, I'd love to hear from you.

If you wish to buy any of the items used, go to contacting me at the top of the page for details of how to order.

Will be back again soon with more cards, in the meantime take care and have a great day.
Annette 😊

Monday, April 21, 2025

Dainty Flowers meets Day To Celebrate

 Welcome to my blog

and  thank you for joining me today!

Happy Birthday Peg


Thanks to Rose Applegate a quick and easy make today - die cutting, heat embossing, layering. I slipped when die cutting the sentiment so trimmed round it and added a plain background 

Materials required for this card are:

Card Stock: basic white, blackberry bliss
Designer Series Paper: *dainty flowers
Dies: something fancy
Embossing Powder: clear
Ink: blackberry bliss, versaMark 
Stamps: *day to celebrate
Accessories: *glittered bakers twine, *woven threads sequins
 
* = no longer available, when using layering dies (1) is the smallest
  1. Start with a base card 14.5 x 21 scored at 10.5, layer one 10.2 x 14.2, dsp layer 10 x 14, scrap pieces of blackberry bliss & basic white
  2. adhere the dsp to layer one using liquid glue then attach to the base card using dimensional pads
  3. ink up the sentiment with versaMark and then blackberry blisss before stamping, add the embossing powder and heat set
  4. die cutting the label
  5. trim round the sentiment and adhere to the label using liquid glue
  6. wind the bakers twine and attach to the back of the label using sticky tape (seal +)
  7. attach to the base card using dimensional pads
  8. add the sequins using mini glue dots
Seem to have lost my mojo at the moment and need to get a few cards done quickly so casing at the moment.

Hope you liked today's card. If you would like more information on how to make it, please don't hesitate to contact me, I'd love to hear from you.

If you wish to buy any of the items used, go to contacting me at the top of the page for details of how to order.
 
Will be back again soon with more cards, in the meantime take care and have a great day.
Annette 😊

Sunday, April 20, 2025

Blast from the past Backyard Basics & Delightful Dozen

 Welcome to my blog

and  thank you for joining me today!

Happy Easter Sheilah


Intermediate level - colour using alcohol markers, die cutting, dry embossing, layering, stamping

Materials required for this card are:

Card Stock: basic white
Designer Series Paper: bright & beautiful
Dies: cheerful daisies, perennial postage, *stitched rectangles (5)
Embossing Folders: *subtle 3D
Ink: basic grey, memento tuxedo black
Stampin' Blends: granny apple green, lemon lolly
Stamps: *backyard basics, *delightful dozen
Accessories: bakers twine 3 color pack, rainbow dots
 * = no longer available, when using layering dies (1) is the smallest

Start with a base card 14 x 21 scored at 10.5, basic white 7.5 x 10.5, 6.5 x 3, dsp 12 x 9
  1. die cut the dsp and adhere to the base card towards the top left side using liquid glue
  2. stamp the flower in memento black and sentiment in gray
  3. color the flower using the blends
  4. dry emboss both of these using the subtle folder
  5. attach the flower using dimensional pads
  6. wind some bakers twine and adhere to the sentiment using stampin seal +
  7. attach to the base card using dimensional pads
  8. add the rainbow dots
Hope you liked today's card. If you would like more information on how to make it, please don't hesitate to contact me, I'd love to hear from you.

If you wish to buy any of the items used, go to contacting me at the top of the page for details of how to order.
 
Will be back again soon with more cards, in the meantime take care and have a great day.
Annette 😊

Excellent Eggs and a little more

 Welcome to my blog

and  thank you for joining me today!

Happy Easter Freddie


Simple card as long as you have a cut and emboss machine
die cutting, dry embossing, layering, punching out, stamping

Materials required for this card are:

Bundles: excellent eggs (3)
Card Stock: basic beige, basic white, granny apple green, lemon lolly
Embossing Folders: basics 3D, painted texture 3D
Ink: basic beige, granny apple green
Punches: *banner triple 
Accessories: bakers twine 3 color pack 
* = no longer available, when using layering dies (1) is the smallest

Start with a base card 14.5 x 21 scored at 10.5, yellow 10.1 x 14.1, white 8.5 x 2, 6 x 7.5, yellow 6.5 x 1.5, green 5 x 1.5, 6 x 1.5, basic beige 3 x 2.5
  1. die cut the egg shape from the yellow layer, the egg shape is not needed
  2. emboss the yellow layer using the basics folder, then adhere it to the base card using liquid glue
  3. stamp the bunny and sentiment
  4. die cut the three zig zags, white egg and bunny
  5. use the punch to flag the end of the sentiment and add the bakers twine
  6. attach the sentiment to the base card towards the bottom using dimensional pads
  7. emboss the white egg using the painted texture folder
  8. adhere the zig zags to the egg using liquid glue
  9. attach to the egg and bunny to the base card using dimensional pads
Hope you liked today's card. If you would like more information on how to make it, please don't hesitate to contact me, I'd love to hear from you.

If you wish to buy any of the items used, go to contacting me at the top of the page for details of how to order.
 
Will be back again soon with more cards, in the meantime take care and have a great day.
Annette 😊

Saturday, April 12, 2025

Over The Moon meets Keeping Tabs

Welcome to my blog

and  thank you for joining me today!

Happy Birthday Duncan


Cased from Christine Ludwig (thank you for sharing)

Intermediate level - die cutting, dry embossing, layering, marker stamping, stamping

Materials required for this card are:

Bundles: keeping tabs
Card Stock: basic white, crumb cake, misty moonlight, night of navy
Dies: radiating stitches
Embossing Folders: *subtle 3D
Ink: night of navy
Stampin' markers: blueberry bushel, crushed curry, lost lagoon, pumpkin pie, 
Stamps: under the moon
 * = no longer available

Start with a base card 14 x 21 scored at 10.5, misty moonlight 10.5 x 14  night of navy 10.6 x 7, basic white 6.7 x 10.2, 5 x 3

  1. die cut the radiating stitches layer and adhere to the base card using liquid glue
  2. stamp the scene, using markers for the clouds, sea and sunset then the night of navy ink for the boat
  3. adhere the scene to the night of navy layer and then the night of navy to the base card using liquid glue.
  4. stamp the sentiment and die cut using the keeping tags die
  5. attach the sentiment to the card using dimensional tabs at the bottom and liquid glue at the top.
Hope you liked today's card. If you would like more information on how to make it, please don't hesitate to contact me, I'd love to hear from you.

If you wish to buy any of the items used, go to contacting me at the top of the page for details of how to order.
 
Will be back again soon with more cards, in the meantime take care and have a great day.

Annette 😊 

Friday, April 11, 2025

Simply Said meets Heartfelt Hexagonal punch

 Welcome to my blog

and  thank you for joining me today!

Happy Birthday Andy


Easy level - dry embossing, heat embossing, layering, stamping 

Materials required for this card are:

Card Stock: basic white. smoky slate
Designer Series Paper: take to the sky
Embossing Folders: *subtle 3D
Embossing Powder: black
Ink: versaMark
Punches: heartfelt hexagon
Stamps: simply said
Accessories: neutrals sequins, *stithced satin ribbon
 * = no longer available

Start with a base card 14.5 x 21 scored at 10.5
  • basic white 14.5 x 5, 8 x 8
  • basic black 7.5 x 7.5
  • dsp 14.5 x 5, 7 x 7
  • smoky slate 14.5 x 10.5
  1. dry emboss the smoky slate and adhere to the base card using liquid glue
  2. punch out a hexagon from the centre of the black square
  3. In the middle of the white square stamp the sentiment in versaMark, cover with black embossing powder and heat set
  4. punch out using the hexagon
  5. layer the 2 rectangle strips using liquid glue
  6. dry emboss the 8 x 8 white square
  7. layer the 3 squares using liquid glue
  8. adhere these 2 pieces to the base card using liquid glue
  9. cut the black hexagon in half and adhere to the white one top and bottom using liquid glue
  10. using sticky tape adhere the ribbon behind the sentiment and attach the card using dimensional pads
  11. add the sequins               
Hope you liked today's card. If you would like more information on how to make it, please don't hesitate to contact me, I'd love to hear from you.

If you wish to buy any of the items used, go to contacting me at the top of the page for details of how to order.

Will be back again soon with more cards, in the meantime take care and have a great day.
Annette 😊

Thursday, April 3, 2025

Adventurous Sky Slider Card

Welcome to my blog

and  thank you for joining me today!

Happy Birthday Mike


Cased from a tube video my Rachael Merrick
Intermediate level - die cutting, layering, stamping

Materials required for this card are:

Bundles: adventurous sky
Card Stock: basic white, real red, silver foil
Designer Series Paper: take to the sky's
Dies: *layering circles (7), *banners (1)
Ink: boho blue, real read
punches: heartfelt hexagon
Stamps: *day to celebrate
Accessories: aqua painter
 * = no longer available, when using layering dies (1) is the smallest

Start with a base card 14.5 x 21 scored at 1, 5 & 15, white pieces 9.2 x 14,  2.54 x 6, 9 x 7.5, 2.5 x 5, dsp 9.6 x 14.1, silver 7.5 x 7.5
  1. with the white 9 x 7.5 stamp the plane and clouds, and add a little shading using an aqua painter
  2. on the  2.5 x 5 piece stamp the banner sentiment 
  3. die cut the plane, clouds and banner and foil circle
  4. adhere the dsp to the centre panel using liquid glue
  5. cut a slot of about 11cm, 2 thirds of the way down the central panel
  6. make a notch on the right hand side the punch, then close the card and make a corresponding one on the back side
  7. using the 9.2 x 14 piece stamp the internal sentiment and plane on the right hand side 
  8. score the 2.54 x 6 in half, and slot it into the slit on the left hand side
  9. adhere the circle to the half showing on the front using liquid glue
  10. flip it over and do the same with the internal sentiment (make sure the mechanism works)
  11. close the card up and adhere it down using the 1cm score mark for the liquid glue
  12. adhere the clouds using liquid glue
  13. attach the banner and plane with dimensional pads
I wanted my card to stand up so I cut a piece of real red cs 6 x 14.5 scored at 1cm,
then punched the notch and adhered it the back of the card.

Hope you liked today's card. If you would like more information on how to make it, please don't hesitate to contact me, I'd love to hear from you.

If you wish to buy any of the items used, go to contacting me at the top of the page for details of how to order.
 
Will be back again soon with more cards, in the meantime take care and have a great day.

Annette 😊 

Cheerful Daisies meets Spotlight On Nature

  Welcome to my blog and    t hank you for joining me today! Happy Birthday Serenia Easy level - die cutting, dry & heat embossing, laye...