Tuesday, September 17, 2024

Blast from the past - Amazing Life

 Welcome to my blog

and  thank you for joining me today!

Happy Birthday Leah


Easy Intermediate - colouring with alcohol markers, die cutting, dry embossing, layering, stamping

Materials required for this card are:
 
Card Stock: basic white, summer splash
Designer Series Paper: 24/26 in colors
Dies: deckled rectangles (3,4)
Embossing Folders: basics 3D
Ink: memento tuxedo black
Stampin' Blends: lemon lolly, summer splash
Stamps: *amazing life
Accessories: *glittered organza ribbon, iridescent rhinestones
Inspiration came from craftygillybean
 
* = no longer available, when using layering dies (1) is the smallest

  1. Start with a base card 14.5 x 21 scored at 10.5, white layer 14.1 x 10.1, ss rectangle 6.5 x 10.1 (panel for the front), dsp rectangle 5 x 10.1, ss 6 x 9.5, bw 5.5 x 8.5 (deckled rectangles), scrap of white for the cake
  2. dry emboss the white layer using the folder then adhere to the base card using liquid glue
  3. adhere the dsp to the ss panel using liquid glue then attach the ribbon towards the top of this piece and adhere to the base card using liquid glue
  4. stamp the sentiment and cake 
  5. fussy cut the cake
  6. die cut the sentiment and ss rectangle using the deckled rectangle dies 
  7. adhere these two rectangles together using liquid glue then attach to the base card using dimensional pads
  8. attach the cake, again using dimensional pads
  9. add the rhinestones
Hope you liked today's card. If you would like more information on how to make it, please don't hesitate to contact me, I'd love to hear from you.

If you wish to buy any of the items used, go to contacting me at the top of the page for details of how to order.

Will be back again soon with more cards, in the meantime take care and have a great day.
Annette 😊 

Sunday, September 8, 2024

Spotlight on Nature - Anniversary

 Welcome to my blog

and  thank you for joining me today!

Happy 6th Anniversary to a lovely Couple


Intermediate - die cutting, dry embossing, fussy cutting, layering, stamping

Materials required for this card are:

Bundles: spotlight on nature
Card Stock: basic white, summer splash
Designer Series Paper: 24/26 in color pack
Embossing Folders: basics 3D
Ink: summer splash
Stamps: layers of beauty
Accessories: iridescent rhinestones, sheer ribbon
  1. Start with a base card 14.5 x 21 scored at 10.5, white layer 14.2 x 10.2, circle layer 7.5 x 7.5, small off cut for the butterfly, dsp layer 4 x 14.2
  2. dry emboss the white layer using the folder
  3. adhere the dsp layer using liquid glue to the embossed layer
  4. add the ribbon across the bottom and attach at the back using tape
  5. make the bow and attach with glue dots
  6. adhere to the base card using liquid glue
  7. stamp the butterfly and sentiment, then add the leaves using the stamped off method 
  8. die cut the sentiment and fussy cut the butterfly
  9. attach to the card using dimensional pads
  10. Add the rhinestones
Hope you liked today's card. If you would like more information on how to make it, please don't hesitate to contact me, I'd love to hear from you.

If you wish to buy any of the items used, go to contacting me at the top of the page for details of how to order.

Will be back again soon with more cards, in the meantime take care and have a great day.
Annette 😊 

Thursday, September 5, 2024

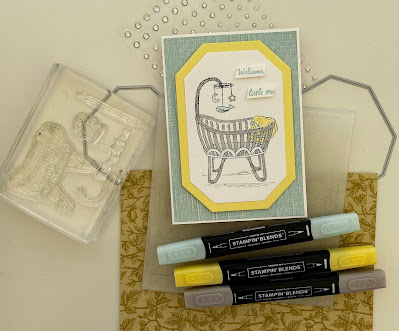
Welcome New Baby

Welcome to my blog

and  thank you for joining me today!

Welcoming a new Baby


Intermediate: colouring with alcohol ink, die cutting, dry embossing, layering, stamping

Materials required for this card are:

Card Stock: basic white, lemon lolly
Designer Series Paper: *softly stippled
Dies: countryside corners, (5,6)
Embossing Folders: *subtle 3D
Ink: momento tuxedo black, pool party, smoky slate (stamped off)
Stampin' Blends: gray granite, lemon lolly, pool party
Stamps: *cradled in love, trucking along
Accessories: rhinestone basics
 
* = no longer available, when using layering dies (1) is the smallest

  1. Start with a base card 14.5 x 21 scored at 10.5, dsp 14.1 x 10.1, rectangles 14 x 9.5, 12.5 x 8
  2. adhere the dsp using liquid glue 
  3. die cut the rectangles
  4. stamp the images and sentiment
  5. colour the images using the blends
  6. emboss the smaller rectangle
  7. adhere the 2 rectangles together using liquid glue
  8. attach the rectangles and sentiment to the base card using dimensional tabs
  9. add the rhinestone
Hope you liked today's card. If you would like more information on how to make it, please don't hesitate to contact me, I'd love to hear from you.

If you wish to buy any of the items used, go to contacting me at the top of the page for details of how to order.

Will be back again soon with more cards, in the meantime take care and have a great day.

Annette 😊  

Tuesday, September 3, 2024

Charming Daisies meets Magnolia Mood

Welcome to my blog

and  thank you for joining me today!

Happy Birthday Lesley


Intermediate: die cutting, dry embossing, dying ribbon, layering, masking, stamping, 

Materials required for this card are:

Card Stock: basic white, peach pie, soft sea foam
Dies: cheerful daisies
Embossing Folders: *timeworn type 3D
Ink: peach pie
Punches: happy labels
Stampin' Blends: peach pie
Stamps: magnolia mood
Accessories: *artistic mix decorative masks, blending brush, *flowers for every season combo, iridescent pearls
 
* = no longer available
  1. Start with a base card 14.5 x 21 scored at 10.5, first layer 10.1 x 14.1, flower layers 7 x 6, 6 x 5.5, 6 x 5, sentiment layer 2 x 9.5, fern layer 6 x 5
  2. colour layer one using the 2 decorative masks and a blending brush
  3. dry emboss layer one
  4. dye the ribbon using the stampin' blend and attach to the back of layer one using tape 
  5. adhere this layer to the base card using liquid glue
  6. stamp the sentiment and crimp the ends using the punch
  7. attach to the card using dimensional pads
  8. die cut the pieces for the flower and fern
  9. lightly colour the centre of the middle piece, adhere the 3 pieces of the flower together using liquid glue
  10. lightly adhere the fern onto the base card using liquid glue
  11. attach the flower using dimensional pads
  12. add the pearls to the centre of the flower
Hope you liked today's card. If you would like more information on how to make it, please don't hesitate to contact me, I'd love to hear from you.

If you wish to buy any of the items used, go to contacting me at the top of the page for details of how to order.

Will be back again soon with more cards, in the meantime take care and have a great day.

Annette 😊  
Adventurous Sky and more

 Welcome to my blog

and  thank you for joining me today!

Happy Birthday Stuart


Used a card template for this one - die cutting, dry embossing, layering, stamping

Materials required for this card are:

Bundles: adventurous sky
Card Stock: basic white thick, night of navy, smoky slate
Designer Series Paper: take to the sky
Dies: deckled rectangles (3,4), mini alphabet
Embossing Folders: exposed brick 3D, painted texture 3D
Ink: night of navy, smoky slate (stamped off)
Accessories: neutral sequins
 
when using layering dies (1) is the smallest
  1. Start with a base card 14.5 x 21 scored at 10.5, first layer 14.1 x 10.1, dsp layer 13.7 x 9.7, card strips 2.5 x 13, dsp strips 2.1 x 12.6, night of navy off cut & basic white off cut for rectangles, letters, sentiment & plane
  2. dry emboss the dsp layer and adhere to the 1st layer
  3. adhere the first layer to the base card using liquid glue
  4. adhere the dsp strips to the card strips and then adhere these to the base card using liquid glue
  5. stamp some clouds on white card using the stamping off method
  6. stamp the sentiment and plane 
  7. add some adhesive sheet to the back of a piece of white card for the letters
  8. die cut all the elements
  9. dry emboss the white rectangle
  10. place the letters
  11. adhere the two rectangles together, then adhere to the base card using liquid glue
  12. attach the plane and sentiment using dimensional pads
  13. add the sequin
Hope you liked today's card. If you would like more information on how to make it, please don't hesitate to contact me, I'd love to hear from you.

If you wish to buy any of the items used, go to contacting me at the top of the page for details of how to order.

Will be back again soon with more cards, in the meantime take care and have a great day.

Annette 😊  

Monday, September 2, 2024

Simply Said and more

 Welcome to my blog

and  thank you for joining me today!

Happy Birthday Evie


Intermediate: blending with brushes, die cutting, layering, stamping

Materials required for this card are:
 
Card Stock: basic white, petunia pop, summer splash
Dies: alphabet al a mode, deckled circles (5), *dots & spots, stylish shapes banner (1) circle (4)
Ink: petunia pop, summer splash
Stamps: *curved occasions, *epic celebrations, simply said
Accessories: 24/26 in color resin dots, bakers twine essentials, blending brushes, 
 
* = no longer available, when using layering dies (1) is the smallest
  1. Start with a base card 14.5 x 21 scored at 10.5, white matt x 2  10.1 x14.1, white strip 6 x 18, pink strip 7 x 21, green strip 4.5 x 3, white off cut for small sentiment
  2. on the first matt do some brush blending in a marble effect with the two colours
  3. die cut the second matt then adhere it to the first matt using liquid glue
  4. die cut the 6 circles (3 white & 3 pink) and 1 banner, 2 numbers with adhesive sheeting on the back 
  5. stamp the 2 sentiments and image, attach the numbers 
  6. adhere the white circles to the pink ones using liquid glue then attach them to the base card using dimensional pads
  7. make a double bow and attach using a glue dot
  8. add the resin dots
Hope you liked today's card. If you would like more information on how to make it, please don't hesitate to contact me, I'd love to hear from you.

If you wish to buy any of the items used, go to contacting me at the top of the page for details of how to order.

Will be back again soon with more cards, in the meantime take care and have a great day.
Annette 😊 

Blast from the past - Amazing Life

  Welcome to my blog and    t hank you for joining me today! Happy Birthday Leah Easy Intermediate - colouring with alcohol markers, die cut...