Tuesday, July 30, 2024

Sweetly Scripted and more

 Welcome to my blog

and  thank you for joining me today!

Happy Anniversary Carole & Nigel


Simple card - die cutting, dry embossing, layering & stamping

Materials required for this card are:
 
Card Stock: basic white, pretty in pink
Dies: painted lavender
Embossing Folders: distressed tile 3D
Ink: pretty in pink
Stamps: sweetly scripted
Accessories: bakers twine essentials, iridescent pearls basic jewels
  1. Start with a base card 14.5 x 21 scored at 10.5, white layer 14 x 10, green 3.5 x 10.5, pink 3 x 11
  2. emboss the white layer at 5.5
  3. stamp the sentiment
  4. wrap bakers twine around the white layer twice
  5. adhere this layer to the base card using liquid glue
  6. die cut the leaves and flowers
  7. adhere the leaves and flowers using liquid glue
  8. add the pearls 
  9. create the bow and attach using a glue dot
Hope you liked today's card. If you would like more information on how to make it, please don't hesitate to contact me, I'd love to hear from you.

If you wish to buy any of the items used, go to contacting me at the top of the page for details of how to order.

Will be back again soon with more cards, in the meantime take care and have a great day.
Annette 😊 

Tuesday, July 23, 2024

Softly Sophisticated and more

 Welcome to my blog

and  thank you for joining me today!

Happy Birthday Anne


Bright and cheerful, using the new in colors and Cased from Sharon Berkert ("astheinkdries") - die cutting, dry embossing, layering, two step stamping

Materials required for this card are:

Card Stock: basic white, petunia pop
Dies: perennial postage (5)
Embossing Folders: softly sophisticated 
Ink: memento tuxedo black, mossy meadow, petunia pop, pretty in pink
Stamps: loveliest tree, *softly sophisticated
Accessories: *bakers twine, brushed brass butterflies
 
* = no longer available, when using layering dies (1) is the smallest
  1. Start with a base card 14.5 x 21 scored at 10.5, pp 10 x 14, bw 12.5 x 9.5
  2. dry emboss the background layer and adhere to the base card using liquid glue
  3. stamp the flowers across the white layer starting with the stems, then the lighter colour flowers followed by the darker colour (you should get 5)
  4. stamp the sentiment
  5. die cut this layer, and then add bakers twine using a double bow
  6. attach to the base card using dimensional pads
  7. finish off by adding the butterflies.
Hope you liked today's card. If you would like more information on how to make it, please don't hesitate to contact me, I'd love to hear from you.

If you wish to buy any of the items used, go to contacting me at the top of the page for details of how to order.

Will be back again soon with more cards, in the meantime take care and have a great day.
Annette 😊 

Sunday, July 21, 2024

Bird's Eye View meets Sentimental Park

Welcome to my blog

and  thank you for joining me today!

Happy Birthday Bill


Intermediate - colouring with blends, die cutting, dry embossing, glassing, layering, stamping

Materials required for this card are:

Card Stock: basic white thick, gray granite
Designer Series Paper: nature's sweetness
Dies: radiating stitches (2)
Embossing Folders: subtle 3D
Ink: memento black
Stampin' Blends: balmy blue, cherry cobbler, gray granite, misty moonlight, old olive, smoky slate
Stamps: birds's eye view, sentimental park
Accessories: black rhinestones, fine tip glue pen

when using layering dies (1) is the smallest
  1. Start with a base card 14.5 x 21 scored at 10.5, dsp 9.5 x 14.5, basic white 7.5 x 10.5, gray granite 7 x 10, off cut for sentiment
  2. stamp the owl, books and sentiment, trim down the sentiment
  3. colour the images using the blends
  4. using the fine tip glue create the lens for the glasses and leave to dry for a little while
  5. adhere the dsp to base card using liquid glue
  6. adhere the gray rectangle to dsp using liquid glue
  7. once the lens glue is dry die cut the rectangle, then dry emboss it and adhere it with liquid glue
  8. attach the sentiment and add the rhinestones
Hope you liked today's card. If you would like more information on how to make it, please don't hesitate to contact me, I'd love to hear from you.

If you wish to buy any of the items used, go to contacting me at the top of the page for details of how to order.

Will be back again soon with more cards, in the meantime take care and have a great day.

Annette 😊  

Wednesday, July 17, 2024

Curved Occasions and more

Welcome to my blog

and  thank you for joining me today!

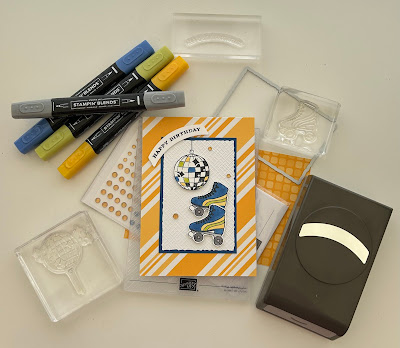
Happy Birthday Kayden


For the boy who loves skating - colouring with blends', die cutting, dry embossing, fussy cutting, layering, stamping

Materials required for this card are:

Card Stock: basic white, blueberry bushel
Designer Series Paper: *dandy designs
Dies: deckled rectangles (5)
Embossing Folders: basics 3D
Ink: memento black
Punches: curved label
Stampin' Blends: blueberry bushel, lemon lime twist, *mago melody, smoky slate
Stamps: *curved occasions
Accessories: *milky dots
 
* = no longer available, when using layering dies (1) is the smallest

  1. Start with a base card 14.5 x 21 scored at 10.5, dsp 14.5 x 10.5, blueberry bushel & basic white 7 x 10.5, white off cuts for images
  2. adhere the dsp to the base card using liquid glue
  3. stamp the skates, glitter ball, sentiment and string (at the top of the white rectangle)
  4. punch out the sentiment
  5. colour the glitter ball and skates using the stampin' blends
  6. die cut and emboss the white rectangle
  7. adhere the white rectangle to the blue one using liquid glue
  8. fussy cut the skates and glitter ball
  9. adhere the rectangles to the base card using liquid glue
  10. attach the skates, glitter ball and sentiment using dimensional pads 
  11. add the milky dots
Hope you liked today's card. If you would like more information on how to make it, please don't hesitate to contact me, I'd love to hear from you.

If you wish to buy any of the items used, go to contacting me at the top of the page for details of how to order.

Will be back again soon with more cards, in the meantime take care and have a great day.

Annette 😊  
Unbounded Love meets Thoughtful Wishes

  Welcome to my blog and    t hank you for joining me today! Happy Birthday Gladys Intermediate level - die cutting, dry embossing, stamping...